
What is Anbox?
Anbox - (Android in a box) is an open-source application that allows you to run most Android applications/games on any GNU/Linux Operating System. It is one of the most popular Android system emulators in use today.
Today, we will learn how to set up Anbox in a Debian environment.
Also Read: Dangers of Third-party Apps
Installing Anbox on a Debian-based System
Anbox requires some kernel modules to be installed on the host machine before you can run it. Below are the steps to install those modules.
Installing Modules
Step 1: Installing DKMS
You will need DKMS. Install DKMS using the following command.sudo apt install dkms
Step 2: Installing Kernel Headers
First, check your installed kernel version with uname -r. When found, search for the kernel header package that matches your kernel version with apt search linux-headers-$(uname -r).
Check if it is already installed or not by running ls -l /usr/src/linux-headers-$(uname -r). If it is not installed, then install it using sudo apt install linux-headers-$(uname -r)
Step 3: Adding Anbox Repo
Clone the Anbox GitHub repository to your system with this command: git clone https://github.com/anbox/anbox-modules.git
Step 4: Installing Required Modules
Once downloaded, run the INSTALL.sh script inside the repository.
To manually install the kernel modules,
- First, install Anbox configuration files:
sudo cp anbox.conf /etc/modules-load.d/
sudo cp 99-anbox.rules /lib/udev/rules.d/
Anbox Config
- Copy module sources:
sudo cp -rT ashmem /usr/src/anbox-ashmem-1
sudo cp -rT binder /usr/src/anbox-binder-1
Anbox Modules
- Install modules using DKMS:
sudo dkms install anbox-ashmem/1
sudo dkms install anbox-binder/1
Installing Modules
- Enable the necessary kernel modules:
sudo modprobe ashmem_linux
sudo modprobe binder_linux
Enabling modules
- Finally, verify if kernel modules are installed properly by running the following commands and checking their results:
lsmod | grep -e ashmem_linux -e binder_linux
## Expected result
binder_linux          114688  0
ashmem_linux           16384  0
ls -1 /dev/{ashmem,binder}
## Expected result
/dev/ashmem
/dev/binderls -alh /dev/binder /dev/ashmem
## Expected Result
crw-rw-rw- 1 root root 10, 55 Jun 19 16:30 /dev/ashmem
crw-rw-rw- 1 root root 511, 0 Jun 19 16:30 /dev/binder
You have successfully installed the required kernel modules if you see the above results.
Installing and Setting Up Anbox
Now, we can move on to installing Anbox itself. Run the following commands:
sudo apt update
sudo apt install anbox
Or, You can also install it using the snap package manager with sudo snap install --devmode --beta anbox
Now, you will need an android image. Anbox expects an android image in the /usr/bin/anbox/android.img directory. Download the image and move the image to the required directory using the following command.
wget https://build.anbox.io/android-images/2018/07/19/android_amd64.img

sudo mv android_amd64.img /var/lib/anbox/android.img
Restart the service with sudo service anbox-container-manager restart
Then launch Anbox using the following command:
anbox launch --package=org.anbox.appmgr --component=org.anbox.appmgr.AppViewActivityInstalling Applications
You will notice that the Play Store and Google Play Services are not available. So, we cannot use the Play Store to install new apps in the android image.
To install an application, you need a .apk file and the Android Debug Tool (adb).
If ADB is not installed in your system, you can install it with:
sudo apt install android-tools-adbNow you can install applications using adb using the command adb install your_desired_application.apk. However, you can only install one application at a time
Related Article: Isolated Test Environments with Testcontainer
Bonus: Setting up Anbox and Burp
Some of you might want to test the application you installed in Anbox and see how it works under the hood. Setting up Anbox to work with Burp is pretty easy and straightforward.
- Check default bridge using
ifconfig anbox0and note the IP address - Now set the global proxy using:
adb shell shetting put global http_proxy 192.168.250.1(IP):8855(PORT)- Then, set your Burp to listen to all interfaces on the port you assigned.
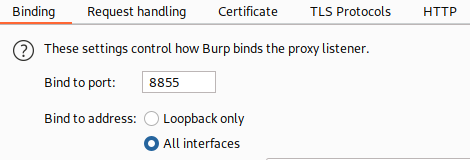
Now you can use your application and the proxy tab will fill itself in the background.
- Finally, you can deactivate the shell proxy with
adb shell settings put global http_proxy :0That's all! Anbox is a very useful tool when testing Android applications, so I hope this tutorial was useful to you. See you later!