
When doing anything, the first thing you need is to start with the basics. So, we will start with the basic elements of DOTween in this part.
Names for DOTween
- Tweener: A tween takes values and animates them.
- Sequence: A special tween that doesn't take values to animate. It animates tweens as a group in a sequence (i.e. one tween after another).
- Tween: A generic word for Tweener and Sequence
- Nested Tween: A Tween inside a Sequence.
Prefixes
There are 3 main prefixes in DOTween, which are the most important among IntelliSense. You need to remember them well.
- DO: This is the Main shortcut prefix that can be used directly in the
GameObjectelement like transform or a material.
transform.DOMove(new Vector3(100,1,0),1); //move to the position provided in the vector in 1 second.
transform.DOMoveY(100,1); //move 100 steps in Y axis in 1 second.
DO Example
- Set: Prefix for combining settings to a tween, except for
Fromsince it is used as a setting but is not one. Used as[Tween].SetLoops(4,LoopType.Yoyo)
transform.DOMoveX(100, 1).SetLoops(4, LoopType.Yoyo)Set Example
- On: Prefix for the callback combined to a tween. Used as
[Tween].SetLoops(4,LoopType.Yoyo).OnComplete(functionToBeCalled);
transform.DOMoveX(100,1).SetLoops(4,LoopType.Yoyo).OnComplete([functionToBeCalled])On Example
Here, functionToBeCalled is the function to be run when the tween finishes the animation.
Tweener
To use DOTween, you need to use/create a Tweener. The Tweener can then take a value and animate it.
Types
There are 3 types of ways by which you can create a Tweener.
- Generic: The most flexible way, allowing almost any value to tween. Used as
static DOTween.To(getter,setter,to,float duration)
// Tween a Vector3 called myVector to 3,4,8 in 1 second
DOTween.To(()=> myVector, x=> myVector = x, new Vector3(3,4,8), 1);

// Tween a float called myFloat to 52 in 1 second
DOTween.To(()=> myFloat, x=> myFloat = x, 52, 1);
Generic Tween
- Shortcut: The Fastest and most used way. The code for the shortcut way is the shortest code used for Tweening.
// Tween a Vector3 called myVector to 3,4,8 in 1 second
transform.DOMove(new Vector3(3,4,8),1);
Shortcut Tween
- Additional Generic: Special use of the generic way of Tweening to make certain animations.
// Punch upwards a Vector3 called myVector in 1 second
DOTween.Punch(()=> myVector, x=> myVector = x, Vector3.up, 1);
Additional Generic Tween
This is just a simple reminder for users who want to use DOTween in their projects. These are explained in more detail with more examples on the DOTween Official Documentation.
Also see: Introduction to Object-Oriented Programming
Basic DOTween using Shortcuts
We generally use shortcuts of DOTween as most of the time they fulfil our purposes. So, we need to learn more about shortcuts for their proper use in the project.
Let's practice some DOTween shortcuts on an actual gameObject in the project.
Creation
First things first. Create a new 3D project in Unity if you haven't created one. Then, set it up with DOTween. You can view the DOTween Setup tutorial if you need any help setting up DOTween in your project.
Now that you have a project ready. Create a 3D cube in the Hierarchy. We will be applying a basic DOTween animation in this cube for our learning process.
Also, create a Demo c# file in your project. This file will be attached to the cube and used to apply the DOTween animation for this tutorial. We will add codes to the Demo script and run them in play mode for a visual example.
Move
Move moves the object from one place to another. It can be between local positions or global positions. The DOTween code for movement is mostly the same, so we will combine them in a single script and apply them in a single cube to see how it works.
- DOMove: Used as
DOMove(Vector3 to, float duration, bool snapping).
Move the target to the given position from its current position. If snapping is true; all the values will be snapped into their nearest integers by the tween.
/// <summary>
/// Destination position where the gameObject will be moved.
///</summary>
public Vector3 Destination;

///<summary>
/// Total time for the move animation to be played.
///</summary>
public float Duration;

// Update is called once per frame
void Update()
{
	//move the gameobject when space button is pressed.
    if (Input.GetKeyDown(KeyCode.Space))
    {
    	gameObject.transform.DOMove(Destination, Duration);
    }
 }
Simple DOTween Movement
Run the game in play mode and give value to the Destination and Duration, and press the Space button after clicking in the Game Scene. The cube will move, as shown in the clip below. You can change values in the code to experiment with what they do.
- DOMoveX/Y/Z: Used as
DoMoveX/DOMoveY/DMoveZ(float to, float duration, bool snapping).
Moves the target to the given position of the chosen axis.
Let's use the same Destination vector3 and Duration float variables for this example as well. Add the codes to move the cube along a single axis.
void Update()
{
    //....

    //Move the gameObject along x axis only
    if (Input.GetKeyDown(KeyCode.X))
    {
        transform.DOMoveX(Destination.x, Duration);
    }

    //Move the gameObject along Y axis only
    if (Input.GetKeyDown(KeyCode.Y))
    {
        transform.DOMoveY(Destination.y, Duration);
    }

    //Move the gameObject along Z axis only
    if (Input.GetKeyDown(KeyCode.Z))
    {
        transform.DOMoveZ(Destination.z, Duration);
    }
}
Moving Object along a Single Axis
Run the game in play mode and Update the Destination and Duration's value and press the corresponding key as shown in the code above. The cube will only move along a single axis.
- DoLocalMove: Used as
DoLocalMove(Vector3 to, float during, bool snapping).
Moving the target to the given local position.
transform.DOLocalMove(new Vector3(100,20,3),3);
// move the target's local position to 100 along X-axis, 20 along Y-axis and 3 along Z-axis in 3 second
To see this movement, you can just change the code in the first example by replacing the DOMove with DOLocalMove.
- DoLocalMocveX/Y/Z: Used as
DOLocalMoveX/DOLocalMoveY/DOLocalMoveZ(float to, float duration, bool snapping).
Moves the target to the given local position along the used axis X or Y or Z. You can test it by changing the 2nd example by replacing DOMoveX-> DOLocalMoveX, DOMoveY-> DOLocalMoveY,DOMoveY-> DOLocalMoveXY.
- DoJump: Used as
DOJump(Vector3 endValue, float jumpPower, int numJumps, float duration, bool snapping).
Move the target to the given end position in a parabolic path, so the target seems like it is jumping instead of moving in a linear path.
Add the following code in the Update() method for testing DoJump.
/// <summary>
/// Power i.e jump height
/// </summary>
public float JumpPower;

/// <summary>
/// Total jump count
/// </summary>
public int JumpCount;

// Update is called once per frame
void Update()
{
	// ....

 	//Jump to a position when `J` key is pressed.
 	if (Input.GetKeyDown(KeyCode.J))
 	{
     transform.DOJump(Destination, JumpPower, JumpCount, Duration);
 	}
}
DOJump
Update the values and start play mode, press J The clip below shows the key, and the jump animation will play.

DOJump() of DOTween- DOLocalJump: Used as
DOLocalJump(Vector3 endValue, float jumpOwer, int numJumps, float duration, bool snapping)
Same as DoJump but only in a local position. This is the same as number 5 mentioned above. So you just need to change the DOJump -> DOLocalJump and you can test the local jump as well.
Rotate
Like we did with the movement, you just need to give a command like DORotate or DOLookAt to rotate the gameObject to your desired angle or direction using DOTween.
- DORotate: Used as
DORotate(Vector3 toAngle, float duration, RotateMode mode).
Rotate the target to the given angle.
Add the following code inside Update() method to test DORotate
     //Rotate the target
 if (Input.GetKeyDown(KeyCode.R))
 {
     transform.DORotate(Destination, Duration);
 }
Rotation of the Target with R
DORotate()Scale
- DoScale: Used as
DoScale(Vector3 to, float duration).
Change the local scale of the target in the given duration.
Add the following code inside the Update() method to test DOScale
     //Scale the target
 if (Input.GetKeyDown(KeyCode.S))
 {
     transform.DOScale(Destination, Duration);
 }
Changing Target Scale with S.
DOScale()Related Article: How to Animate a 2D Laughing Emoji
DemoUI.cs for Transform Commands
using DG.Tweening;
using UnityEngine;
public class Demo : MonoBehaviour
{

	/// Destination position where the gameObject will be moved.
	/// public Vector3 Destination;

	/// <summary>
	/// Total time for the move animation to be played.
	/// </summary>
	public float Duration;

	/// <summary>
	/// Power i.e jump height
	/// </summary>
	public float JumpPower;

	/// <summary>
	/// Total jump count
	/// </summary>
	public int JumpCount;

	// Update is called once per frame
	void Update()
	{
	    //move the gameobject when space button is pressed.
	    if (Input.GetKeyDown(KeyCode.Space))
	    {
	        transform.DOMove(Destination, Duration);
	    }

	    //Move the gameObject along x axis only
	    if (Input.GetKeyDown(KeyCode.X))
	    {
	        transform.DOMoveX(Destination.x, Duration);
	    }

	    //Move the gameObject along Y axis only
	    if (Input.GetKeyDown(KeyCode.Y))
	    {
	        transform.DOMoveY(Destination.y, Duration);
	    }

	    //Move the gameObject along Z axis only
	    if (Input.GetKeyDown(KeyCode.Z))
	    {
	        transform.DOMoveZ(Destination.z, Duration);
	    }

	    //Jump to a position
	    if (Input.GetKeyDown(KeyCode.J))
	    {
	        transform.DOJump(Destination, JumpPower, JumpCount, Duration);
	    }

	    //Rotate the target
	    if (Input.GetKeyDown(KeyCode.R))
	    {
	        transform.DORotate(Destination, Duration);
	    }

	    //Scale the target
	    if (Input.GetKeyDown(KeyCode.S))
	    {
	        transform.DOScale(Destination, Duration);
	    }
	}
}
Full Code of Demo.cs
Unity UI Shortcuts
For the Unity UI shortcut test, create a 2D sprite in Hierachy and create a C# script DemoUI and attach it to the Image.
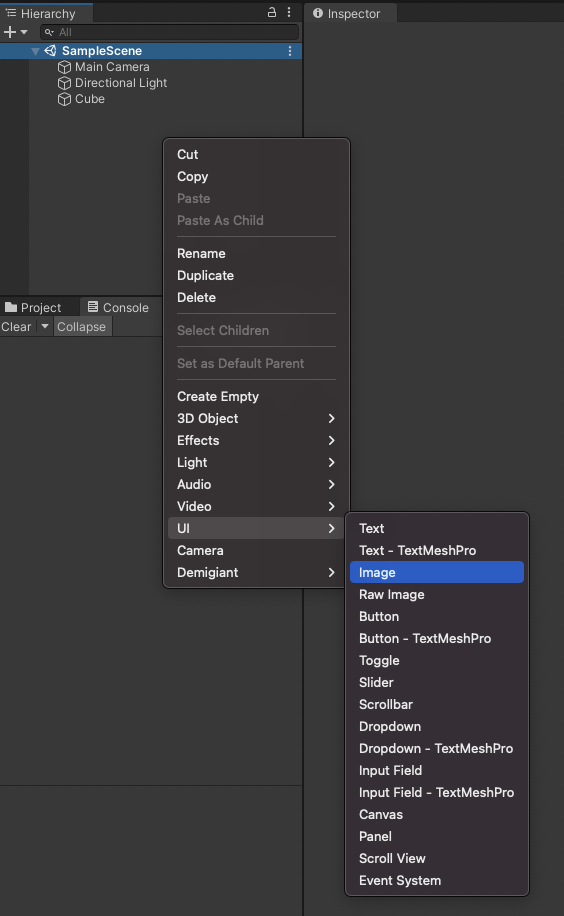
Let's add the required code and test the UI shortcut in the created Image.
- DOColor: Used as:
DOColor(Color to, float duration).
This shortcut changes the target's colour to a given colour in the given duration.
DOColor()- DOFade:
DoFade(float to, float duration).
Changes the alpha value of the given target in the given duration.
DOFade()DemoUI.cs for UI Commands
using UnityEngine;using UnityEngine.UI;
public class DemoUI : MonoBehaviour
{
	public Image TestImage;
	public Color ColorToChange;
	public float Duration;
	public float FadeValue;
	public float FadeDuration;

	public void Update()
	{
	    //Change the Color of the target
	    if (Input.GetKeyDown(KeyCode.C))
	    {
	        TestImage.DOColor(ColorToChange, Duration);
	    }

	    //Fade the target's alpha value
	    if (Input.GetKeyDown(KeyCode.F))
	    {
	        TestImage.DOFade(FadeValue, FadeDuration);
	    }
	}
}
Full code of DemoUI.cs file
The Input action done in the Update() method can be replaced with a button click if you want. We just used the key pressed because it is faster.
These all are just some of the basic elements of DOTween that you will generally use in your project. There are many more elements provided by DOTween, so checkout DOTween documents if you want to know more about them or leave a comment on this blog. We will try to provide you with the information with a little demo.
In the next part, we will use these basics and make animations that you will be able to use in your own project.