
Pre-Requisites
- Computer System with 2 GB Usable RAM
- Helm
- Minikube
- Kubectl
What Is Agones?
Agones is an open-source platform that runs on top of Kubernetes and automates tasks like hosting, scaling and orchestrating game servers. It's an open-source solution for game server cluster management and scaling.
We can focus more on multiplayer game development by using Open Match rather than on the underlying infrastructure, as it'll handle everything for us!
Agones can be deployed on both On-Premise and Cloud Infrastructure. We can adjust the Autoscaling and management strategies of Agones to ensure the resources need for hosting the game server are optimal for their environment.
What Can Agones Do?
- Deploy Game Servers irrelevant of platform and dependencies
- Autoscaling capabilities to ensure players always have a game server available to play on
- Game Server scheduling and allocation strategies to ensure cost optimization across cloud and on-premise environments
- Run Gamesevers without worrying about game servers shutting down when active players are playing
- Deploy games inside docker containers which can then be deployed into Kubernetes
- Autoscaling and Scheduling
- Metrics and Log Aggregation
How Does Agones Work?
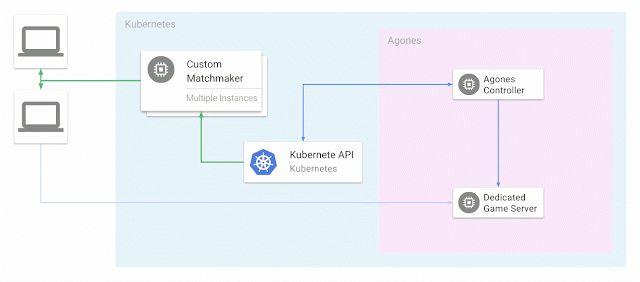
When a Game Client requests for a match with the matchmaker, the matchmaker communicates with the Kubernetes API, which in turn communicates with the Agones Controller to allocate a dedicated Gameserver for a Match.
Depending upon the player capacity, Agones will provide a new Dedicated Game Server or reuse the old one if there's enough capacity.
This is just a simple overview of how Agones works behind the scenes to provide Dedicated Game Servers to players according to their requests.
For Agones to work efficiently, a proper matchmaker is equally important; this is where Open Match comes into play! It's also an Open Source Match Making framework which can be leveraged to provide a top-notch multiplayer game experience.
Starting with Agones
We'll first need to set up a Kubernetes Cluster (K8) to install Agones. We can use Minikube to set up a local Kubernetes cluster or use a Kubernetes Cluster provided by a Cloud Provider.
Setting Up Minikube Cluster
If your minikube has been installed correctly, then the command below will start the minikube cluster.
minikube start

minikube start --cpus=2 --memory=4000Be careful not to provide resources close to the system's max resources, as instability issues can occur!
Helm Installation
Helm is a package manager for Kubernetes, just like apt for Debian and rpm for Redhat. Certain features of Agones can only be enabled by the use of Helm Charts during installation.
A dive into Helm Charts is not in the scope of this blog. You can learn more about it from my Kubernetes Deployment with Helm article.
helm install agones --namespace agones-system --create-namespace agones/agonesFeature Gates of Agones required for player tracking and allocation filters can be enabled using the following flags. (Just append them into the helm installation command)
--set agones.featureGates=PlayerTracking=true&StateAllocationFilter=true&PlayerAllocationFilter=true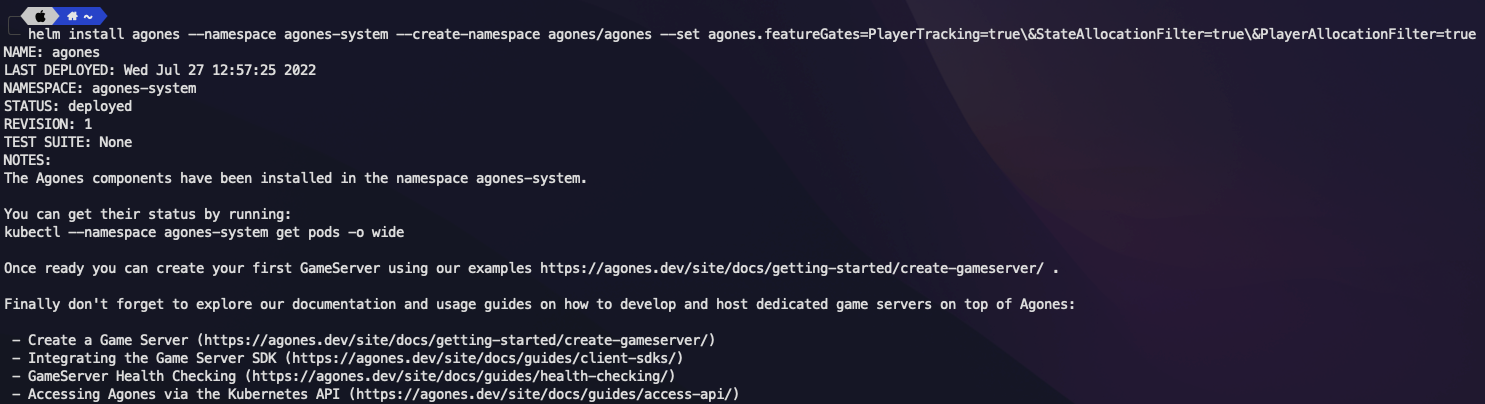
To check the status of the pods deployed by Agones, run the following command.
kubectl get po -n agones-system

That's it! Agones is successfully installed in our Kubernetes Cluster! We can now use the Custom Resource Definition (CRD) provided by Agones to set up Game Servers (GS), Fleets, Fleet Auto Scalers and more!
Troubleshooting
What to Do When Your New Installation Doesn't Work?
This does not happen all the time, but rarely the installation will not work as intended. Issues can range from the Pods being slow to the provision to out-right errors in the Pod.
The best thing to do would be a re-install. Most things get solved by this! This may sound like a joke, but this solved an ambiguous issue I had where the Pods weren't getting provisioned. I deleted the namespace and did a re-install, and tada! It worked!
kubectl logs -f agones-controller-6497b6d5c-bjg7k -n agones-systemNamespace Doesn't Get Deleted
When experimenting with Agones, we may look to use the Alpha Features once we're comfortable with the standard features and need more advanced features. For this, we need to perform a complete re-install as there is no hot-reload support in Agones.
Lately, I faced an issue during this process wherein the agones-system namespace was not getting deleted but was stuck in the terminating state. Here's how I resolved it!
In Kubernetes, there is a resource called API services. This component communicates with the Kubernetes API for the Custom Resource Definitions. (Remember that agones uses CRDs)
Whenever we remove Agones, we also need to delete the API service v1.allocation.agones.dev as the namespace gets stuck on terminating state until this API service gets deleted.
kubectl get apiservice | grep -i false
Conclusion
In this blog, we've learned to create a minikube cluster with custom resource configurations, deployed Agones into the cluster using helm and learned a few troubleshooting steps.
The cluster is now ready to host, scale and manage our Game Servers.
Stay Tuned for Part 2 on creating Game Servers by utilizing Custom Resource Definitions (CRD) provided by Agones.