
Imagine you have a game in Unity where you use thousands of materials all across the project, whether for characters, NPCs, environments, UI, or anything else. In such cases, generating a lot of textures or meshes – or applying materials with multiple shaders – might increase something called "Draw Calls" in your game.
Draw Calls
A Draw Call is a call to the graphics API to draw an object – like a mesh – and draw call batches are the calls done to the graphics API in bulk to draw objects together.
Having too many batches of draw calls in your game might slow down your game. Even worse, it might significantly affect your FPS and make your game unplayable if it isn't managed well.
Draw Call Optimization: Draw Call Batching
So, to solve these issues, we will have to use an optimization technique called Draw Call Batching. Draw call batching is a form of draw call optimization that lets you combine meshes and helps Unity render them in fewer draw calls.
So, in this blog, we will be optimizing draw calls of a simple UI that uses multiple images and materials using a sprite atlas. Our goal is to decrease the draw call to the least possible number.
There are two types of draw call batching.
- Static Batching: This batching combines static GameObjects and renders them together.
- Dynamic Batching: For small enough meshes, this batching technique transforms their vertices on the CPU, groups similar vertices together, and renders them in one draw call.
You can use either of these batching techniques depending on your project.
Implementation
To have a basic idea of what draw calls do, I have created a simple Unity scene with multiple UI images around them.
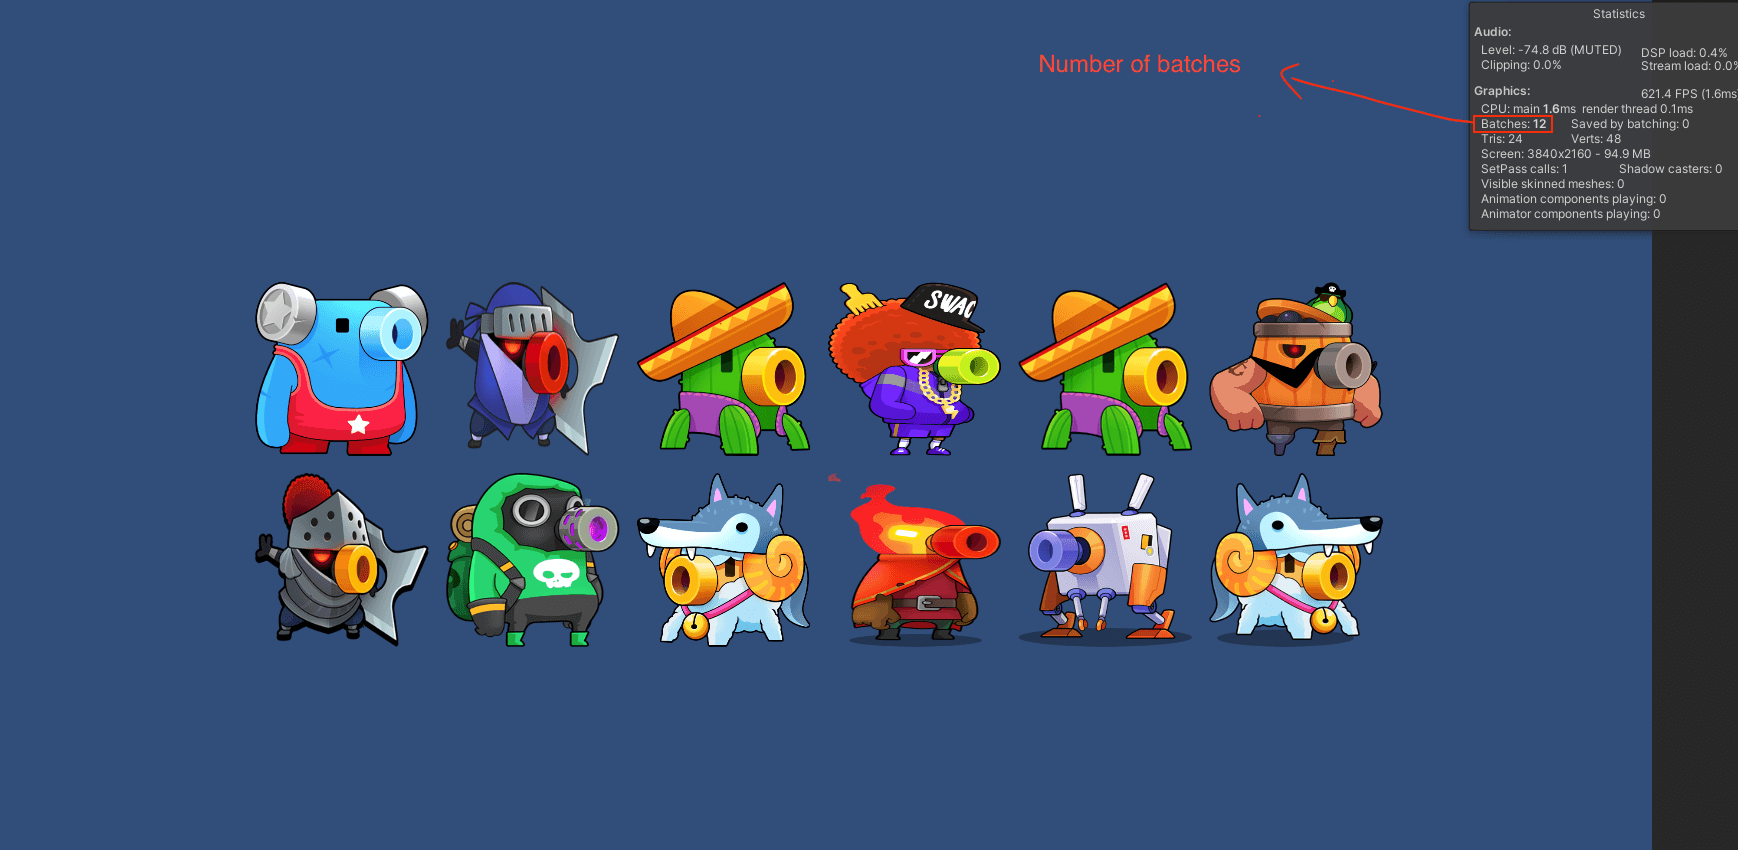
As you can see in the screenshot above, I have created 12 image components. Each image has its own sprite texture. That has resulted in Unity generating 12 draw batches because it treats every object as an independent texture with its own unique material.
So, to optimize this, we will have to create a sprite atlas that contains the collection of images we are going to use and look at the difference that process makes on the draw batch number.
Creating a Sprite Atlas
To create a sprite atlas, you will need the latest Sprite 2D library package. Then, you can go to your project menu, click the plus button, and create a sprite atlas like this.
Adding to the Sprite Atlas
After creating and naming a sprite atlas, you will be prompted with a sprite atlas settings page similar to Unity's default texture import settings.
To pack those textures into the sprite atlas, you have to add the images you want into the sprite atlas's object for a packing list, as shown below. You can either pack the whole folder into a sprite atlas or add single images to the list by adding them individually.
As you can see, after packing the preview, your sprite atlas preview will look like a pack of multiple images combined together. Sprite atlas also packs them into a single power-of-4 image, which lets you compress the image simultaneously.
After the sprite atlas creation is done, we don't have to worry about missing image references in our Unity project because Unity's sprite atlas replaces all the old images with the currently packed atlas images.
Result
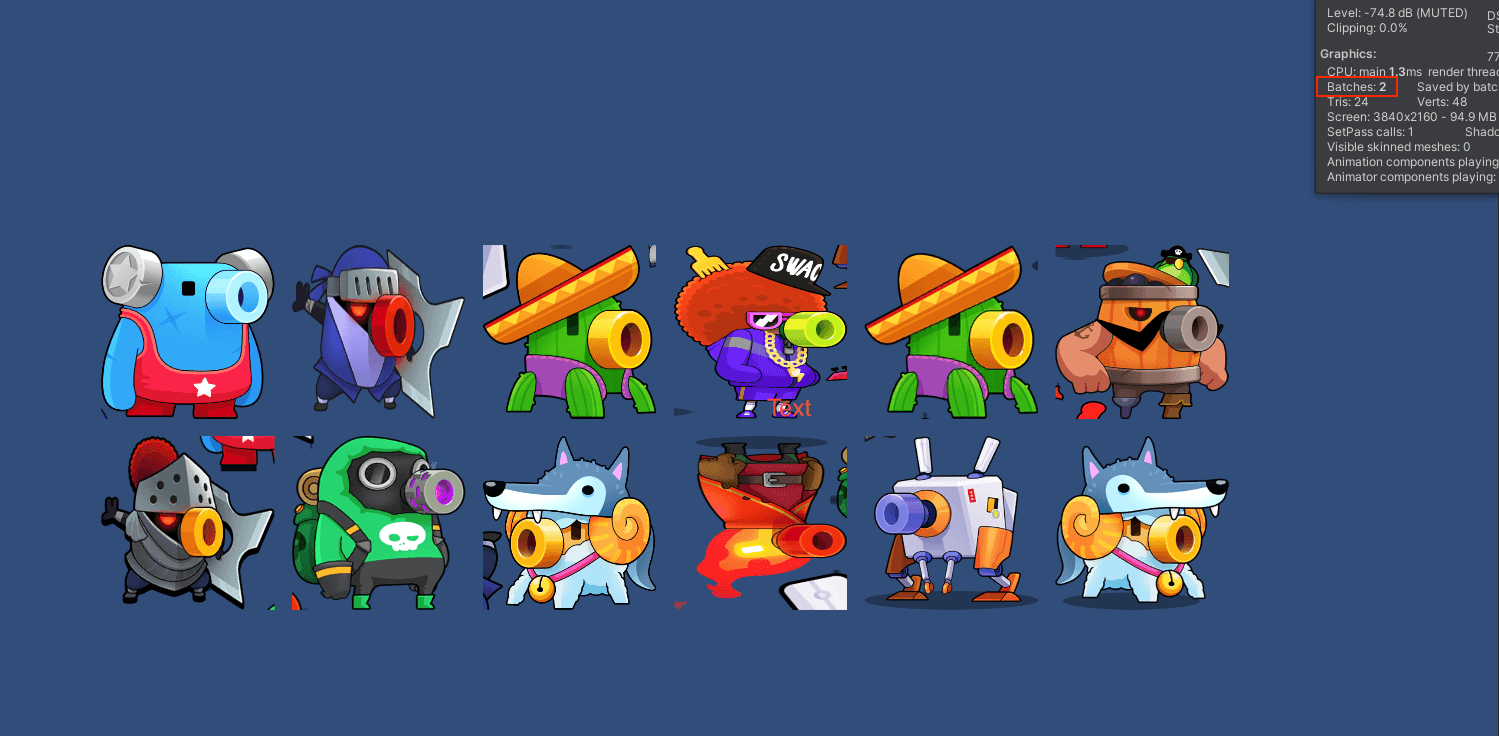
You can see in the screenshot above that the draw call batches have been reduced significantly from 12 batches to 2 batches after using the sprite atlas for our images.
This was an example of a simple game optimization technique using sprite atlas. You can do a lot more with sprite atlases, like managing multiple textures for models or creating compressed 2D images without having the images in a power-of-4, and so on.
That's all for the blog. I will be writing more blogs on Unity game optimization soon!
Thank you for reading and learning with me. Please leave comments if you have any regarding this article.