
What We'll Do
In Part 2, we will cover the following steps.
- Setup Kubernetes Cluster
- Deploy Application into Kubernetes
Pre-Requisites
Certain Pre-Requisites need to be fulfilled to successfully complete the tutorial.
- A Kubernetes Cluster (Instructions are provided in the Kubernetes Cluster Setup section below)
- Application to be deployed in a Containerized Form
Introduction
Kubernetes is a container orchestration system used to manage containerized applications and handle automated deployment, scaling, scheduling, storage, application updates, load balancing, self-healing, and monitoring containers across an infinite group of hosts.
Currently, there are many container orchestration systems available to us, but Kubernetes is the go-to for most people as it's cost-efficient, has lots of room for deployment customization, is supported by different cloud vendors, and is Open Source. It's currently maintained by the Cloud Native Computing Foundation (CNCF), but it was initially developed by Google.
This tutorial will teach us to set up and manage Kubernetes Clusters. We'll also deploy the Node Application that we previously Containerized (Part 1) into Kubernetes.
Kubernetes Architecture
Kubernetes follows the master/slave architecture. There are master nodes, also known as the control plane, which manage the worker nodes and together, they are known as a cluster. There's always at least one node in a functioning Kubernetes cluster. The master node can also function as the worker node, i.e. it can also host application deployments, but they are separated in production setups.
Kubernetes Cluster Setup
Kubectl
Kubernetes Clusters are managed using an API Server known as Kube API. It's an HTTP REST API and is the real Kubernetes user interface. We communicate with it using kubectl which is a client for the API Server.
How it Works
Kubernetes Operations are exposed through an individual endpoint in the API. Kubectl communicates with the Kube API to execute Operations by executing HTTP requests to the particular resource endpoint.
We can use brew to install kubectl (For Linux/Unix/Mac)
brew install kubectl
Windows Users can install kubectl through the installer found on the official downloads webpage.
Kubernetes with Minikube
We'll also be using Minikube to create and manage our Kubernetes Cluster. You can opt to use Kubernetes as a Service provided by AWS, Azure Digital Ocean, etc. or other cluster creation tools such as kind, rancher, etc.
Installing Minikube
There are different ways to set up Minikube. For this guide, we'll use brew (For Linux/Unix/Mac Systems).
brew install minikube
Windows Users can install minikube from the installer found on the official downloads webpage.
Using Minikube
Now to start a cluster, we can use the command below:
minikube start

--cpus=4 --memory=4096 during new cluster creation. This command will only create a cluster if there's no cluster present. If a cluster was already created before using minikube, then the existing cluster will be started/updated.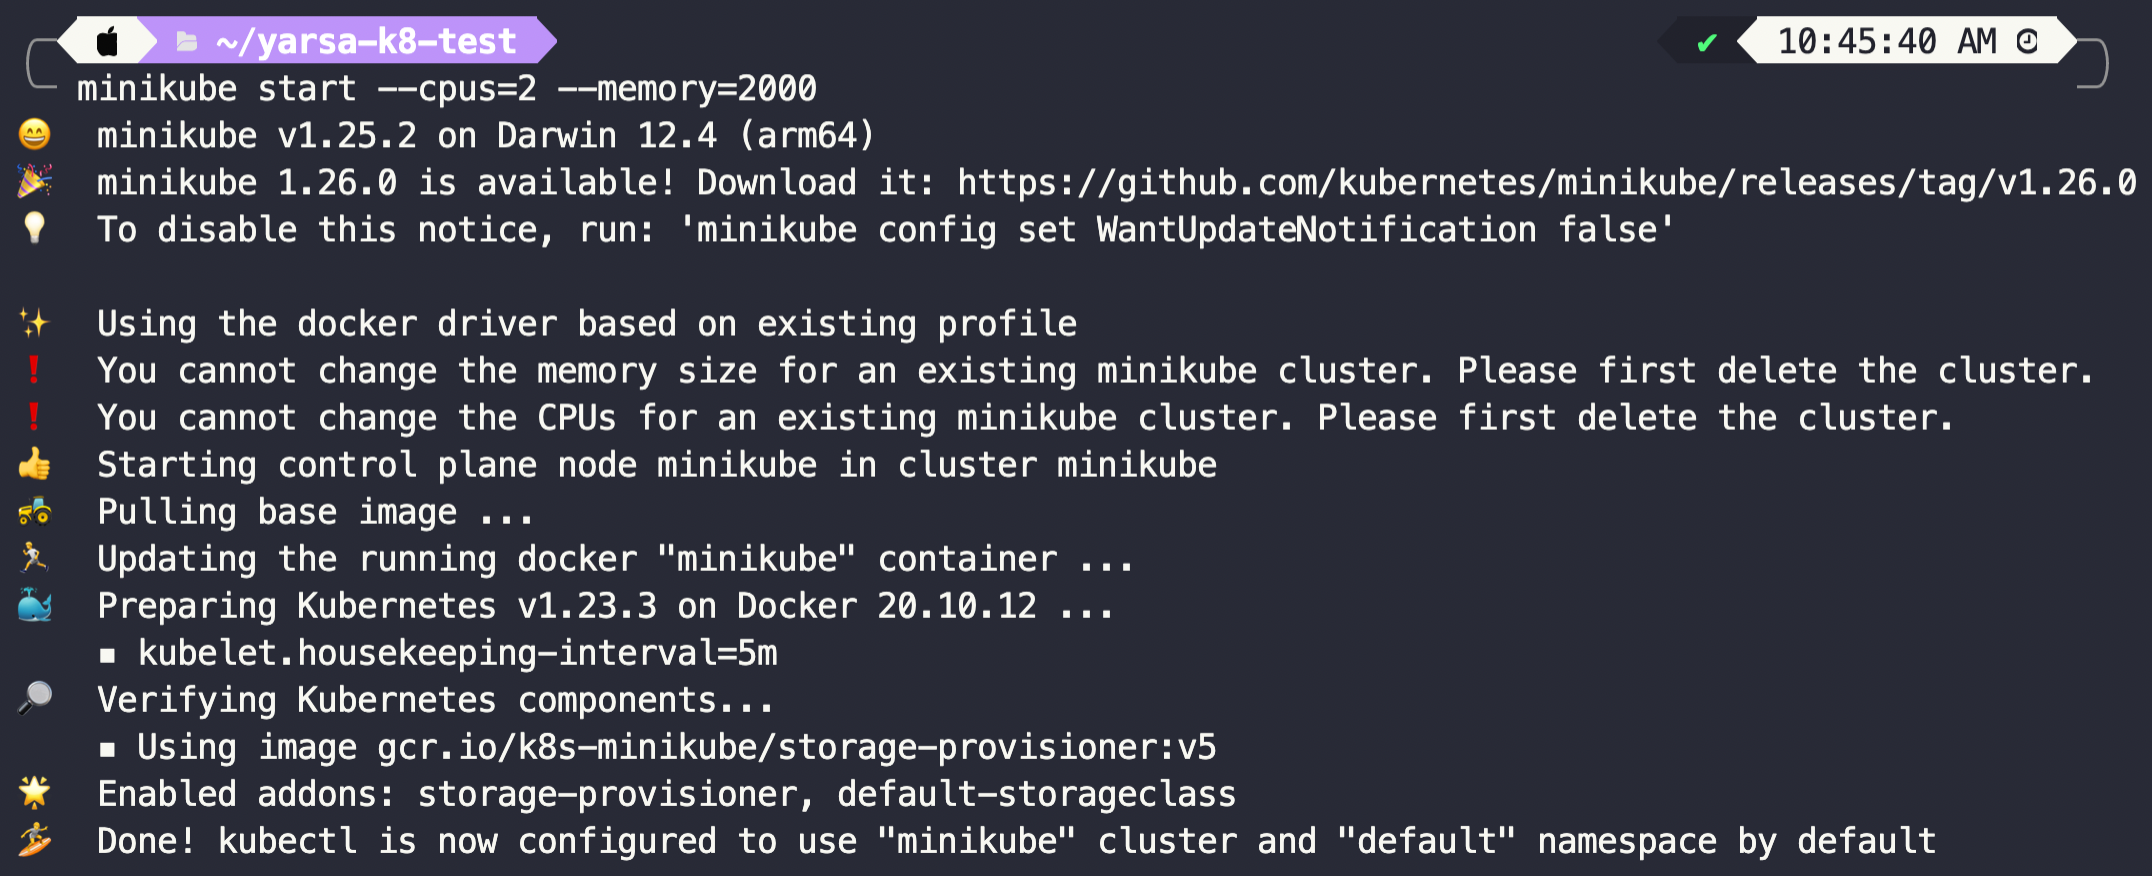
Deploying into Kubernetes
When deploying applications into Kubernetes, our methods will differ slightly from what we did to run the application in Part 1.
Node Application Deployment
Let's create a YAML Definition file for the Node Application. Create and copy the following into the YAML file:
apiVersion: apps/v1
kind: Deployment
metadata:
  labels:
    app: node-test-app
  name: node-app-secret-referenced
spec:
  replicas: 1
  selector:
    matchLabels:
      app: node-test-app
  template:
    metadata:
      labels:
        app: node-test-app
    spec:
      containers:
      - image: username/image-name:tag
        name: nodejs-chat-app
        ports:
          - containerPort: 3000
        env:
          - name: NODE_MONGODB_USERNAME
            valueFrom:
              secretKeyRef:
                name: node-mongodb-secret
                key: database-access-user
          - name: NODE_MONGODB_PASSWORD
            valueFrom:
              secretKeyRef:
                name: node-mongodb-secret
                key: database-access-pawd
          - name: NODE_DATABASE_SERVER_URL
            valueFrom:
              configMapKeyRef:
                name: node-mongo-configmap
                key: database_url
          - name: NODE_DATABASE_SERVER_PORT
            valueFrom:
              configMapKeyRef:
                name: node-mongo-configmap
                key: port
---
apiVersion: v1
kind: Service
metadata:
  name: node-service
spec:
  selector:
    app: node-test-app
  type: ClusterIP
  ports:
    - protocol: TCP
      port: 80
targetPort: 3000MongoDB Deployment
Now let's create a YAML Definition file for our Database (MongoDB). Create a file called mongodb.yaml and copy the following into it:
apiVersion: apps/v1
kind: Deployment
metadata:
  name: mongo-deployment
  labels:
    app: mongo
spec:
  replicas: 1
  selector:
    matchLabels:
      app: mongo
  template:
    metadata:
      labels:
        app: mongo
    spec:
      containers:
      - name: mongo
        image: mongo:latest
        ports:
          - containerPort: 27017
        env:
          - name: MONGO_INITDB_ROOT_USERNAME
            valueFrom:
              secretKeyRef:
                name: mongo-secret
                key: mongo-username
          - name: MONGO_INITDB_ROOT_PASSWORD
            valueFrom:
              secretKeyRef:
                name: mongo-secret
                key: mongo-password
---
apiVersion: v1
kind: Service
metadata:
  name: mongo-service
spec:
  selector:
    app: mongo
  ports:
    - protocol: TCP
      port: 27017
targetPort: 27017We also need to add Configmaps and Secrets to our Kubernetes Cluster. This is done so that credentials are not Hard-Coded in the code and can be changed during deployments.
The passwords/usernames and database URL/Port will be added using Secrets and Configmaps, respectively.
MongoDB Secret (Username/Password)
This Secret will be used to initialize MongoDB with the provided credentials.
apiVersion: v1
kind: Secret
metadata:
    name: mongo-secret
type: Opaque
# username password should be in base64 format
data:
    mongo-username: <user-name>
mongo-password: <pass-word>Node ConfigMap (DB URL/PORT)
apiVersion: v1
kind: ConfigMap
metadata:
  name: node-mongo-configmap
data:
  database_url: mongo-service.default.svc.cluster.local
port: "27017"This Configmap will be used by the NodeJS Application to connect with MongoDB.
Node MongoDB Secret (Username/Password)
apiVersion: v1
kind: Secret
metadata:
  name: node-mongodb-secret
type: Opaque
# username | password should be encoded in base64 format, k8 will automatically decode it during use!
data:
    database-access-user: <user-name>
    database-access-pawd: <pass-word>
This Secret will be used by the NodeJS Application to authenticate with MongoDB.
Deployment
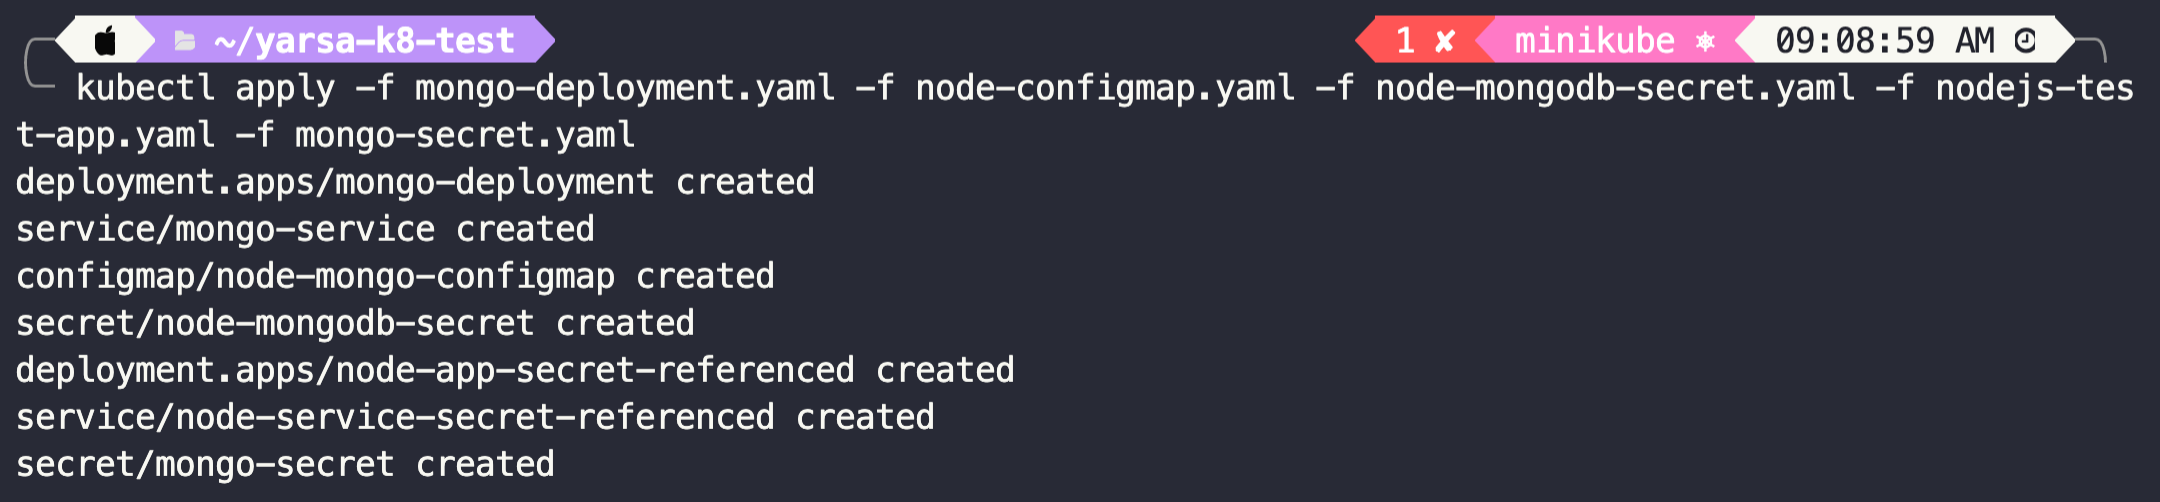
Now that we've our YAML(s) ready, let's deploy our application into Kubernetes using the kubectl apply -f command.
kubectl apply -f node-deployment.yaml
kubectl apply -f node-configmap.yaml
kubectl apply -f mongodb-secretfile.yaml
kubectl apply -f node-secretfile.yaml
kubectl apply -f mongodb-deployment.yaml
The status of our deployments can be checked using the following command:
kubectl get all
-n parameter can be used to specify different namespaces.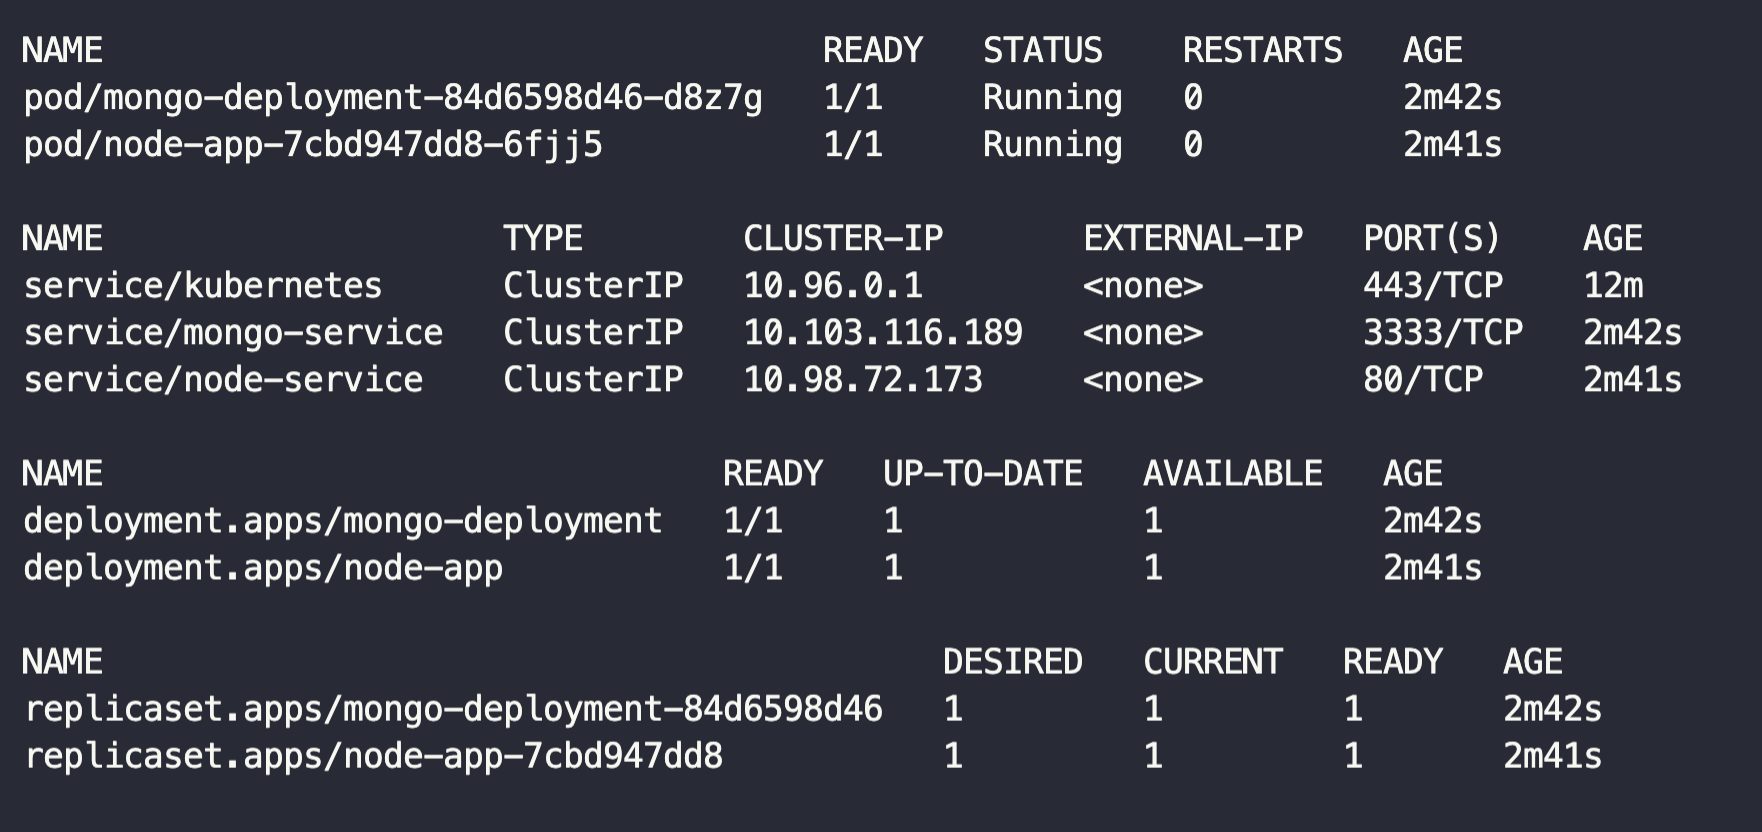
As seen above, our deployments are healthy, and no issues have occurred. We can access the application from our browser using port-forwarding. This basically works by tunnelling our traffic into the service, which will re-direct our traffic into a particular pod using the round-robin load-balancing method.
kubectl port-forward svc/node-service 3000:80
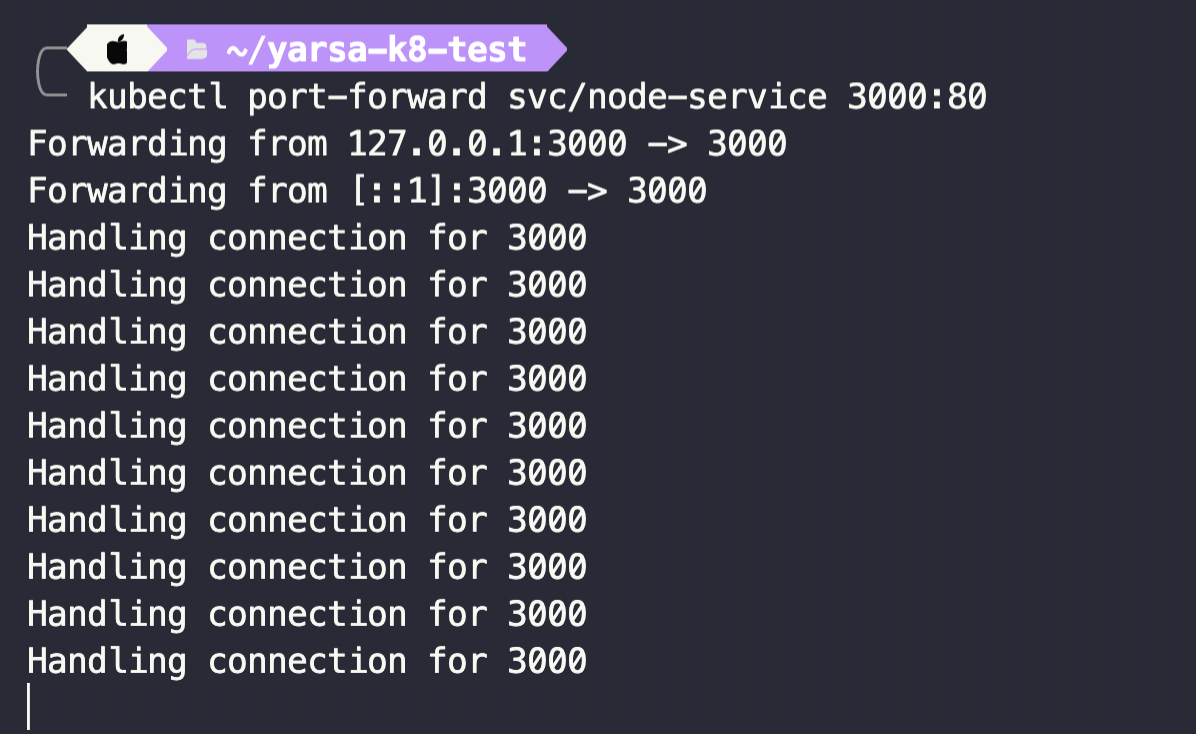
Now, if we open the URL localhost:3000 in our browser, we should see a webpage like the one shown below.
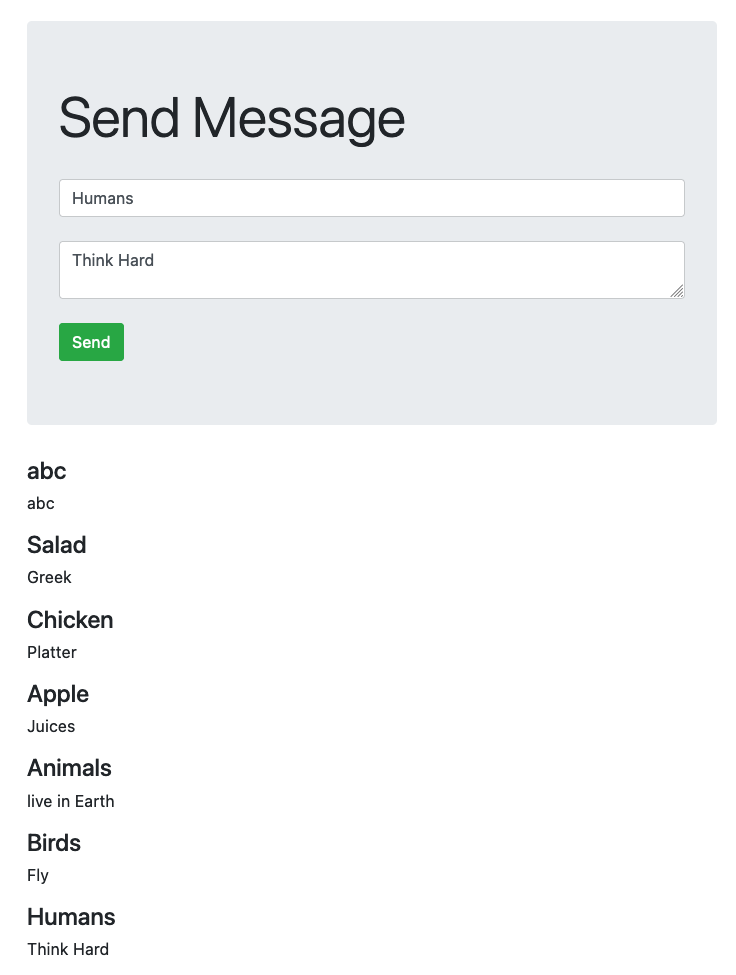
If the communication between the database and the application is successful, then whatever you type and send should be displayed.
Conclusion
Following this tutorial, you successfully set up a Kubernetes Cluster (Locally) using Minikube and deployed the Node JS Application (created in Part 1) into a Kubernetes Cluster.
You also learnt about Kubernetes and how it works! This tutorial can be used as a reference for further deployments that you'll make in the future!
This is it for the second part of the blog. In the next one we'll implement autoscaling for our deployments and load test our application! Stay Tuned!