
Super Mario Galaxy has a unique character control system where players can move in all directions. It means that characters can move on the wall seamlessly from the floor and vice versa. Gravity is not specific like in other games where the character always falls down. Mario can jump from one mini world to another mini world and start walking right away.
We will learn how to achieve such features in our game using the Unity engine. This should be fairly easy to understand and easily transferable to other game engines of your choice.
What Are We Making?
- Make a simple gravity system so that player can fall when he jumps.
- The player can move in any direction of his choice.
- The player should be able to jump regardless of where he is standing right now.
- The player should be able to jump from one mini world to another mini world and should be able to move there.
Step 1: Creating Gravity
To create gravity, we must first know where the player will fall. Gravity is a force in a certain direction (usually towards the object's centre). But in our case, we won't be applying force toward the centre of an object. In our case, we will apply force opposite to the surface normal of an object.
A Normal describes the orientation of a geometric object. It shows where the surface is facing. So first, we calculate the normal of an object. The steps taken to calculate normal are as follows.
- First, user OverlapSphere to find all overlapping colliders in a certain radius.
- Find a collider with the shortest distance from the player.
- Cast raycast towards shortest distance collider.
- Find Normal at a point where raycast hit.
- Linearly interpolate from current normal to newfound normal to make a smooth transition in current player rotation.
Once the normal is calculated, we just apply force opposite the current normal and have our gravity. Next, we apply rotation to this player using calculated normal so that player always aligns properly on the surface. This will ensure that players always rotate properly when we jump from one world to another or walk on different surfaces. Let's see how we can do all this on code.
public class CustomGravity : MonoBehaviour
{
   [SerializeField] private float gravityPower =20f;
   [SerializeField] private LayerMask groundMask ;
   [SerializeField] private Rigidbody rb;
   [SerializeField] private float groundCheckDistance;

   // this controls how player is rotated from current normal to next normal
   [SerializeField] private float playerSmoothRotation;
   private Vector3 newNormal;
   public Vector3 currentNormal;

   private void Start()
   {
      rb.useGravity = false; // disable this rigidbody gravity
      rb.freezeRotation = true; // disable this rigidbody from rotating with physics
   }

   private void FixedUpdate()
   {
      ApplyGravity();
   }
   private void Update()
   {
      CheckForGravityDir();
      alignToSurface();
   }
   private void ApplyGravity()
   {
      rb.AddForce(-currentNormal*gravityPower*Time.deltaTime,ForceMode.Acceleration);
   }

   void CheckForGravityDir()
   {
      var colliders =Physics.OverlapSphere(transform.position, groundCheckDistance);
      Vector3 closestPoint = Vector3.zero;
      float distance = Single.MaxValue;

      int totalCollision = 0;
      foreach (var collider in colliders)
      {
         // make sure to avoid checking own collider
         if (collider.gameObject.transform.root != transform)
         {
            totalCollision++;
            float newDistance = Vector3.Distance(collider.ClosestPoint(transform.position), transform.position);
            Debug.DrawLine(transform.position,collider.ClosestPoint(transform.position));
            if (newDistance < distance)
            {
               distance = newDistance;
               closestPoint = collider.ClosestPoint(transform.position);
            }
         }

      }
      Vector3 rayShootDir = (closestPoint - transform.position).normalized;
      bool hitSuccess = Physics.Raycast(transform.position, rayShootDir, out RaycastHit hitInfo, groundCheckDistance,
         groundMask);

      if (hitSuccess)
      {
         newNormal = hitInfo.normal;
         lastSurfacePos = hitInfo.point;
      }

   }
   private void alignToSurface()
   {
      // this will smooth out change from current normal to next normal
      currentNormal = Vector3.Lerp(currentNormal, newNormal, playerSmoothRotation);
      transform.up = currentNormal;
   }
}Step 2: Creating Player Controls
Once gravity is done, our next job is to move the player.
Moving a player is fairly an easy process. We take input and then use vertical input to move a player in a current forward direction of this player model and horizontal input to rotate the player's model.
For jumping, we just apply instant force towards the current normal direction so that jump is always perfect wherever we are standing right now. Let's look at the code to get a better idea.
using UnityEngine;

public class PlayerController : MonoBehaviour
{
    [SerializeField] private Rigidbody rb;
    [SerializeField] private float moveSpeed = 10f, rotateSpeed= 10f;
    [SerializeField] private Transform playerModel;
    [SerializeField] private CustomGravity _customGravity;
    [SerializeField] private float jumpForce;

    private Vector3 playerInput;
    private bool jump;

    private void CheckInput()
    {
        playerInput.x = Input.GetAxisRaw("Horizontal");
        playerInput.z = Input.GetAxisRaw("Vertical");
        if(!jump)
        jump = Input.GetKeyDown(KeyCode.Space);
    }

    private void Update()
    {
        CheckInput();
    }

    private void FixedUpdate()
    {
        RotateCharacter();
        Move();
        if (jump)
        {
            jump = false;
            Jump();
        }
    }

    private void Move()
    {
        transform.position += playerModel.forward *playerInput.z* moveSpeed * Time.deltaTime;
    }

    private void RotateCharacter()
    {
        playerModel.Rotate(Vector3.up,playerInput.x*rotateSpeed*Time.deltaTime);
    }

    private void Jump()
    {
        rb.AddForce(_customGravity.currentNormal*jumpForce,ForceMode.VelocityChange);
    }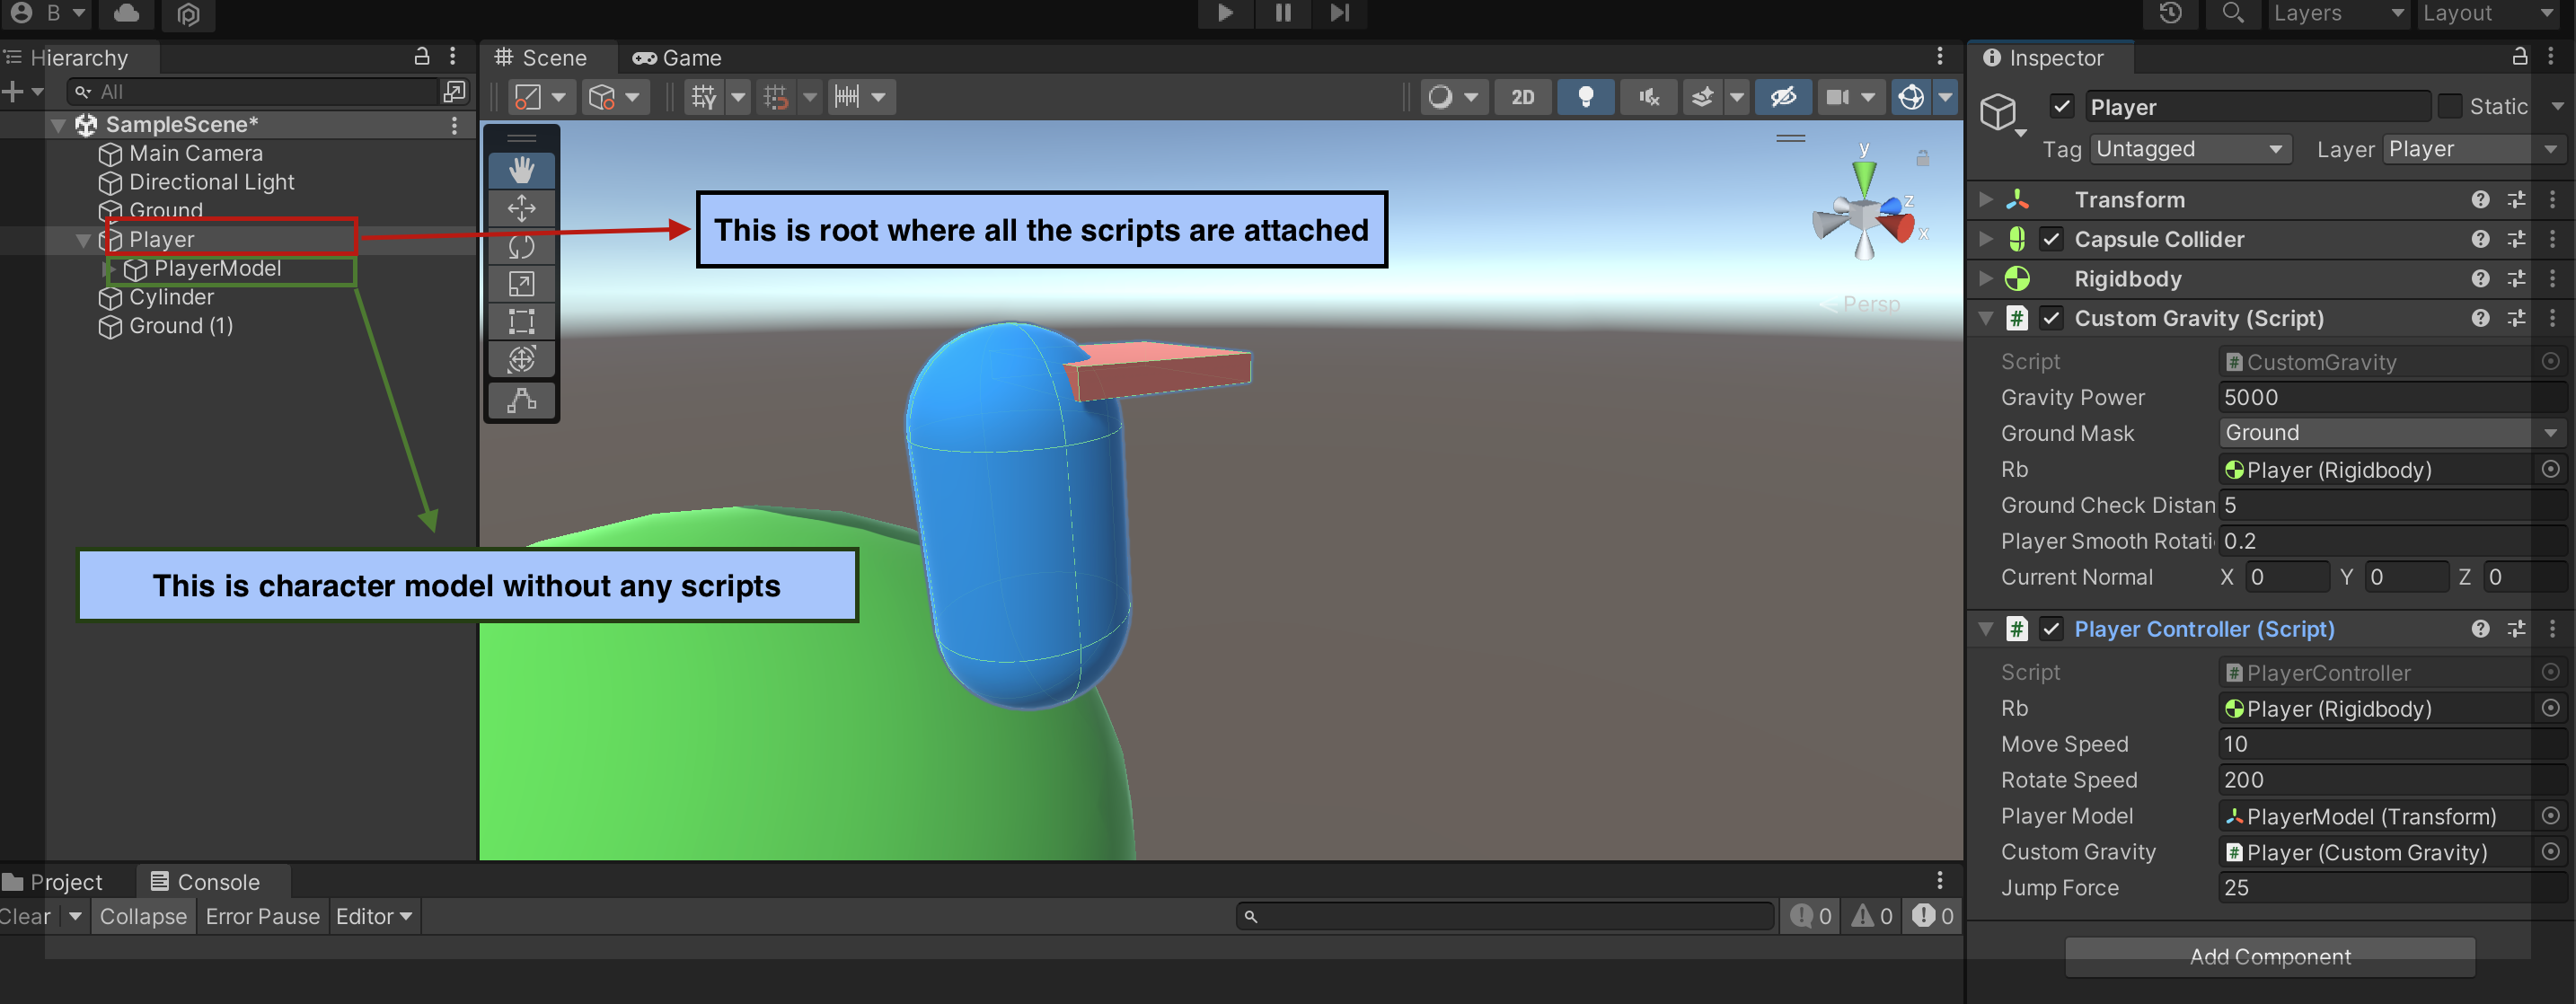
}Now let's look at how my character is set up in the Unity Editor.
You can see a demo of the final result in the video below!
However, this tutorial doesn't include a camera control system, so that's one part you will have to do on your own. This system works properly as long as the edge is not too steep. It also works on steep surfaces, but you won't get a smooth transition when changing the angle.
And that's it! This wraps up our article. I hope you get an idea of how this system works and can make an even better system than this.
Thank you for following the article. I'll be writing more. Stay tuned.