
Outline is a note-taking app, that makes taking notes quite an interesting task. It has a clean UI, has keyboard shortcuts, integrates with many third-party services, and recently added support for collaborative editing. Just like many other open-source "writing" apps like Ghost (which powers this blog), self-hosting it is extremely easy - wait - not so easy. That's because Outline neither supports local authentication, nor local storage. We need to have a few more services running to have the Outline app running.
A Note on Cloudron
Cloudron is an almost complete, and ever-improving solution for self-hosting apps on your own server. It lets you run dockerized apps isolated from each other and performs a lot of server management tasks like DNS setting, email configuration, backups, SSL certificates, OS updates, users, groups, permissions, etc. out of the box, and automatically. Basically, Cloudron provides the apps with a runtime environment powered by docker networks, built-in user directory, databases, storage, and email, so the apps don't need to include those features. What a perfect scenario for an app like Outline, heh! While any dockerized app can be installed on Cloudron, the developers of Cloudron have packaged several apps and published them on the Cloudron App Store, from where one can "install" the app on the server within seconds. Until now, Outline is not available in the App Store. Few people seemed to have tried packaging it, so I also decided to start packaging it myself.
Cloudron's LDAP Service
Cloudron does not expose its internal LDAP server to the internet, instead only exposes LDAP connection strings and auth credentials as environment variables to the internal apps. Since Outline supports a custom passport strategy, we might have been able to use Cloudron LDAP for Outline with the help of the passport-ldap library, but I didn't explore that option because I needed to set up Keycloak for other external applications. I might as well try the library, and if I could successfully authenticate using Cloudron LDAP, I'll update the post so you don't need to package and install Keycloak only to run the Outline app on Cloudron.
In our setup, we package Keycloak and set it up to make use of the Cloudron LDAP internally, and serve as an OpenID Connect (OIDC) server for all other apps that support authentication using a generic OIDC server. In our setup, Outline users are authenticated against the Keycloak instance using the Oauth2 protocol, whereas internally Keycloak connects to the Cloudron LDAP service to authenticate the users.
Keycloak for Authentication
For authentication, Outline requires an external authentication provider such as Google/Slack, etc. Recently it added support for authenticating with a generic OpenID Connect Server. There are few apps on Cloudron App Store that can work as an OIDC Server, but since I already had some experience with Keycloak, I'll be using it instead. Keycloak is undoubtedly one of the best OIDC servers you can find. Explaining why Keycloak is a good choice is out of the scope of this article, but you can do your research if you want. Keycloak is not available on the Cloudron App Store yet, but I managed to package it. For the sake of simplicity, we'll have it up and running at auth.example.com.
Mino for Storage
For storage, Outline needs S3 compatible storage. For a note-taking app, I'd say it is overkill but that's how it is, so we'll have to find a way around it. Since I'm packaging the Outline app for Cloudron this time, you can install an app called Minio from the Cloudron App Store, that provides S3 compatible storage service. For the sake of simplicity, we'll install the app from the Cloudron App Store, and have it up and running at minio.example.com.
Set up Keycloak for Authentication
Once Keycloak is set up and running, users from your Cloudron LDAP can automatically log in. Since we aren't authenticating external users we do not use the default master realm, but instead, add a new realm called 'cloudron'. The realm is already set up for federating users from Cloudron and sending emails using Cloudron mail. Log in to the admin console for the master realm. Usually, the URL is https://auth.example.com/admin/master/console.
Create a new client.
Make sure you have selected the realm in which you want to create a client. If you haven't added other realms, then the client will be created in the default Master realm. In the Clients section, create a new client application by clicking on the Create button on the right-hand side.
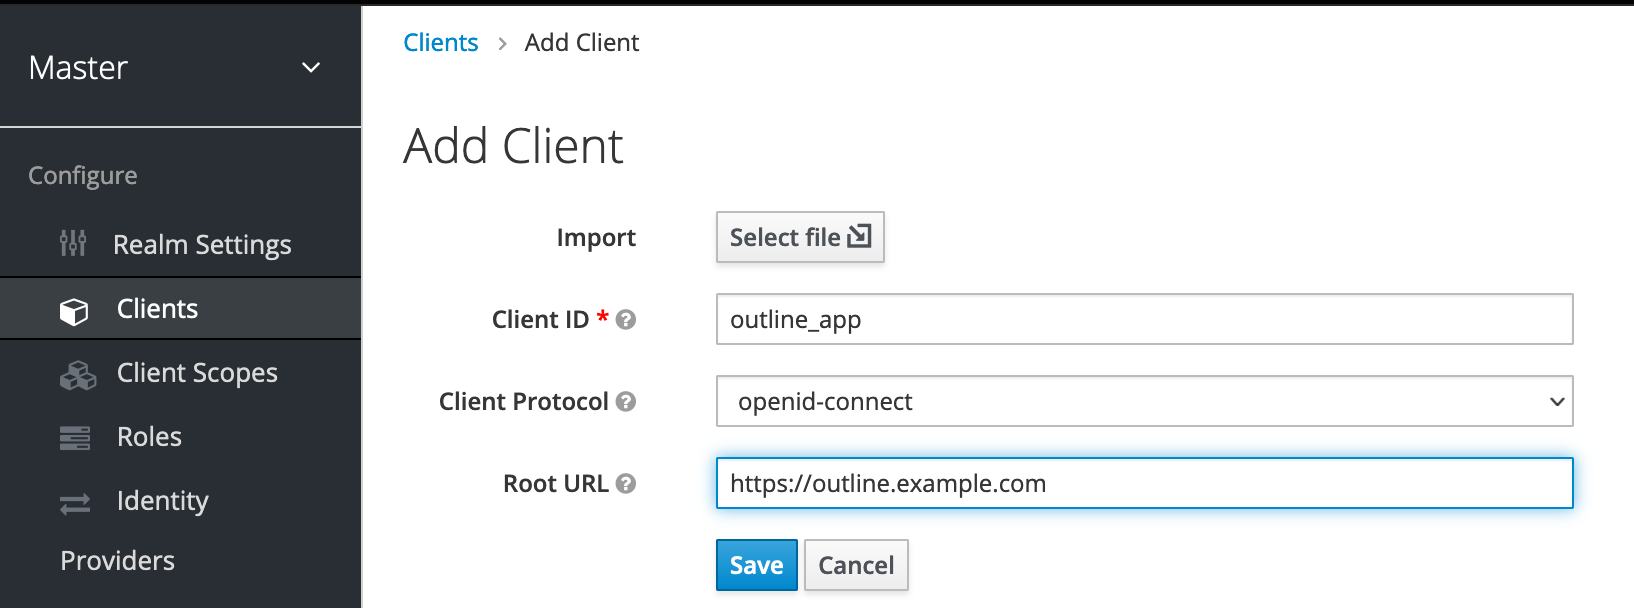
/auth/ is optional, and the default master realm is not recommended for anything else except managing Keycloak itself. Hence, the URLs in the screenshots may be different from those in the text. Use https://auth.example.com/realms/cloudron/... instead of https://auth.example.com/auth/realms/master/.... It's a great idea to add a new realm called cloudron if it doesn't already exist.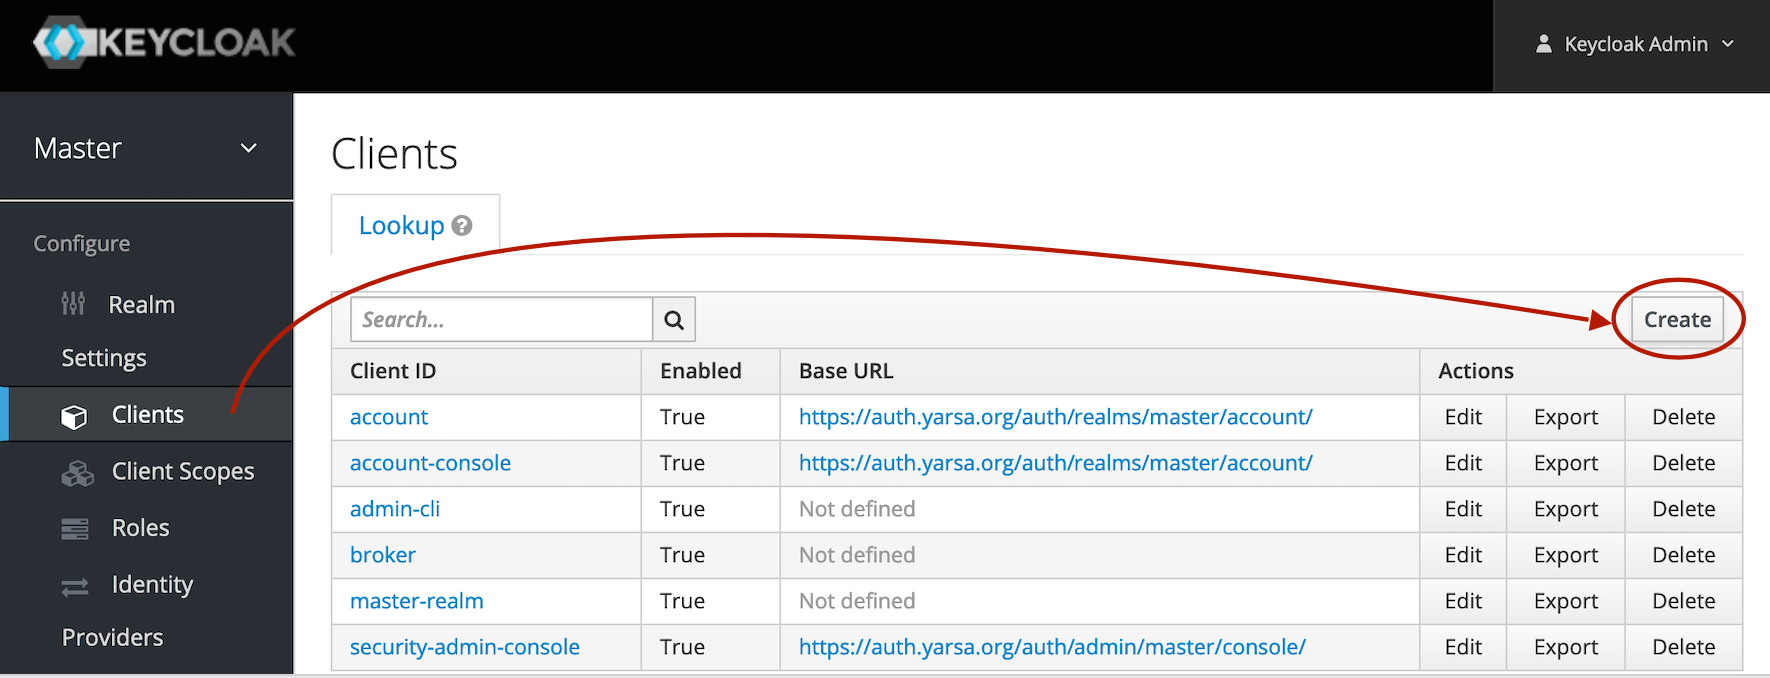
Name the app outline_app for simplicity. Also, provide the Root URL where you have installed/planned to install Outline. Click on Save to continue.
Configure the client.
On the client settings page, add a name and description to help your users understand what the client app is.

Make these changes to the default setting so the Oauth flow initiated by Outline can work as expected. You can change other values to fit your needs but if you don't have any specific requirements, there's nothing that needs to change.
| KEY | VALUE |
|---|---|
| Access Type | confidential |
| Direct Access Grants Enabled | OFF |
When you have made these changes, scroll to the bottom of that page and click on the Save button to save your changes.
Almost done.
Click on the Credentials tab and copy the Client Secret.
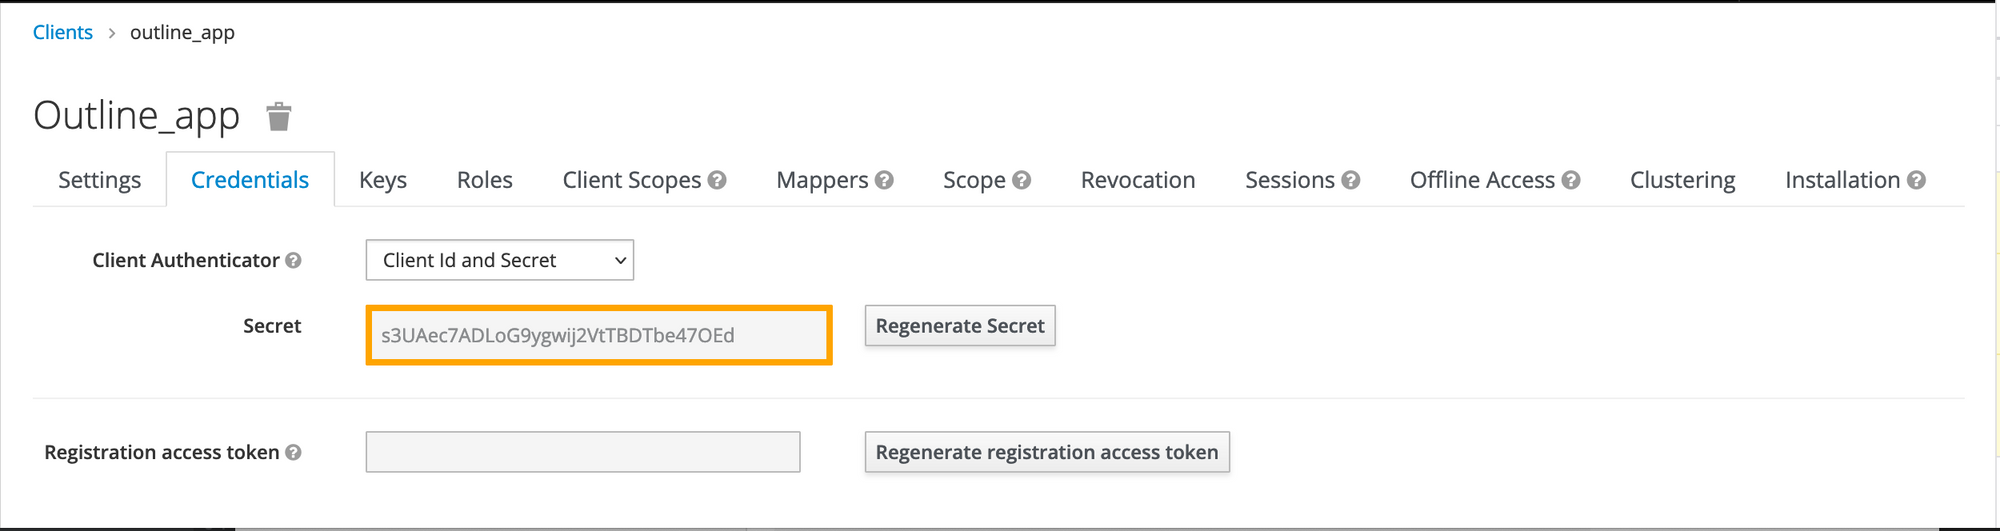
You will need this secret later.
Keep note of these four values that you will need later. If you are using a different realm than the master, you should change it accordingly.
| KEY | VALUE |
|---|---|
| client id | ouline_app |
| client secret | the secret from the Credentials tab |
| auth uri | https://auth.example.com/realms/cloudron/protocol/openid-connect/auth |
| token uri | https://auth.example.com/realms/cloudron/protocol/openid-connect/token |
| userinfo uri | https://auth.example.com/realms/cloudron/protocol/openid-connect/userinfo |
Set up Minio for Storage
Once Minio is running, we'll quickly start configuring it for our needs. Let's do this one step at a time.
Create an initial admin user.
Create an initial admin user using the Minio app's terminal. You can either use the web-based terminal on the Cloudron dashboard or use the Cloudron CLI to exec into the app to run this command.
/app/code/minio-credentials set minio_admin new_secret_key
Create a new bucket.
Using the newly set credentials, log in to the Minio dashboard (https://minio.example.com/minio/). Click the floating (+) button, then select the "Create Bucket" menu option to create a new bucket named outline_data. Later, Outline will use this bucket for storage.
Create a new user and access policy.
On your local machine, install the Minio Client tool called mc . Then run add an alias called myminio to your Minio server for ease. When prompted, enter the credentials you created above. When prompted for authentication, enter the credentials of the initial admin user.
mc alias set myminio https://minio.example.com --api s3v4Create a new user for the outline app.
mc admin user add myminio outline_userCreate a new policy that grants full access inside the bucket, and add it to the Minio instance. Let's call this policy outlineAppFullAccess.
cat > new_policy.json << EOF
{
  "Version": "2012-10-17",
  "Statement": [
    {
      "Effect": "Allow",
      "Action": [
        "s3:GetBucketLocation",
        "s3:ListBucket",
        "s3:ListBucketMultipartUploads"
      ],
      "Resource": [
        "arn:aws:s3:::outline_data"
      ]
    },
    {
      "Action": [
      "s3:AbortMultipartUpload",
      "s3:DeleteObject",
      "s3:GetObject",
      "s3:ListMultipartUploadParts",
      "s3:PutObject",
        "s3:GetObject"
      ],
      "Effect": "Allow",
      "Resource": [
        "arn:aws:s3:::outline_data/*"
      ],
      "Sid": ""
    }
  ]
}
EOF mc admin policy add myminio outlineAppFullAccess new_policy.jsonThen, apply the newly created policy to the newly created user.
mc admin policy set myminio outlineAppFullAccess user=outline_userSet a policy to the bucket
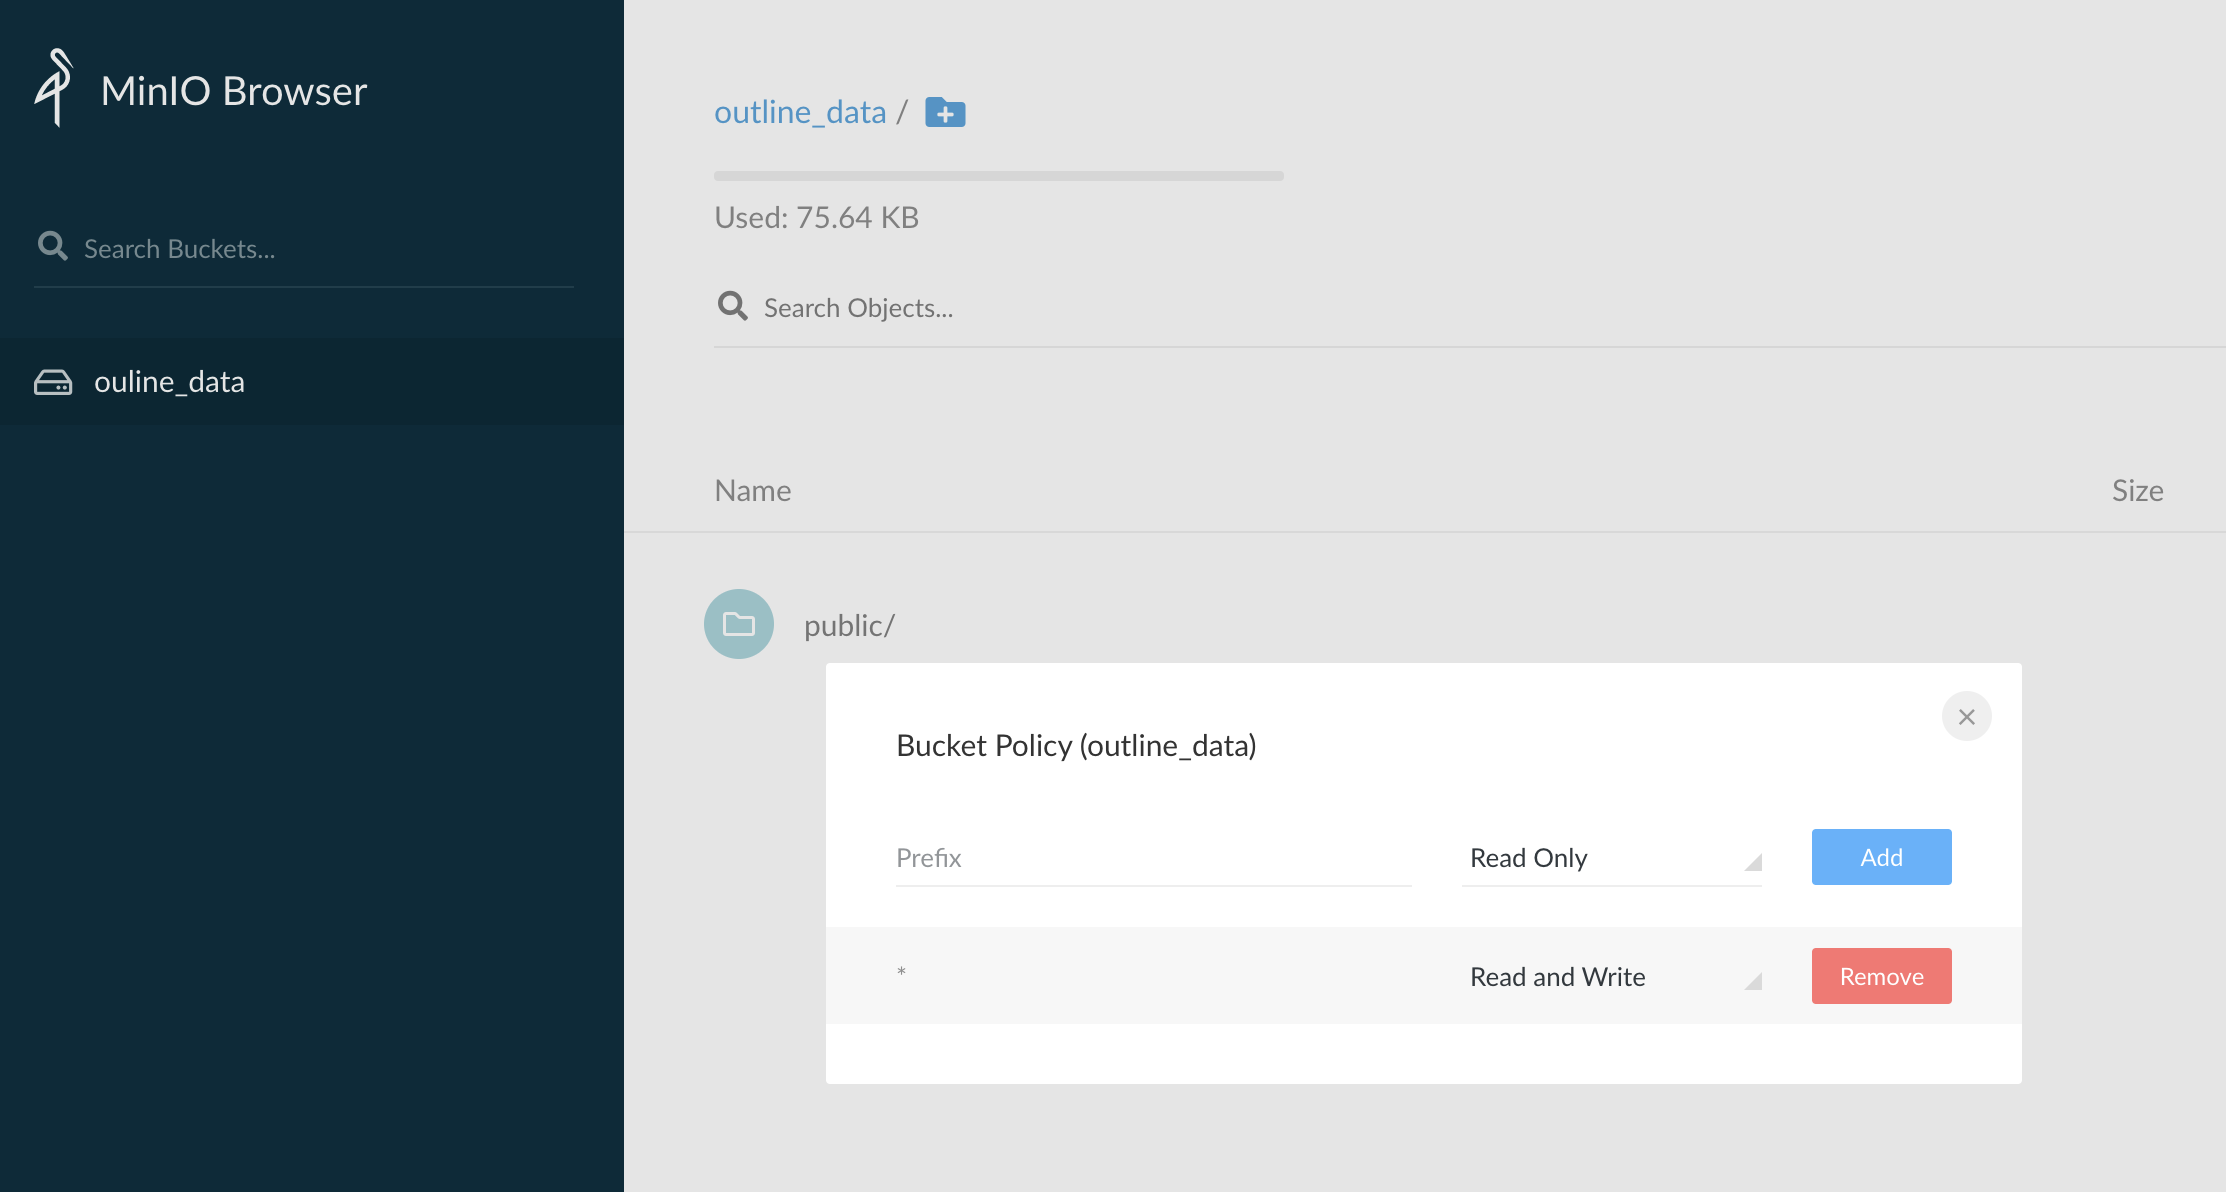
Click on the overflow menu on the sidebar, right next to the bucket name, and click on the Edit policy button to open the bucket policy dialog. On the dialog box, add a new Read and Write policy and close the dialog box. If the policy is removed, the Outline app cannot upload photos or read photos from the bucket.

Test your settings
Log out of the Minio dashboard, and then log back in as the new user named outline_user and the newly created secret for that user. Once logged in, you should see the bucket named outline_data on the left sidebar. Try creating/deleting files and paths inside the bucket. Deleting the bucket is not allowed by the policy. If everything works fine, we are done setting up Minio.
When everything works as expected, we can use these values to set up storage on the Outline app.
| KEY | VALUE |
|---|---|
| access key id | outline_user |
| access key secret | < the password of outline_user > |
| bucket URL | https://minio.example.com |
| bucket name | outline_data |
Installing and Setting up Outline
Once both Keycloak and Minio are up and running, it's time to set up the Outline app. We just need to set the proper values in the environment file (.env) for everything to start working as intended. Remember, we have the credentials of the S3 storage server from Minio running at minio.example.com, and secrets of an OIDC server running at auth.example.com.
Set / Replace the following key-values on the .env file and restart the app to reflect the changes.
AWS_ACCESS_KEY_ID=outline_user
AWS_SECRET_ACCESS_KEY=<___password/secret for outline_user__>
AWS_REGION=xx-xxxx-x
AWS_S3_UPLOAD_BUCKET_URL=https://minio.example.com
AWS_S3_UPLOAD_BUCKET_NAME=outline_dataOIDC_CLIENT_ID=outline_app
OIDC_CLIENT_SECRET=<__secret_from_credentials_tab___>
OIDC_AUTH_URI=https://auth.example.com/realms/cloudron/protocol/openid-connect/auth
OIDC_TOKEN_URI=https://auth.example.com/realms/cloudron/protocol/openid-connect/token
OIDC_USERINFO_URI=https://auth.example.com/realms/cloudron/protocol/openid-connect/userinfoTroubleshooting
Make sure the user that you are trying to log in has a valid email set up in their profile. Otherwise, authentication may fail silently, and you cannot log in. The user can log in to Keycloak and go to Account Console at https://auth.example.com/realms/cloudron/account/#/personal-info to add an email.