
SSH is an essential tooling for developers and system administrators around the world. It allows for remote access to servers in the far corners of the world and those right beside us. SSH stands for Secure Shell, meaning that anything you do in the remote server through this protocol is secure and hard to intercept for malicious attackers. Connections are kept secure via passwords and public/private key pairs.
As these servers can contain extremely sensitive assets, they need to be well secured from attacks both internal (inside organization) and external (outside organization). Although all security methods are vulnerable, using different authentication methods can make the bypass as hard as possible for the attackers.
Multi-layer security includes two or more auth methods that combine to set up a pretty strong lock. We can use a password and the private/public key pair combination for SSH. But what if we need more? Would it be possible to add another layer of authentication methods? Yes, it is by using OTPs (One-time Password).
We will use an authentication code rather than a password, but the concept is the same. A one-time authentication code is generated from a unique combination of alphanumeric characters and cannot be easily brute-forced. In this article, we will learn to set up a multi-factor authentication system for SSH authentication.
How Does This Implementation Work?
We can achieve this implementation using PAM or Pluggable Authentication Framework. By default, this is present in almost all distros presently available in the market. This is the framework used for login/signup/signout in the distros, and we can easily plug a module into the framework and get it working in minutes.
We can use a module that allows us to generate OTPs and secure our SSH server using them, like the google-authenticator-libpam module. This module will generate the codes and verify if the code entered is correct or incorrect. OTP rate-limiting will also be handled by this module. It's an open-source module developed and maintained by Google and its open-source community.
A fresh instance of Debian 12.01 with SSH pre-installed is used for this demo. No extra configuration has been performed on the server.
Without further ado, let's get started.
Configuration
To get it to work, we first need a configuration file for each user we want to enrol into this system. Remember that this can be set up on a per-user basis, a much-needed flexibility provided by the PAM Framework.
The server will be configured with the following scenario in mind,
A server that will handle critical workloads in the future has been provisioned. It needs to be kept as secure as possible. Password, SSH, and OTP-based authentication methods will be implemented for each user using the server. Root SSH access will be disabled, and only a group of users will be provided root access via SUDO.
With the above scenario in mind, we'll start the configuration.
Install google-authenticator-libpam
Google Authenticator package is already available in the Debian repos, and it's easy to install using the command below:
apt update && apt install libpam-google-authenticatorgoogle-authenticator PAM moduleConfigure google-authenticator
Now, we need to write a script which checks for an existing configuration for the user, and if it does not find any, it goes ahead and creates it.
Copy the following script into a file called check-and-create.sh in any directory you want.
if [ ! -e ~/.google_authenticator ]; then
    printf "Authenticator configuration was not found, creating one for you....\n"
    google-authenticator --time-based --disallow-reuse --rate-limit=3 --rate-time=30 --window-size=3
    echo
    printf "Config created, applying neccessary permissions for $USER\'s access"
    chmod 600 ~/.google_authenticator
    echo
    printf "Save the generated emergency scratch codes and use secret key or scan the QR code to register your device for multifactor authentication.\n"
    echo
    printf "Login again using your ssh key pair and the generated One-Time Password on your registered device.\n"
    echo
    logout
fiAlthough the script above is self-explanatory, there is one line that is explained below:
google-authenticator --time-based --disallow-reuse --rate-limit=3 --rate-time=30 --window-size=3What they do:
google-authenticator: This is the authenticator binary application. This is being used for config generation.
--time-based: Using the time-based OTP authentication method.
--disallow-reuse: An authentication code that has been used will not be accepted.
30 seconds to a minute before a new code is generated, which can then be used.--rate-limit = 3: Allows a maximum of three failed attempts before disabling the authentication for a certain time period.
--rate-time = 30: Disables authentication for a minimum of 30 seconds once three OTP login attempts have failed.
--window-size = 3: The size of the window which displays the setup QR code to the user. The QR window will only be displayed when a user enrols.
Auto Enrollment
The users must be configured into the OTP authentication method during their first login. Also, we cannot allow the users to log in first and then set it up by running the configuration command above. This must be done as soon as they log in before they hit their SHELL.
We will move the script we created above into the /etc/profile.d directory to accomplish this. This directory can host init scripts executed during a user's login.
It does not matter if the user is already in the system or has been newly created; our script will be executed every time a user logs into the system. Once the script is executed, our script logic will take care of the rest.
Configuring SSHD and PAMD
Finally, the last thing to do is configure our SSH server and PAM.
Open the /etc/pam.d/sshd file and do as instructed below:
#The line below is already present, comment it,
@include common-auth

#Add the following line right below the above line,
auth required pam_google_authenticator.so nullokOpen the /etc/ssh/sshd_config file and perform the following modifications.
#This line is commented in the default config, uncomment and modify as shown below.
ChallengeResponseAuthentication yes

#Find all existing lines with the verb AuthenticationMethods and remove them. Add the line below, this will enable password, publickey as well as OTP based login for all users in the server
AuthenticationMethods password, publickey, keyboard-interactivesshd_config fileConfiguring SUDO Access
As mentioned in the scenario, a subset of users will be allowed SUDO access and root user access will be disabled. We disabled the root users' access privileges when modifying the SSH configuration, so now we will set up an admin users group with access to SUDO and add users into the group only if required.
#Create the group using the command below,
groupadd adminz

#Create a user using the command below. Follow the on-screen instructions and provide the necessary details along with the user password.

adduser sysadminz

#Set the password age to 0. The password will expire after first login and then the user sysadminz will need to set a unique password known to themselves only.

chage -d 0 sysadminz

#Now add the sysadminz user into the adminz group.
usermod -aG adminz sysadminzgroup and a user and Add the user Into the groupFinally, let's allow users in the adminz group access to sudo by editing the sudoers file. Follow the instructions below:
- Open the
sudoersfile using the commandvisudo(works only if you havesudoaccess or if you're logged in through therootuser)
2. Add adminz into the sudoers group
There will already be an entry for the user root and the group sudoers in this file. Add this line below the sudo entry.
# Provide members of adminz group root/sudo privileges
%adminz ALL=(ALL:ALL) ALLadminz group in the sudoers fileNow that we've configured everything that we need, let's go ahead and test it.
Testing
For testing, I'll create a new user without sudo access. Use the command below:
adduser rasbariAdd the public key of the user rasbari into the authorized_keys folder present inside the rasbari user's home directory. If the file or directory does not exist, create it using the below command:
To create the directory,
mkdir /home/rasbari/.sshTo create the file,
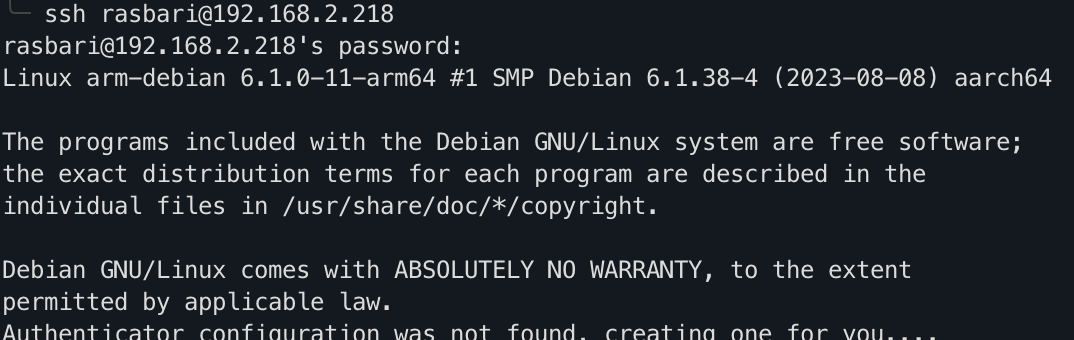
touch /home/rasbair/.ssh/authorized_keysNow, using the user rasbari perform an SSH connection into the server. The output below shows that the user will be asked for their password. Their private key will be verified against the public key stored in the SSH server, and lastly, the OTP configuration process will commence.
The next time the user rasbari logs in, they'll be asked for their OTP and the password.
FAQ
What Does the Configuration Look Like?
The Google Authenticator configuration lives in the user's $HOME directory inside the .google_authenticator.conf file.
Here's an example of the configuration present inside the file.
#This is the OTP Secret used to generate the code
R6MNCIXUCEWNXR3B4NZ577GVUI
# Specifies rate limiting
" RATE_LIMIT 3 30
# Window size used to display the QR code during initial setup
" WINDOW_SIZE 3
# Disallow using a code that has already been consumed
" DISALLOW_REUSE
# Specifies the typoe of auth, the first letter T in TOTP means time based
" TOTP_AUTH
# These are the backup codes that can be used in the event that you are unable to generate the TOPT codes (i.e useful in events like device loss, secret key deletion, etc)
80816794
99246658
49188931
96982819
77660495.google_authenticator.conf File and Its ExplanationWhy Was chmod Used on the File?
The configuration file is very sensitive and must be accessible to the user who owns it only. If other users could get a hand on that configuration, it's theoretically possible to authenticate into that user's account.
chmod 600 ~/.google_authenticatorroot user OR the users present in the adminz group will still be able to access this file.All other users without root permissions cannot access the file.
Conclusion
In this article, we learned to implement multiple authentication methods for SSH servers, including OTP-based authentication. The concept is the same for all other Linux distros that utilize PAM authentication. You can explore more regarding locking down access to specific binaries for sudo users.
Please comment below if you have any queries. I try to periodically update my articles to ensure legibility.