
Introduction
Implementing Authentication and Authorization in APIs has always been challenging. There are many ways of achieving security; one could be writing a security layer that checks for permission on each user request, a sort of middleware. But as your application grows, these rules can get complex and hard to maintain.
If you use Prisma ORM in your stack, there's a simpler way of implementing authorization in your applications: with the ZenStack user.
What is ZenStack
Well, according to their website, ZenStack is:
"A TypeScript toolkit that supercharges Prisma ORM with a fine-grained Authorization layer"
The features of ZenStack are:
- Authorization
- CRUD endpoint generation
- Frontend query code generation
In this blog, we will be only talking about the authorization part.
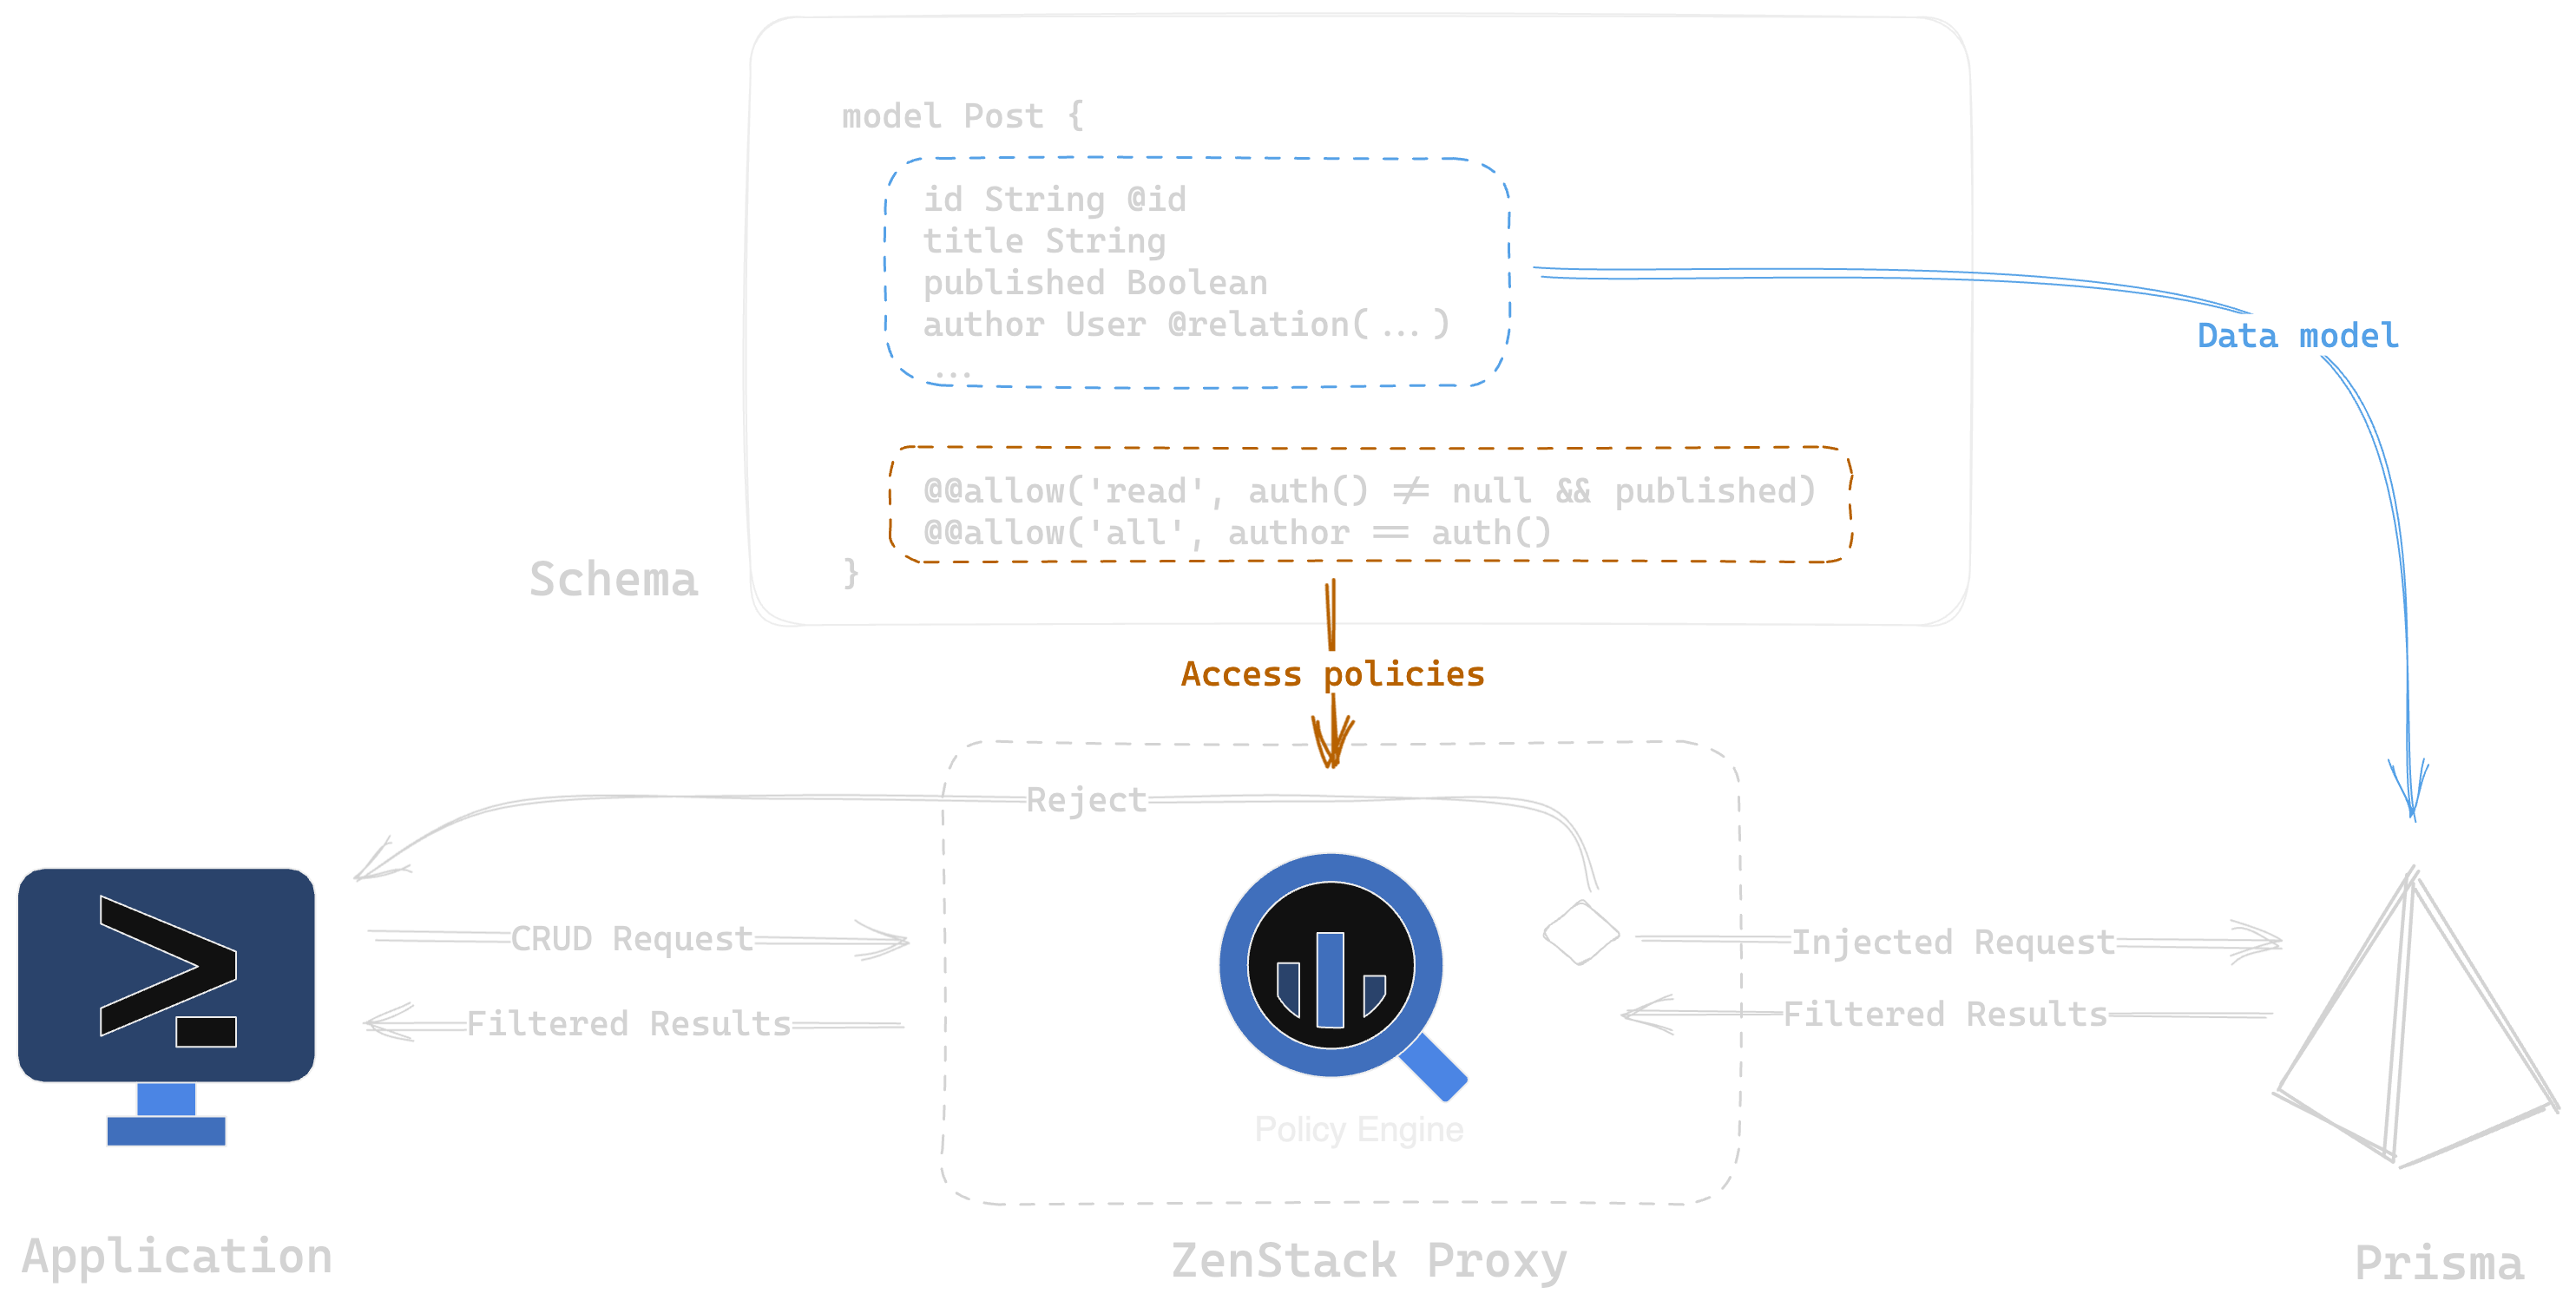
ZenStack allows you to define access control rules in the schema itself. The DDL for the ZenStack schema is built on top of Prisma's schema definition DDL, which can be called a superset of Prisma's DDL. The image below summarizes an overview of how ZenStack works.
How Does ZenStack Work?
OpenStack has its own DDL to define database models (a superset of Prisma's DDL), which also allows for defining access control rules. We can then generate the code that applies the so-defined access control rules. These rules can be applied by "extending" the Prisma client with ZenStack's rules included. It will act as middleware that sits between queries.
Implementing Authorization With ZenStack
Defining App Requirements
Let us define the requirements for our blog app.
- The user should be able to create posts
- Users who do not own the post can only view the post
- Only published posts can be viewed by all users
Scaffolding Out Demo Project
Now, let's look into how we can implement authorization in our APIs with ZenStack. Let's start by scaffolding our demo app. Create an express application from the following command:
$ pnpx degit prisma/prisma-examples/typescript/rest-express blog-app && cd blog-app && pnpm iCommand to scaffold our project and install dependencies
Let us prepare the database by syncing the tables with our schema and seeding the data.
$ pnpm prisma db push
$ pnpm prisma db seed
Commands to prepare our database
After everything is done, let us install the required dependencies for ZenStack.
$ pnpx zenstack@latest initCommands to initialize ZenStack
This creates a file schema.zmodel in our project root from our existing schema.prisma file. We will only be modifying the schema.zmodel file from now onwards. If you are using VSCode, there is an extension that will help with syntax highlighting and suggestions.
Now open src/index.ts file and add the following line before the server listens.
app.get("/post", async (req, res) => {
  const post = await prisma.post.findMany({
    include: { author: true },
  });

  res.json(post);
});
Code to fetch post
Now, if you send a GET request to the endpoint /post you should receive a response similar to the one below:
[
    {
        "author": {
            "email": "alice@prisma.io",
            "id": 1,
            "name": "Alice"
        },
        "authorId": 1,
        "content": "https://pris.ly/discord",
        "createdAt": "2024-04-23T03:30:02.091Z",
        "id": 1,
        "published": true,
        "title": "Join the Prisma Discord",
        "updatedAt": "2024-04-23T03:30:02.091Z",
        "viewCount": 0
    },
    ...
]
Response from GET /post
If you look at thee response, you can find unpublished posts in the list as well. In addition to that, the endpoints DELETE /post/:id and PUT /publish/:id allows you to modify any posts, even those you do not own. Now, let us fix that by defining access policies in ZenStack.
Defining Policies in ZenStack
By default, everything is private in ZenStack. Add the following access policies.
model User {
  ...
  // make user profile public
  @@allow('read', true)
}

model Post {
  ...

  // owner can modify posts
  @@allow('all', auth() == author)

  // posts shpuld be published and user should be authenticated
  @@allow('read', auth() != null && published)
}
Adding access policies in schema.zmodel
To implement these policies in our API, we should first generate the policies. Do so by running the following command
$ pnpm zenstack generateSecuring API Endpoints
Now that we have defined the policies, it's time to implement them in code. Add the following lines in src/index.ts
app.use((req, res, next) => {
  const userId = req.header("X-USER-ID");
  if (!userId || Number.isNaN(parseInt(userId))) {
    res.status(403).json({ error: "unauthorized" });
  } else {
    next();
  }
});

function getUserId(req: Request) {
  return parseInt(req.headers.get("X-USER-ID")!);
}

function getPrisma(req: Request) {
  const userId = getUserId(req);
  const user = Number.isNaN(userId) ? undefined : { id: userId };
  return enhance(prisma, { user });
}
The above code checks for the user ID in the header. If it is not found, the request is not processed further and sends response code 403. Also, we created a wrapper for the Prisma client that applies ZenStack's policies to it.
Let us modify the function to create a post. We will automatically add the authenticated user as the author of the post.
app.post(`/post`, async (req, res) => {
  const { title, content, authorEmail } = req.body;
  const result = await prisma.post.create({
    data: {
      title,
      content,
      author: { connect: { id: getUserId(req) } },
    },
  });
  res.json(result);
});
Adding author automatically to posts
Now, let us update the endpoint so that all posts use the enhanced Prisma client instance instead of the regular Prisma client.
app.get(`/post`, async (req, res) => {
    const post = await getPrisma(req).post.findMany({
        include: { author: true },
    });
    res.json(post);
});
Using enhanced Prisma client
Now, if we send a simple GET request to /post we get the following response
HTTP/1.1 403 Forbidden
Connection: keep-alive
Content-Length: 24
Content-Type: application/json; charset=utf-8
Date: Tue, 23 Apr 2024 05:37:02 GMT
ETag: W/"18-gH7/fIZxPCVRh6TuPVNAgHt/40I"
Keep-Alive: timeout=5
X-Powered-By: Express

{
    "error": "unauthorized"
}
Response from GET /post
Now let's send the request again but also send X-USER-ID the header in the request with a value 1. We should see a response containing all the posts which are published.
Now, let us create a new post for user 1. I will be using HTTPie for this purpose.
$ http POST http://localhost:3000/post title="Unfinished Post" content="Lorem Ipsum" X-USER-ID:1If we resend the request to get all the posts for user 1, we can also see the newly created unpublished posts.
[
 ...
 {
        "author": {
            "email": "alice@prisma.io",
            "id": 1,
            "name": "Alice"
        },
        "authorId": 1,
        "content": "Lorem Ipsum",
        "createdAt": "2024-04-23T05:58:38.246Z",
        "id": 5,
        "published": false,
        "title": "Unfinished Post",
        "updatedAt": "2024-04-23T05:58:38.246Z",
        "viewCount": 0
  }
]
Conclusion
ZenStack provides a wrapper around Prisma, allowing developers to easily implement authorization into their application through the schema directly. It eases development and saves the hassle of maintenance as the application grows.
Thank you for reading this article. Please consider subscribing if you liked the content.