
The game size is one of the key factors when developing games for mobile devices. Size factors can contribute to more user acquisition and can also affect performance. There are different ways of optimising a game and its size with Unity. In this article, we will be looking at some of the major factors that help in the size optimisation of a game. So we will be discussing:
- Cleaning up the project and removing unnecessary assets, models and scripts
- Removing built-in packages in your project that aren't being used
- Importing images and compressing textures
- IL2CPP Compilation and ARMv7 vs ARM64 architecture
- Properly handling unity scenes and use of runtime instantiation
1. Cleaning Up and Removing Unnecessary Assets
The first thing above everything else regarding game size is the use of assets like images, sounds, scripts and prefabs.
While in the development phase, you might use many assets for your project, which can be of no use later in the production. For example, you might be using a playerholder.png image in your development phase, but later, you might have disabled that image's game object in your project. When this happens, even though the specific picture isn't visible anywhere in your game, the Unity compiler thinks that you are using the image even if it is disabled and compiles the asset into its shared assets.
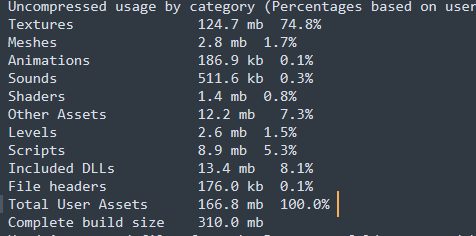
To avoid this issue, you should check and remove all the leftover assets from development that aren't used in your game. You can check what assets are being compiled by clicking on the 3 dots in your Unity console window. Doing this will open your editor.log file.
You can open the editor.log file in any text editor and find Build Report which will provide you with all details of what assets are being compiled in your build with Unity.
2. Removing Unused Built-in Packages
When you create your project in Unity for the first, the engine might import some extra packages in your project as default that might be of no use to you. Removing those packages might contribute a lot to lessening your build size.
For example, you might have created a game that has no use of 3D physics but you could have unknowingly imported a 3D physics package into your project. So, when you compile your build, this specific 3D physics package might increase your build size by 2-3 MB.
You can search for unused packages through your project's package manager. You can also remove/disable them through the same package manager. You can open the package manager from Window > Package Manager > Built-In.
3. Importing Images and Compressing Textures
When importing images or textures to your Unity project, always make sure to import the image with height/width having a multiple of 4 – like 128x128 or 256x256. We need to do this because if the image's height/width is not a multiple of 4, the image cannot be crunch compressed or compressed to ETC2 format.
You should also prioritise 9 slicing for most images throughout the game. Doing this will save resources, and most images used throughout the game will be compressed to kilobytes in size. For bigger model textures, you can change their max size from the image setting max size section.

4. ARMv7 vs ARM64 Architecture
You can also change your build architecture to ARMv7 to lower your build size. However, this will make the app work only for devices supporting ARMv7 architecture.
If you need your application to support both ARMv7 and ARM64 architectures, you can create two separate builds with ARMv7 and ARM64. When you upload the app to the Play Store, you can upload both builds, and the store will download the app with the architecture version of the user's device.
You also need to set the managed stripping level to medium as this might also help in size optimisation.
5. Handling Unity Scenes and Runtime Instantiation
A Unity scene is a level/environment system for your game and a collection of objects and instances. Unity compiles all the scenes in your build settings to your output build when building, so lightweight Unity scenes can also help in size optimisation.
Unity scenes tend to increase in size when you keep creating objects and instances of your scripts in the scene. For example, you might have a button in your scene that is 0.1kb in size. But, when you have a hundred buttons in your scene, the button size will go up to 10kb. The same goes with all the GameObjects you create, the texts and terrains you add, etc. This can make the scene size go way higher.
To solve these issues, you can generate all the extra stuff by just instantiating it in the game's runtime. This will help the scene be of a lower size as the scene wouldn't have to contain all the objects before being loaded in runtime.
Thank you for reading! You can find many more articles relating to Unity on this blog, so make sure to check them all out. See you in the next one!