
To provide the illusion of depth to the gamer, most of the popular 2D and 3D games use the parallax effect technique. With a few straightforward visuals and programming approaches, the main aim of this technique is to increase the reality and immersion of our environment.
How does Parallax Effect work?
The parallax effect or parallax scrolling is a unique method which allows the backgrounds and foreground layers to move separately from the main screen. It works by delaying the movement of succeeding background & foreground layers to develop game levels that look more natural and dynamic. 2D platformer games are the best genre for the execution of this visualization type, but this is not always the case.
Let's dive into the tutorial.
Implementation of Parallax Scrolling
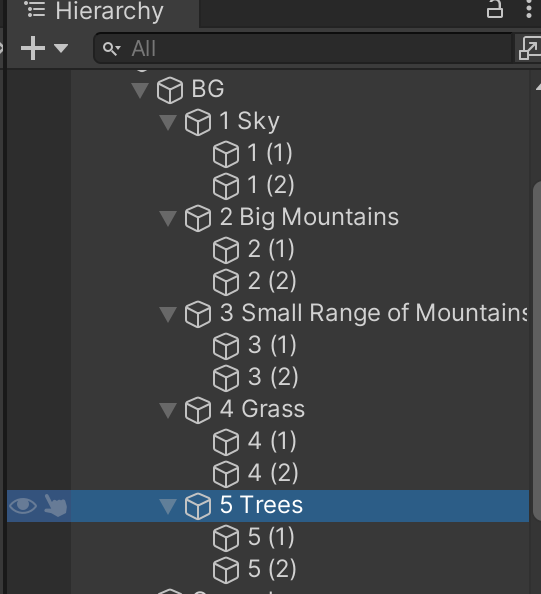
First of all, create a 2D project in Unity. Add the player with the player's movement script of your own. Create a new folder in the hierarchy to add the background layers. Add the layers of backgrounds inside the folder with the proper sorting order in the sprite render.
The backgrounds will not repeat if we move outside the camera's border at this point. To repeat the backgrounds, we can simply duplicate the layers of the backgrounds and add them to the left and the right of the first created background layers. This gives the parallax effect a little more space to work with.
For a better view of the hierarchy panel in Unity, arrange the duplicated similar layers.
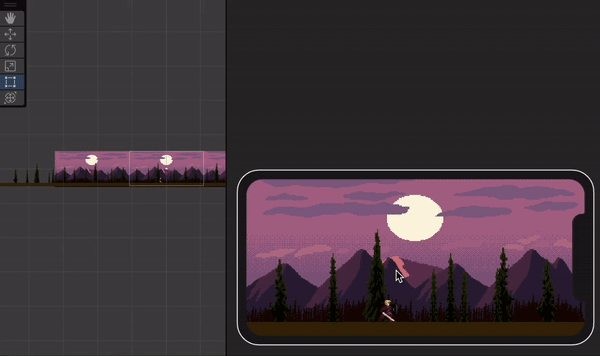
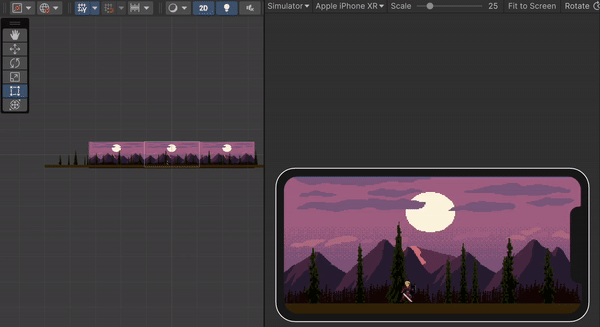
As of now, your scene will look like the following image:

Scripting for Parallax Effect
First, create a script ParallaxEffect.cs and create the following variables:
-
_startingPosition, which is starting position of the sprites. _lengthOfSprite, which is the length of the sprites.-
AmountOfParallax, which is the movement speed of the sprites. -
MainCamera, which is the reference to the main camera.
 private float _startingPos; //This is starting position of the sprites.
 private float _lengthOfSprite;    //This is the length of the sprites.
 public float AmountOfParallax;  //This is amount of parallax scroll.
 public Camera MainCamera;   //Reference of the camera.
Variables
Now, in the Start() function, we need to get the initial values of the starting position & the length of the sprites.
  private void Start()
        {
            //Getting the starting X position of sprite.
            _startingPos = transform.position.x;
            //Getting the length of the sprites.
            _lengthOfSprite = GetComponent<SpriteRenderer>().bounds.size.x;
        }
Getting the starting position of the sprite
Here, in the Update(), we must first determine the 'distance' by which the layer must be moved. Remember that each layer scrolls at a different pace during parallax scrolling to provide the illusion of depth. To do this, I'll apply the AmountOfParallax float value that was previously defined.
private void Update()
        {
            Vector3 Position = MainCamera.transform.position;
            float Temp = Position.x * (1 - AmountOfParallax);
            float Distance = Position.x * AmountOfParallax;

            Vector3 NewPosition = new Vector3(_startingPos + Distance, transform.position.y, transform.position.z);

            transform.position = NewPosition;
        }
Updating Sprites position in each second
After creating the ParallaxEffect.cs, add the script to each parent layer in the hierarchy panel, and then give the camera's reference to the public variable field. Now, give the AmountOfParallax value to each of the layers.
Here, in the project, I have used values like:
1for the last layer, i.e., the sky0.8for the second last layer, i.e., big mountains0.5for the range of the small mountains0.3for the grass0for the first layer
We must add 0 to the layer that is in front so that it moves as the camera passes it. For the remaining layers, we must then gradually raise these numbers until they reach 1.
If everything has gone according to plan to this point, you should be able to see the parallax effect on clicking the run game button in Unity.
Making the Background Repeat
Although we successfully created a parallax effect, the backgrounds no longer display once we step outside the defined boundaries. Therefore, we must repeat the background for a never-ending effect.
To regenerate whether the camera was moved outside of its permitted range, we must determine how far we actually moved the camera and set criteria to do so. By including the following piece of code in the Update() function of the ParallaxEffect.cs script, we can achieve this.
if (Temp > _startingPos + (_lengthOfSprite / 2))
	{
		_startingPos += _lengthOfSprite;
	}
else if (Temp < _startingPos - (_lengthOfSprite / 2))
	{
		_startingPos -= _lengthOfSprite;
	}
Update() Function
Consequently, the backgrounds will repeat no matter how far the camera is moved.
Also Read: Recipe for Creating a Compelling Game Narrative
Final Script
Here is the final script of ParallaxScript.cs.
using System;
using UnityEngine;

namespace _Scripts
{
    public class ParallaxEffect : MonoBehaviour
    {
        private float _startingPos, //This is the starting position of the sprites.
            _lengthOfSprite; //This is the length of the sprites.
        public float AmountOfParallax; //This is amount of parallax scroll.
        public Camera MainCamera; //Reference of the camera.


        private void Start()
        {
            //Getting the starting X position of sprite.
            _startingPos = transform.position.x;
            //Getting the length of the sprites.
            _lengthOfSprite = GetComponent<SpriteRenderer>().bounds.size.x;
        }


        private void Update()
        {
            Vector3 Position = MainCamera.transform.position;
            float Temp = Position.x * (1 - AmountOfParallax);
            float Distance = Position.x * AmountOfParallax;

            Vector3 NewPosition = new Vector3(_startingPos + Distance, transform.position.y, transform.position.z);

            transform.position = NewPosition;

            if (Temp > _startingPos + (_lengthOfSprite / 2))
            {
                _startingPos += _lengthOfSprite;
            }
            else if (Temp < _startingPos - (_lengthOfSprite / 2))
            {
                _startingPos -= _lengthOfSprite;
            }
        }
    }
}
Final script of ParallaxScript.cs
Conclusion
In this tutorial, we have learned how to create a parallax background. The characters and capabilities of video game characters are frequently improved, while the landscapes are typically kept simple. The game becomes more lifelike thanks to the 3D visuals created by parallax backgrounds.
In this tutorial, we have explored the implementation of parallax scrolling for 2D platformer games. First, we used Unity to construct the layers for the backgrounds. After that, we created a script to control how each layer of the parallax background and foreground moves. Then, we developed a parallax layered layout inside the project's components to tie everything together.
Thank you for reading this article. Hope you found it helpful. Subscribe for more.