
Introduction
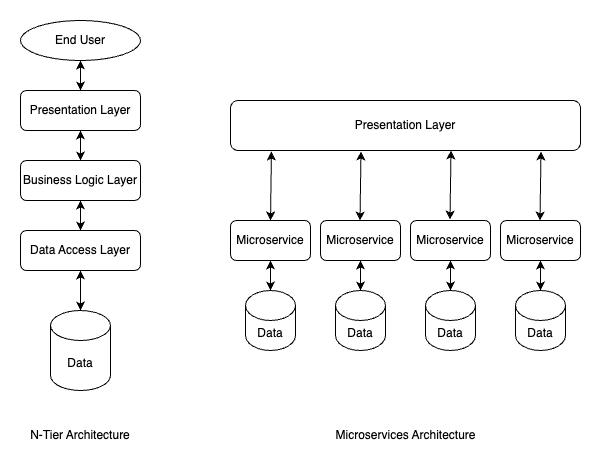
When software development was still in its early stages, there were monolith codebases that had code intermingled all over the place. Separation of concerns wasn't an issue and was difficult to keep up. Then came the n-tier architecture, which divided code into functional areas. Without causing significant damage, different code components could be changed.
For instance, the database layer would solely be concerned with communicating with the database, not the application, view, or other layers. As a result, the codebase was maintainable. However, the issue of scalability emerged following the internet explosion. Microservice architecture can be used in this situation.
What are Microservices?
Microservices takes the separation of concern from n-tier architecture to the next level. Microservices are independent applications that exist on their own. In most cases, they have their own database, which is isolated from others. They are hosted separately and are loosely coupled. They communicate with each other by using communication means such as API calls or message passing. They can be scaled, maintained and upgraded independently. This also means that different teams can work on their own microservice in different languages. Each microservice can be based on the n-tier architecture as well.
Building Microservices In NestJS
NestJS supports building applications with microservice architecture out of the box. It even supports various message communication strategies like gRPC, and MQTT. If we pair it with Nx, we will have a solid tool for developing our application with multiple microservices.
Setting Up Environment
Creating Nx Workspace
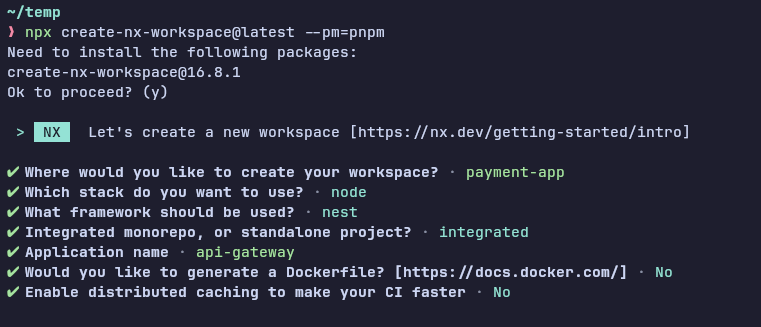
Let us create a dummy authentication service project using microservices with NestJS and RabbitMQ. Let's start by setting up our Nx workspace. Run the following commands in your terminal emulator:
npx create-nx-workspace@latest --pm=pnpm
When prompted for the workspace name, type payment-app and hit enter. For the stack, choose node , and for the framework, choose NestJs. In the next prompt, select integrated Monorepo. Enter api-gateway when prompted for the app name. Select no for Dockerfile and Nx cloud. The end result should look like something shown in the screenshot below.
Installing Dependencies
We will need to install some additional dependencies as well. Run the following commands.
pnpm i @nestjs/config @nestjs/microservices \
amqp-connection-manager amqplib class-transformer class-validator uuid

pnpm i -D @nx/workspace @types/uuid
Commands to Install App Dependencies
Setting .env File
We will be using an .env file to manage development environment variables. Create a file in the project root and name it .env. Fill the content of the file as shown below
GATEWAY_HOST="localhost"
GATEWAY_PORT=3000

RABBITMQ_HOST="localhost"
RABBITMQ_PORT=5672
RABBITMQ_DEFAULT_USER="administrator"
RABBITMQ_DEFAULT_PASS="letmetin"
RABBITMQ_URL="amqp://${RABBITMQ_DEFAULT_USER}:${RABBITMQ_DEFAULT_PASS}@${RABBITMQ_HOST}:${RABBITMQ_PORT}"
.env file.
Composing a Docker File
Let's set up our docker-compose file. We will only be running one service in it, rabbitmq. Create a docker-compose.yml file in the root of your project.
version: '3.9'

services:
  rabbitmq:
    image: 'rabbitmq:3.12.4-management-alpine'
    container_name: 'payment-app-rabbitmq'
    env_file:
      - .env
    ports:
      - 5672:5672
      - 15672:15672
docker-compose.yml
Run docker compose up -d to start the service.
Creating a Shared Library
We will create a shared library containing code that'll be shared between the microservices like DTOs, configs, etc. Run the following command in the root of the project. A new library should be generated in the libs directory.
nx generate @nx/nest:library --name=shared --buildable=true --importPath=@/shared --projectNameAndRootFormat=derivedCommand to generate a shared library
We will add the DTOs and Entities. Create a dtos folder and an entity folder in the shared library's libs folder. Create the files auth.dto.ts and index.ts in dtos and index.tsand user.entity.ts in the entities folder and populate as follows.
// dtos/auth.dto.ts
import { IsEmail, IsNotEmpty, IsString } from 'class-validator';

export class CreateUserDto {
  @IsString()
  @IsNotEmpty()
  name: string;

  @IsEmail()
  @IsNotEmpty()
  email: string;
}

// dtos/index.ts
export * from './auth.dtos';

// entities/user.entity.ts
export class User {
  id: string;
  name: string;
  email: string;
}

// entities/index.ts
export * from './user.entity';
User DTOs and Entities
Ultimately, we will export them all in the shared library's barrel file.
export * from './lib/dtos';
export * from './lib/entities';
index.ts of Shared Library
Update the main.ts file in our API-gateway project as follows.
import { Logger, ValidationPipe } from '@nestjs/common';
import { NestFactory } from '@nestjs/core';

import { AppModule } from './app/app.module';
import { ConfigService } from '@nestjs/config';

async function bootstrap() {
  const app = await NestFactory.create(AppModule);

  const globalPrefix = 'api';

  app.setGlobalPrefix(globalPrefix);
  app.useGlobalPipes(
    new ValidationPipe({
      whitelist: true,
      transform: true,
    })
  );

  await app.listen(3000);
  Logger.log(
    `🚀 Api gateway is running on: http://localhost:3000/${globalPrefix}`
  );
}

bootstrap();
main.ts of API Gateway Application
Creating the Auth Microservice
Now, let us create our Auth microservice. Run the following command in the project root.
nx generate @nx/nest:application --name=auth-microservice --linter=none --projectNameAndRootFormat=derived --strict=trueCommand to create Auth Microservice
Populate the main.ts as follows.
import { Logger } from '@nestjs/common';
import { NestFactory } from '@nestjs/core';

import { AppModule } from './app/auth.module';

async function bootstrap() {
  const app = await NestFactory.create(AppModule);

  app.connectMicroservice<MicroserviceOptions>({
    transport: Transport.RMQ,
    options: {
      urls: ["ampq://administrator:letmein@localhost:5672"],
      "AUTH_QUEUE",
      queueOptions: {
        durable: false,
      },
    },
  });

  await app
    .startAllMicroservices()
    .then(() => Logger.log('✨ Auth MicroService Started'));
}

bootstrap();
Contents of main.ts of Auth Microservice
Here, the auth microservices are connected to our RMQ server and ready to Pub/Sub messages in the AUTH_QUEUE.
Create auth.controller.ts, auth.service.ts, auth.module.ts and user.repository.ts in the app folder of auth-microservice. Then, populate them with the following.
// user.repository.ts
import { User } from '@/shared';
import { Injectable, Logger, NotFoundException } from '@nestjs/common';
import { RpcException } from '@nestjs/microservices';
import { v4 as uuidV4 } from 'uuid';

@Injectable()
export class UsersRepository {
  private readonly logger = new Logger(UsersRepository.name);
  private readonly users: User[] = [];

  save(user: Omit<User, 'id'>) {
    const newUser = { id: uuidV4(), ...user };
    this.users.push(newUser);
    return newUser;
  }

  findOne(id: string): User {
    const user = this.users.find((u) => u.id === id);
    if (!user) throw new RpcException(new NotFoundException('User Not Found'));
    return user;
  }
}

// auth.service.ts
import { Injectable } from '@nestjs/common';
import { UsersRepository } from './users.repository';
import { CreateUserDto, User } from '@/shared';

@Injectable()
export class AppService {
  constructor(private readonly usersRepository: UsersRepository) {}

  createUser(data: CreateUserDto): User {
    return this.usersRepository.save(data);
  }

  getUser(id: string): User | null {
    return this.usersRepository.findOne(id);
  }
}

// auth.controller.ts
import { CreateUserDto } from '@/shared';
import { Controller, ParseUUIDPipe, ValidationPipe } from '@nestjs/common';
import { MessagePattern, Payload } from '@nestjs/microservices';
import { AppService } from './auth.service';

@Controller()
export class AppController {
  constructor(private readonly appService: AppService) {}

  @MessagePattern("CREATE_USER")
  handleUserCreate(@Payload(ValidationPipe) data: CreateUserDto) {
    return this.appService.createUser(data);
  }

  @MessagePattern("GET_USER")
  handleGetUser(@Payload('userId', ParseUUIDPipe) userId: string) {
    return this.appService.getUser(userId);
  }
}

// auth.module.ts
import { Module } from '@nestjs/common';
import { ConfigModule } from '@nestjs/config';
import { AppController } from './auth.controller';
import { AppService } from './auth.service';
import { UsersRepository } from './users.repository';

@Module({
  controllers: [AppController],
  providers: [AppService, UsersRepository],
})
export class AppModule {}
Contents of Auth Microservice
For simplicity, we will be using an in-memory database instead of an actual database in user.repository.ts.
In our API-gateway application, create three new files auth.controller.ts, auth.service.ts and auth.module.ts in a folder named auth in the app directory and populate the following.
// auth.service.ts
import { CreateUserDto, User } from '@/shared';
import { Inject, Injectable, Logger } from '@nestjs/common';
import { ClientRMQ } from '@nestjs/microservices';

@Injectable()
export class AuthService {
  private readonly logger = new Logger(AuthService.name);
  constructor(@Inject("AUTH_QUEUE") private readonly authClient: ClientRMQ) {}

  createUser(createUserDto: CreateUserDto) {
    return this.authClient.send<User>("CREATE_USER", createUserDto);
  }
}

// auth.controller.ts
import { CreateUserDto } from '@/shared';
import { Body, Controller, Post } from '@nestjs/common';
import { ApiConsumes, ApiProduces, ApiTags } from '@nestjs/swagger';
import { AuthService } from './auth.service';

@ApiTags('Auth')
@Controller('auth')
export class AuthController {
  constructor(private readonly authService: AuthService) {}

  @Post('sign-up')
  createUser(@Body() createUserDto: CreateUserDto) {
    return this.authService.createUser(createUserDto);
  }
}

// auth.module.ts
import { Module } from '@nestjs/common';
import { ClientsModule } from '@nestjs/microservices';
import { AuthController } from './auth.controller';
import { AuthService } from './auth.service';

@Module({
  imports: [
    ClientsModule.registerAsync([
    	{
            transport: Transport.RMQ,
            options: {
              urls: ["ampq://administrator:letmein@localhost:5672"],
              queue: "AUTH_QUEUE",
              queueOptions: {
                durable: false,
              },
            }
        }
    ]),
  ],
  controllers: [AuthController],
  providers: [AuthService],
})
export class AuthModule {}
Contents of Auth Module in API Gateway
Add AuthModule in the app.module.ts. The AuthModule In API gateway is connected to the out RMQ'sAUTH_QUEUE. The gateway will communicate with the auth microservice through this channel. Here in AuthService's createUser method, we can see that it sends the CREATE_USER message with a payload of type CreateUserDTO. This is then handled by the corresponding MessageHandler which we described in the auth microservice, which is handleUserCreate method in auth microservice. It then responds with the newly created User entity to the api-gateway.
Testing Auth API
Open the API testing application of your choice. Here, I'll be using Insomnia and making a POST request to the endpoint /api/auth/sign-up as following.

Here, the API gateway creates and passes the incoming request to the AUTH_QUEUE message queue and the auth microservice creates the user in the "database" and then returns the created user data, which is returned to the caller.
Conclusion
In this part, we implemented the auth microservice and connected it to our gateway through RabbitMQ. We connected our gateway and auth microservice through RabbitMQ. In the next part, we will implement a Payment microservice. We will also learn how to handle errors in microservices in NestJs.
Thank you for reading this article. If you loved it, please consider subscribing and leaving a response in the comment section below.