
Windows Subsystem for Linux (WSL) is a feature that lets you run GNU/Linux applications natively on Windows. You can install various flavours of Linux distribution without the hassle of setting up a virtual machine or dual booting (or more in case you want various distributions).
Why WSL?
One of the reasons to start using WSL is its ease of setup. Anyone can install and start using Linux by simply entering a few commands. Developers can also utilize the various tools available for free on Linux or develop a cross-platform application without the pain of having to set up multiple virtual machines. New users who simply want to learn the ways of Linux can also do so without much commitment.
Installing WSL
Start a command prompt with administrator permission.
# Installs WSl along with Ubuntu
wsl --install
For older versions of Windows, you will need to manually enable WSL. Run the following command as an administrator on PowerShell.
dism.exe /online /enable-feature /featurename:Microsoft-Windows-Subsystem-Linux /all /norestart

# Enable Virtual Machine
dism.exe /online /enable-feature /featurename:VirtualMachinePlatform /all /norestart
Download the Linux Kernel Package from here. Once installed, run the wsl --set-default-version 2 command to set WSL 2 as default.
Installing Different Distributions
By default, when you run wsl --install, it will install Ubuntu as the default distribution. You can list available distributions with wsl -l -o when you want to install other distributions.
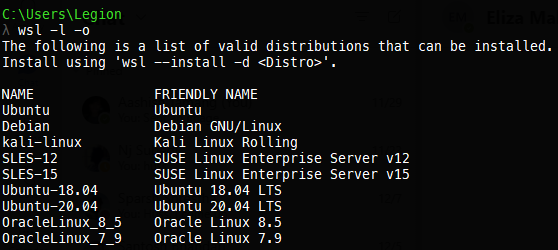
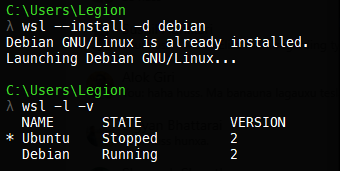
To install the distribution of your choice, run the command wsl --install -d <Distro_Name>. You can list the distribution installed as well as the version of WSL using wsl -l -v.
Uninstalling WSL Distribution
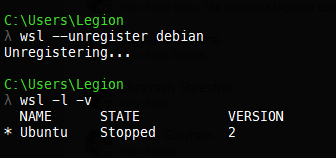
Uninstalling is as easy as installing with WSL. To uninstall any distribution, run the command wsl --unregister <distro_name>.
Start Your Shell
You can launch the Linux shell with the command wsl on the Command Prompt or PowerShell. This will start your default Linux distribution on the current location.

To start other distributions, we would simply run <Distro_name> or wsl -d <Distro_Name>.
Closing Application
Terminate the session using wsl --teminate <Distro_name>
Installing Application
To install an application, you simply use the package manager shipped with the distribution (or you can use your preferred one).
For Debian-based distribution, you can do so by running the command sudo apt install <package_name>.
For Arch-based, you can use Pacman sudo pacman -S <package_name>.
For OpenSuse, you can use sudo zupper install <package_name>.
For Red Hat, you can use sudo yum install <package_name>.
WSL Tricks and Tips
Moving Default Installation Location of Specific Distribution
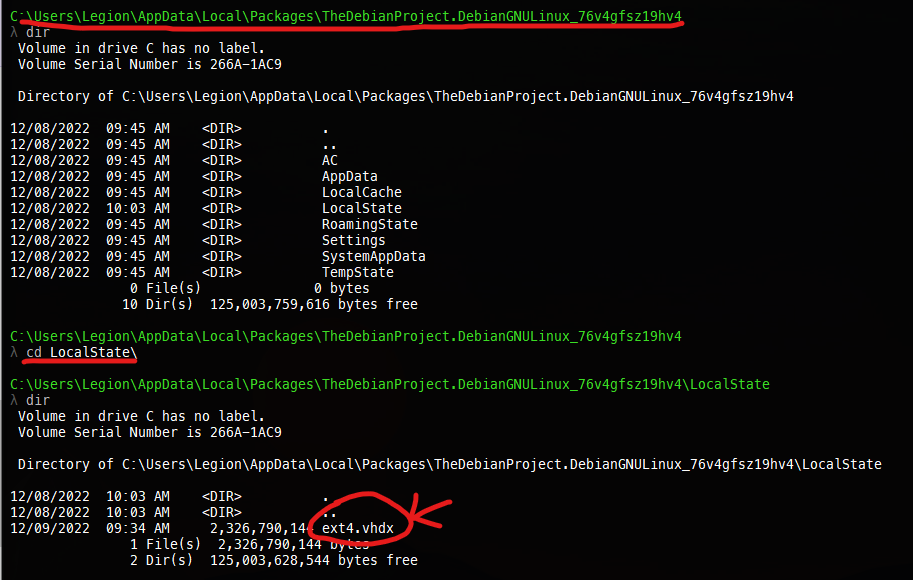
By default, WSL distributions are stored in %USERPROFILE%\AppData\Local\Packages\<PackageName>. Locate the folder and image file i.e ext4.vhdx
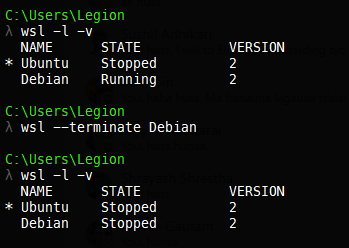
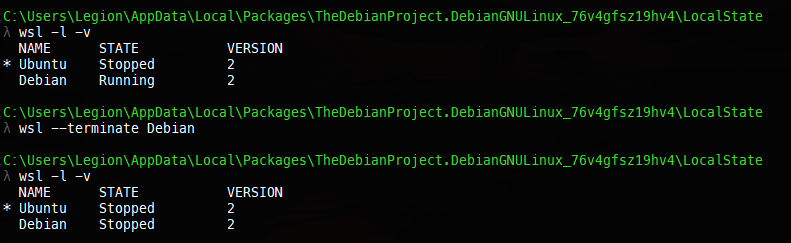
Make sure the distribution you want to copy is not running. You can do so by running wsl -l -v command.
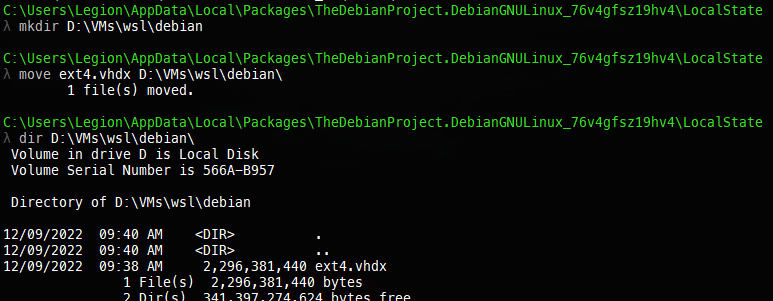
Now, move the image i.e ext4.vhdx to the location you want.
Make sure the distro has been removed from WSL with wsl -l -v. If it is not removed, unregister the existing image with wsl --unregister <distro_name>

Now, you can simply import the image with the following command.
wsl --import-in-place <Distro_name> <path/to/new/ext4.vhdx/location>Changing the Name of the Distribution
If you want to change the name of the installed distribution and the installation path's location, follow the steps below.
Step 1: Export the distribution file in a tarball.
wsl --export <distroname> <location/to/store/file.tar>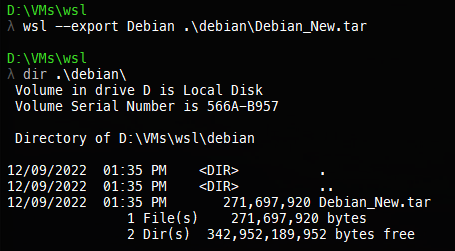
Step 2: Import the tar file and set the desired name of the distribution.
wsl --import <Distro_Name> </path/to/new/location> </path/to/tar/file>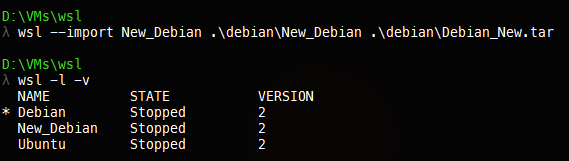
When you move the distribution with this method, you should reset the default username for logging in. There are various ways to do it, but the easiest and safest way is to create the file wsl.conf in /etc/ directory. Also, add the following line in it and restart the shell.
[user]
default=<username>
Changing Default Distribution
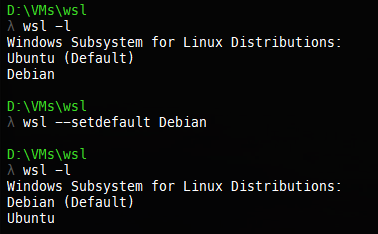
When you install WSL with wsl --install, you will install Ubuntu along with it, and it will be set as your default distribution. Whenever you run wsl, it will simply give you the Ubuntu shell. If you want to change it to another distribution, you can simply do it with the command wsl --setdefault <distro_name>.
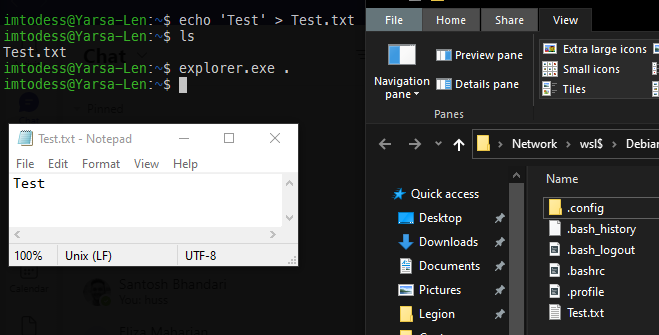
Opening the WSL Folder on Windows Explorer
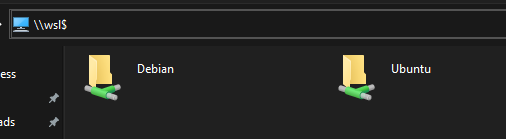
Working with files between WSL and Windows may seem complicated, but WSL has made it easier for its user. You can explore the file system of your installed distribution by entering \\wsl$ in your file browser.
Or, run the command explorer.exe . in your WSL shell.
Best Terminal Emulators For WSL
While the command prompt is enough for most users, it might be restricting for others as it isn't that feature-rich, and you can't really do anything to make it more usable. I personally use Cmder.
It is one of the fastest, most portable, feature-rich and good-looking terminal emulators available for Windows. You can also use some Linux commands on Windows, so you don't have to struggle when switching between Linux and Windows. Another good alternative is Terminal (available on Microsoft Store).
Hope this article helped you in getting started with Windows Subsystem.
Thank you for reading this blog. Comment below if you have any questions and subscribe using either of the buttons below.