
Widely known as an open-source, in-memory data structure store, Redis is often used as a database, cache, and message broker. It is also recognized for its high performance, low latency, and versatility, making it a popular choice for many applications. Redis is often used as part of a larger technology stack, where it is used to store and retrieve data quickly and efficiently.
I came across a case where I needed the RedisJSON feature. Using a database hosted in Digital Ocean, going through their docs on how to add that feature to the hosted database was troublesome. Instead, I created and deployed my own Redis server in a VPS.
In this article, I will guide you through the installation process of RedisJSON and show you how to secure Redis and load the RedisJSON module in your own VPS.
To get started, you'll need a VPS with a Debian-based OS. I will be showing the procedure with the use of Debian 11.
About RedisJSON
The RedisJSON module provides JSON support for Redis. RedisJSON lets you store, update, and retrieve JSON values in a Redis database, similar to any other Redis data type.
RedisJSON also provides:
- full support for JSON standard
- a syntax for selecting and updating elements inside documents (using JSONPath syntax)
- documents are stored as binary data in a tree structure
- allows fast access to sub-elements
- typed atomic operators for all JSON value types
RedisJSON also offers a command set that allows you to perform operations on JSON data stored in Redis. These commands include:
JSON.SET: sets the value of a JSON key in Redis with a JSON documentJSON.GET: retrieves the value of a JSON key in Redis as a JSON documentJSON.DEL: deletes a JSON key in RedisJSON.TYPE: retrieves the type of a JSON key in Redis (object, array, string)JSON.ARRAPPEND: appends a JSON value to a Redis List that represents a JSON arrayJSON.ARRINDEX: returns the index of a JSON value in a Redis List that represents a JSON array
There are many more commands tailored with their specific features. To learn more about the RedisJSON commands, please visit the official RedisJSON command documentation or click here.
How to Deploy the RedisJSON Module?
Step 1: Make the VPS ready
Let's start with updating and upgrading the existing applications and installing a few required ones throughout the process.
apt -qq update
apt -qq -y upgrade
apt -qq install git build-essential ufw libclang-devSince we installed the Uncomplicated Firewall (UFW), let's configure it to allow ssh but disable other ports such that the VPS has no other open ports. Thus, only internal apps will be able to access the Redis.
ufw default allow outgoing
ufw default deny incoming
ufw allow ssh
ufw --force enableFurther, when the Redis database is ready, you might want to allow your specific port via UFW.
Step 2: Install Redis
Method 1 - with Docker
Redis suggests running the RedisJSON in Docker for a quick start.
docker run -p 6379:6379 --name redis-redisjson redislabs/rejson:latestIf you're ready to rock with dockerized Redis, the article is complete, and you can rest easy. The installation is successful and ready.
Method 2 - with apt install
Debian 11 provides Redis installation directly from the apt repository. We can install it directly as:
apt install redisThis will install Redis v6 at the time of writing on Debian 11. We must build the RedisJSON module and load it to the installed Redis.
Step 3: Build and Load the RedisJSON module
First, we will need to install Cargo for building the module. We can do it in the following way:
curl --proto '=https' --tlsv1.2 -sSf https://sh.rustup.rs | sh
source "$HOME/.cargo/env"We can now proceed with building the module.
git clone https://github.com/RedisJSON/RedisJSON.git
cd RedisJSON
cargo build --releaseOnce the build is complete, we need to copy the module to the existing, installed Redis application. Move the module to a directory and point it from the Redis configuration file. We can do so by executing the following commands.
mkdir /etc/redis/modules
cp ./target/release/librejson.so /etc/redis/modules/
echo "loadmodule /etc/redis/modules/librejson.so" >> /etc/redis/redis.confStep 4: Wrap up
The task is now complete. We installed Redis, built the RedisJSON module with Cargo, and directed the module from the Redis config file. Now, restart your Redis server for it to recognize the changes.
systemctl restart redis-server.serviceThis will restart the Redis server with the RedisJSON module.
Step 5: Run tests
Let's open redis-cli and run some tests to see the action of RedisJSON. I will set, get, and retrieve a certain key of the JSON object.
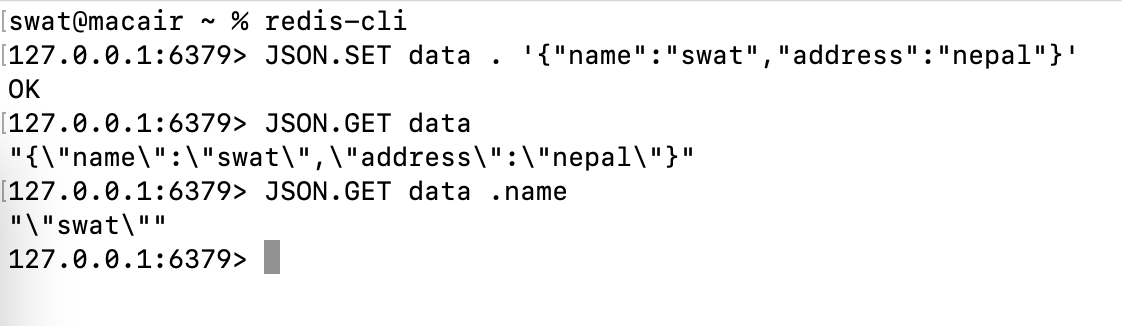
I first set a JSON object {"name":"swat","address":"nepal"} under key data. Then I got the key data and retrieved the name of the data.
128. If the JSON value contains an object or an array nested in more than 128 levels, it will return an error.Completion of RedisJSON Module
Follow the process, and you can launch your own hosted Redis server with the RedisJSON module in your VPS.
Leave a comment below if you run into any problem or if you have any feedback. Thank you for reading this article. Subscribe!