
Auth in the microservices world is fairly complicated and has given rise to a niche industry of IAM/Auth/SSO-labeled cloud services and client SDKs. Okta, a leading player in cloud-based auth, recently completed the acquisition of another key player: Auth0. Okta has thus become one of the most popular choices for organizations that prefer to outsource the authorization part of their software infrastructure.
Many organizations may have valid reasons to not use a non self-hosted solution for their authorization purposes. This is especially true if they have higher risks associated with external credentials breaches or simply due to the lower operational cost of not having to pay an external provider per user for a critical service.
About Keycloak
Keycloak is a battle-tested enterprise product that provides single-sign-on (SSO) and Identity & Access Management (IAM) support for standard auth protocols like OAuth 2.0, SAML 2.0, and OpenID Connect identity layer. It is available as a free, open-source offering for self-hosted usage and also as an upstream project called RH-SSO by Red Hat for managed-cloud usage.
With Keycloak, the team pays for their hosting costs and gets a security-audited and thoroughly tested high-quality product. The team mostly needs to know only the standard OAuth/OIDC concepts to configure the auth server via a simple form-based UI. The Keycloak instance can be deployed with an external database for production or with the H2 database for local installations during development. A sample docker-compose file for installation is provided below:
version: '3.9'
services:
  db-kc:
    image: postgres:15.1-alpine
    container_name: db-kc
    restart: always
    env_file:
      - .env
    ports:
      - 5432:5432
    volumes:
      - postgres-kc:/var/lib/postgresql/data
    networks:
      - keycloak-and-pg-network

  keycloak-w:
    image: quay.io/keycloak/keycloak:latest
    ports:
      - 8080:8080
    restart: unless-stopped
    environment:
      KEYCLOAK_ADMIN: admin_user
      KEYCLOAK_ADMIN_PASSWORD: admin_password
      KEYCLOAK_USER: some_user
      KEYCLOAK_PASSWORD: some_password
      DB_VENDOR: postgres
      DB_ADDR: db-kc
      DB_PORT: 5432
      DB_USER: db_username
      DB_PASSWORD: db_password
      DB_DATABASE: db_name
    depends_on:
      - db-kc
    command: start --optimized   # or start-dev for local instances
    networks:
      - keycloak-and-pg-network

volumes:
  postgres-kc:
    name: pg-data

networks:
  keycloak-and-pg-network:
    name: kc-pg-network
Within Keycloak, one can create a realm which conceptually maps a set of software clients into one logical group.
One could use a master realm user equipped with realm-management-related roles to programmatically create different realms, clients and users. The Keycloak Admin Rest API for creating realms, clients, users, groups, roles, attributes etc., is documented and has an accompanying official node library for ease of use and type safety.
UI Clients: Standard Flow
Whether you are making realms and clients programmatically or using the UI forms, different clients will need different configurations, and these configured values may change over time. UI Clients like Remix/NextJS/SvelteKit-based UI SSR/SSG/IR servers or React/Angular/Svelte/Vue-based SPAs should opt to use a Keycloak served login page instead of handling user credentials on their own. For this, one can enable Standard Flow in the client, as shown below:
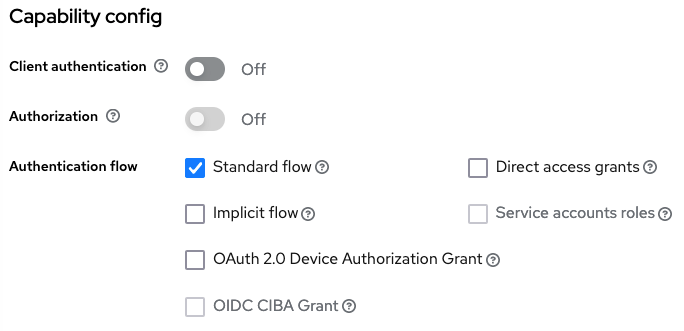
In this flow, the login page is provided by the Keycloak server to the user when a user requests to log in or to use any parts of the application requiring the user to be signed in first. The application does not need to worry about handling the username and password, whether the Keycloak sign-in requires text credentials, and offers buttons to log in with external social identity providers or provides OTPs. Whatever the login process within the Keycloak-provided login page is configured to be, the end result of a successful login is that a valid access_token and refresh_token is sent back along with their expiry times to the registered client by the Keycloak server (when using JWT, a default).
Using SSR-style clients like Remix provides an additional security benefit. By utilizing Keycloak on the server side, the clients can avoid the risk of exposing the tokens on the browser side, where they can be exploited by browser extensions and other malicious actors. The tokens on the browser side are more vulnerable to exploitation, especially in cases where the user has logged out, but the token has not yet expired. The tokens can be refreshed by sending the refresh token to the token endpoint auto-configured by Keycloak.
Keycloak also provides the entire registration and user account management flow, including emails for profile activation, forgotten password reset, and account disabling or deletion. Besides that, one can also pre-populate users in the Keycloak database via the dashboard or the aforementioned Rest API.
Resource Servers: Signed JWT & JWKS
API Resource servers are usually registered as different kinds of clients in a realm. In case a resource server needs to verify whether the access_token in the request is from a valid user with non-expired login, one can simply check the token in the request header by sending it to the aforementioned token endpoint for validation.
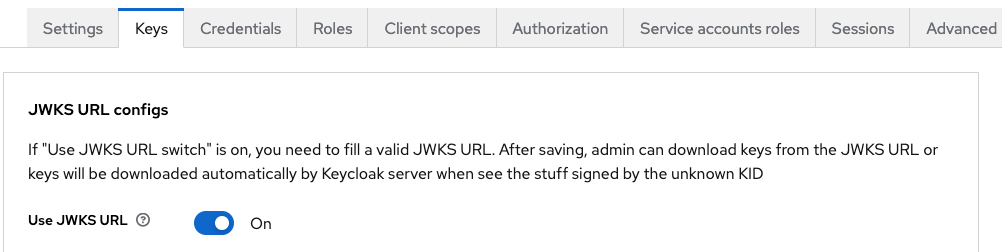
To remove this additional network latency, clients can also choose to use public keys provided by Keycloak for locally reading and verifying the signed and encrypted tokens created by the particular Keycloak realm. The JSON Web Key Set (JWKS) is a set of keys containing the public keys used to verify any JSON Web Token (JWT) issued by an authorization server like our Keycloak server.
Additionally, the keys can be scheduled for regular rotation or changed after a breach. Keycloak also provides a URL to retrieve JWKS. A new JWKS is usually retrieved by the client resource server whenever the kid or key identifier part of the JWT header changes.
Essentially a resource server's client configuration in a Keycloak realm could look like this:
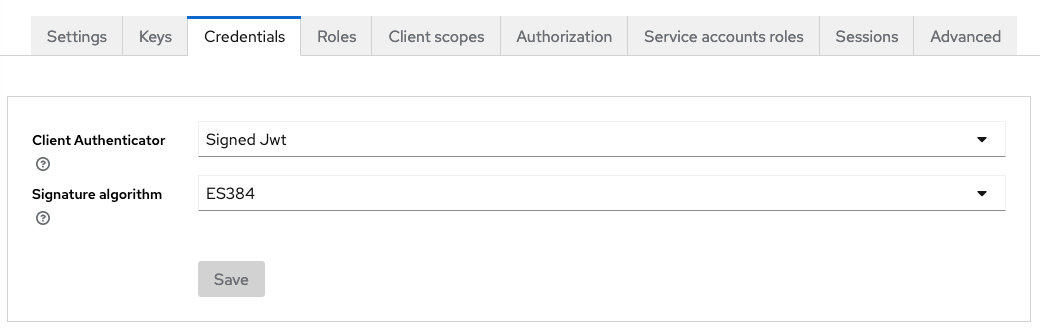
The resource server can create a remote JWKS and use that when verifying the token. Here we're using panva's "jose" (jwtVerify) and "node-openid-client" (Issuer.discover) are being used in this example code:
//...during application startup
this.issuer = await Issuer.discover(this.authConfig.issuer);

//...returns a function to conditionally get JWKS from cache or keycloak
this.jwkS = createRemoteJWKSet(
  new URL(this.issuer.metadata.jwks_uri),
);

//...when user sends a request with a bearer token in the header
const result = await jwtVerify(bearerToken, this.jwkS);Resource Servers: Client Id & Secret Key
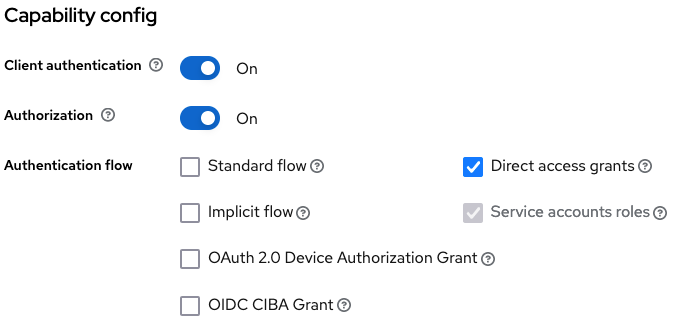
Alternatively, a resource server may also opt to use Client Id and Secret instead of keys from a JWKS. The above client configuration for such resource servers would be adjusted as shown below:
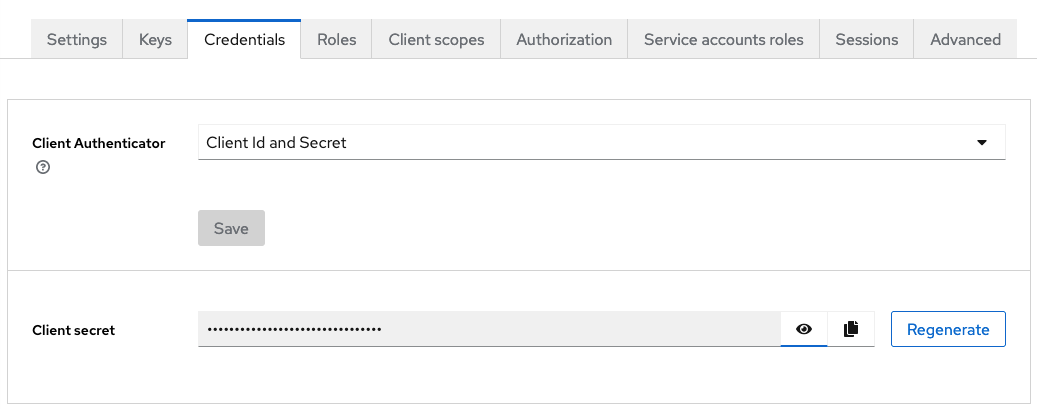
Clients configured like this can communicate with Keycloak by providing the Id and Secret in their requests to Keycloak.
Here's an example of logging in a user by directly asking for their username and password.
import { HttpService } from '@nestjs/axios';

// ...setting up the payload
const params = new URLSearchParams();
params.append('grant_type', 'password');
params.append('username', username);
params.append('password', password);
params.append('client_id', this.client_id);
params.append('client_secret', this.client_secret);

// ...making a login request
const response = await this.httpService
.post<LoggedInUserDto>(this.issuer.metadata.token_endpoint, params, {
  headers: {
    'Content-Type': 'application/x-www-form-urlencoded',
  },
})
Similarly, for refreshing the token received from the above request, the payload would just have a different grant_type and refresh_token instead of the username and password.
const params = new URLSearchParams();
params.append('grant_type', 'refresh_token');
params.append('client_id', this.client_id);
params.append('client_secret', this.client_secret);
params.append('refresh_token', refreshToken);
Here, the client provides a password login and token refresh endpoint. This kind of setup should only be used for internal or trusted applications, such as an internal dashboard, to create users and assign permissions to them. For external applications using your microservices or API gateway, it is understandably never a good idea to make the users log in by providing your platform's login credentials directly to their external server instead of via the OAuth standard flow.
A Keycloak instance, after a configuration like the one above, can then be configured to use by your API Gateway. On AWS, you can add Keycloak as a gateway extension, either as a lambda or a regular server instance. Beyond this, microservices also sometimes need to authenticate themselves instead of authenticating a request on behalf of the user. Especially the configuration server in your microservices' fleet needs a careful setup and Keycloak integration.
In the upcoming posts of this blog series, we will explore the more involved aspects of Keycloak-based microservices.
Thank you for reading. Stay tuned for part 2!