

Gradient banding is when the gradient looks like it has been separated into distinct bands instead of appearing smooth. Banding happens when enough tones are not available to recreate a seamless gradation. Banding is most common in 8-bit images with heavily compressed image files, but it may also appear when you use uncompressed images.
One simple solution to gradient banding is to increase the quality of the image you are using, but it is very size-consuming to use high-quality images for every gradient you want to use. So, I will discuss alternative solutions that do not require drastically changing the image size you are currently using in Unity.
Solution A: Export Using Bicubic Interpolation

This method is very useful if you have the original gradient image in Photoshop. Photoshop provides a lot of resampling options when exporting an image:
- Bicubic
Bicubic Interpolation interpolates data using cubic lines or other polynomials on a regular two-dimensional grid. Cubic or cubic spline interpolation is used to draw smooth curves through several points based on the engineer's tool. This spline consists of weights attached to a flat surface at the points to be connected. - Bicubic Smoother
Bicubic Smoother works similarly to Bicubic resampling, but it gives a smoother result that handles subsequent sharpening better than Bicubic sampling. - Bicubic Sharper
While Bicubic resampling produces smoother tonal gradients than nearest neighbour bilinear, Bicubic Sharper resamples images with enhanced sharpening. To maintain details in an image, use this sampling method for a sharp and detailed result in your picture. - Bicubic Automatic
This method automatically detects where to upsample or downsample the image and chooses to do bicubic sharper/smoother as required. - Nearest Neighbor
The Nearest Neighbor resampling method adds new pixels following the existing pixels. This method detects the nearest pixel and assumes the current pixel to have the intensity of the nearest pixel. It is very useful for upscaling pixel graphics.
We can also use the Bilinear Resize Algorithm in Unity. Use the Bilinear Resize Algorithm from Inspector after choosing your image.
The Bicubic resampler will give us the smoothest gradient out of all these resampling methods.
Solution B: Unity HQ Bicubic Interpolation
Unity itself has a few resampling methods that you can use for your images.

In your image settings, set the Resize Algorithm to Bilinear and change the compression from Normal to High Quality.

After applying the change, you can see the results as follows:

The smooth image is the result of high-quality compression. This method, unfortunately, increases the size of the image in the unity build, but it is better than other ways to resolve gradient banding.
Here are the before and after sizes of the image while using high-quality compression.
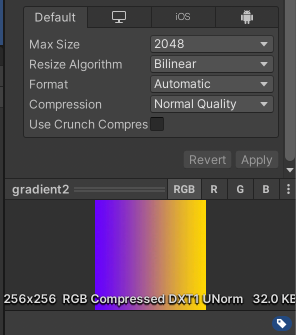
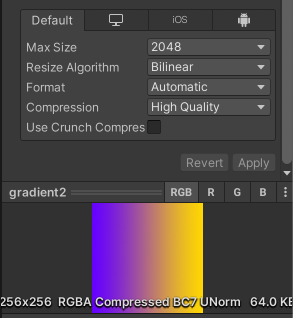
You can see that the size of the image increased to 64kb from the initial 32 kb, but this method is still the best among other methods that can be used to resolve the gradient banding.
Solution 3: Using the 32-bit Format
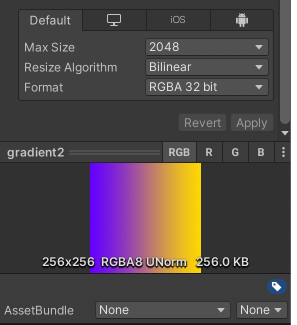
Another solution is to use a 32-bit RGBA format on the image. This will naturally resolve gradient banding because there are more colours available in this format, which results in the smooth transition of the gradient colors.
However, this will result in a massive increase in the size of the image due to the same reason i.e increase in color format i.e 32-bit RGBA. The increase in the size from the initial size can be seen below:
Thus we can see the various methods used to resolve the gradient banding along with their pros and cons. Choose the suitable method according to your needs!