
Introduction
Checklist-based testing is one of the most widely used software testing approaches in recent years. It provides a structured way of testing by utilizing the predefined checklist created before the actual testing is done. It is basically a list of predefined steps or specific tasks related to the software testing that should be completed one after another while performing both manual and automation testing. It also plays a major role in keeping track of the testing progress to ensure that all the specified tasks have been completed. It involves creating a list of tasks that should be verified in your software before considering it ready for release. This testing approach is most commonly used for Website Testing and Game Testing.
Procedure to Perform Checklist-Based Testing
Step 1: Gather the testing requirements
The first step of any testing procedure is to gather all the testing requirements and documentation. The testing requirements involve the testing tools, test environment, test data, test cases, test scenarios, areas to be tested, preconditions, and the expected results.
Step 2: Create a checklist
After gathering all the testing requirements, a detailed checklist based on your software should be created to list what should be tested along with the scenarios to test the conditions. It must involve both functional as well as non-functional testing. Once the checklist is created from your side you can either review it with the team lead or the peer review can be done to check out for any missing aspect to ensure the overall coverage of the project.
Step 3: Assign a tester
Once the checklist is reviewed, it can be handed over to the testing team so that they can perform the testing activities based on it. The testing team must be able to analyze the checklist to figure out the priority order to be followed while testing. The critical functionalities should be prioritized first, followed by the less critical ones.
Step 4: Execute the test and Update the Check box
At this point, the tester should be able to execute each test based on their priorities, document the outcome of each test, and report any issues or deviations found while testing. The tester should tick the check box once the particular action representing that particular check box is completed successfully.
Step 5: Review and Update the checklist
Since the requirements are changed repeatedly, using the same checklist every time for testing will not be efficient and reliable. The checklist should be kept up to date with all the new changes that occur in every iteration of the updated version of the software. Therefore, it must be updated repeatedly based on the testing requirements.
Advantages of Checklist-Based Testing:
- Guides testers through the step-by-step testing procedure.
- It avoids confusion by introducing an organized approach to testing.
- It guarantees that all test regions are completely covered.
- It offers flexibility since it may be changed on a project and necessity basis.
- When the test is finished, tracking progress by clicking a checkbox is much easier.
- It is simple to identify recurring concerns.
- Provides a clear view of the high-priority task followed by the low-priority task.
- It helps to encourage the collaboration among the team members.
- It improves the overall efficiency of the test operation.
- It can be used as a reference for new project team members.
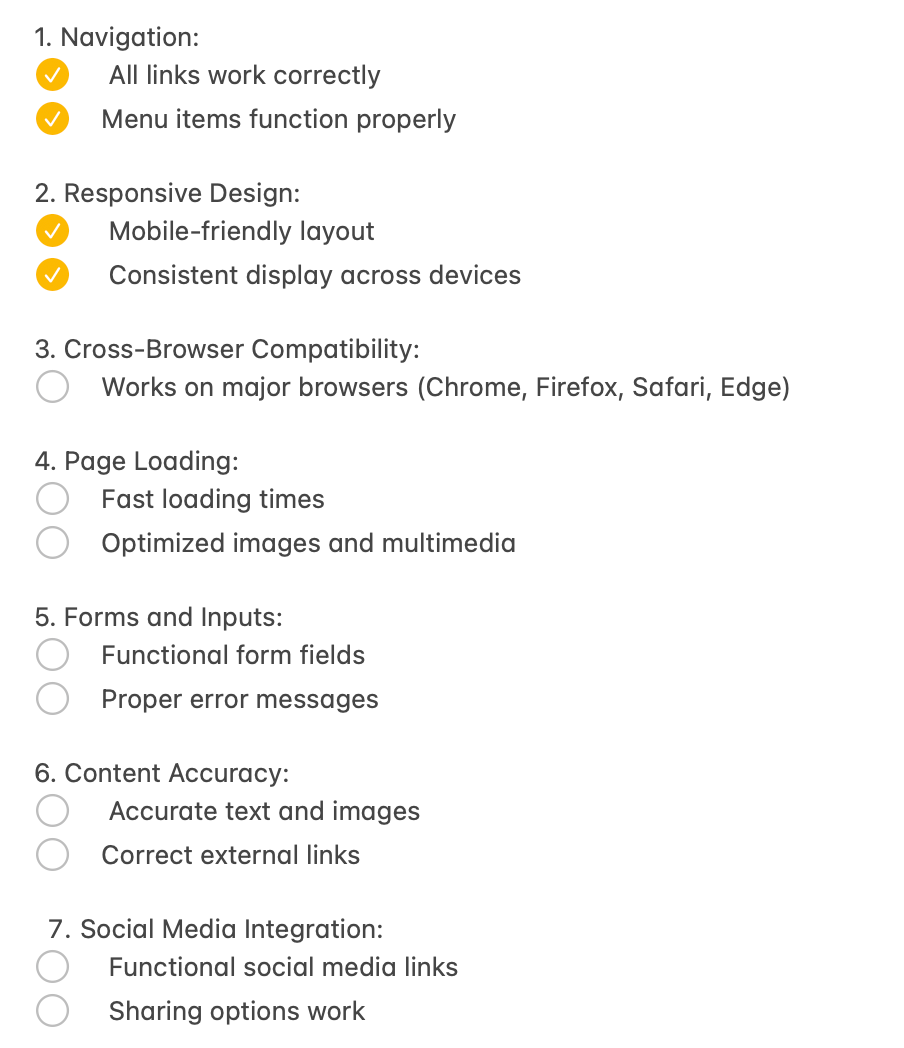
Essential Areas for Website Testing Checklist:
- Checking Functionality: Ensure that all the buttons, links, and forms work properly and that navigation is easy and straightforward.
- Appearance Assessment: Confirm that the website appears appealing on devices with consistent colours, fonts, formats, videos, and images.
- Input Testing: Evaluate typing functionality within boxes and forms to ensure they work correctly and review the clarity and helpfulness of any error messages provided.
- Speed Check: Verify the website's loading speed under traffic conditions to ensure performance.
- Security Evaluation: Ensure the website is secure against data breaches and uses connections to protect company and customer information.
- Compatibility Testing: Test the website on different devices and browsers to ensure it works well everywhere.
- Internationalization Testing: Check if the website supports languages effectively and accurately displays important information, dates, and currency.
- Integration Testing: Test how well the website interacts with services like payment gateways and social media platforms.
- User-Friendliness Evaluation: Evaluate whether the website is user-friendly for all users in terms of ease of use. Ensure the website can be easily used by both technical and non-technical people.
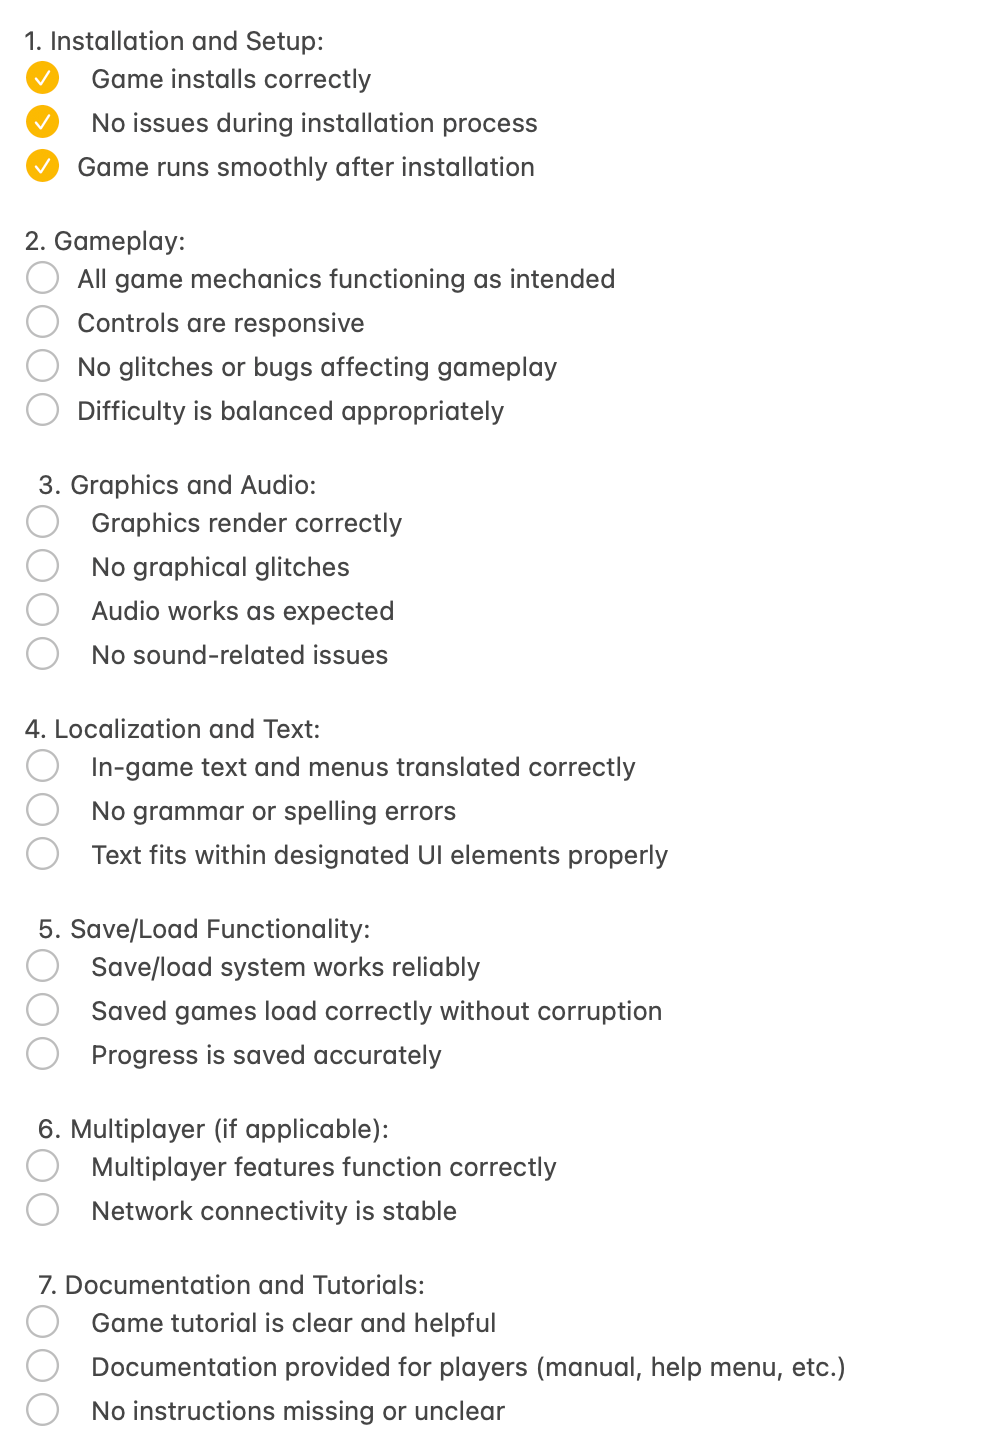
Essential Areas for Game Testing Checklist:
- Game-play Mechanics Testing: Ensure that all the different actions and features in the game work properly, such as fighting, solving puzzles, or using special abilities.
- UI/UX Testing: Check that all the buttons and menus are easy to use, clickable, and look good. Also, see if they work well on different screen sizes.
- Performance Optimization Testing: Test to ensure the game runs smoothly without any slowdowns or glitches, especially on different devices.
- Network Testing: Test your games in multiple network conditions, such as data, hotspots, and various WiFi speeds.
- Progression Testing: Check if the story changes based on what the player does and if those changes make sense and keep the game interesting.
- Event Testing: Test events during the game to ensure they occur when they're supposed to and don't mess up the game.
- Audio Testing: Make sure all the sounds in the game, like music and special effects, sound good and happen at the right times.
- Balance Testing: Check if the game feels fair and fun as players play it, ensuring it's not too easy or hard.
- Multiplayer Interaction Testing: Check if players can play together smoothly, like talking to each other or competing against each other online.
Conclusion
Ultimately, the checklist is a perfect tool for testers to mark their checkpoints while ensuring all the areas are picked up in the test phase. By introducing this method, teams can perform better as their level of accountability rises. They also become more organized, reflecting better, more reliable, and more stable products.
Thank you for reading this article. Please consider subscribing for more such articles