
In a variety of mobile and PC games, we can see fluffy sprites dropping down on your screen which provides somewhat of a good chewy and cartoonish effect. Today we will be creating a fluffy sprite that interacts with other bodies to deform itself. There are many ways to recreate this but we will be using a very simple approach towards it using line renderers and hinge joints.
Here's a demo of what it will looks like in the end:

Getting Started
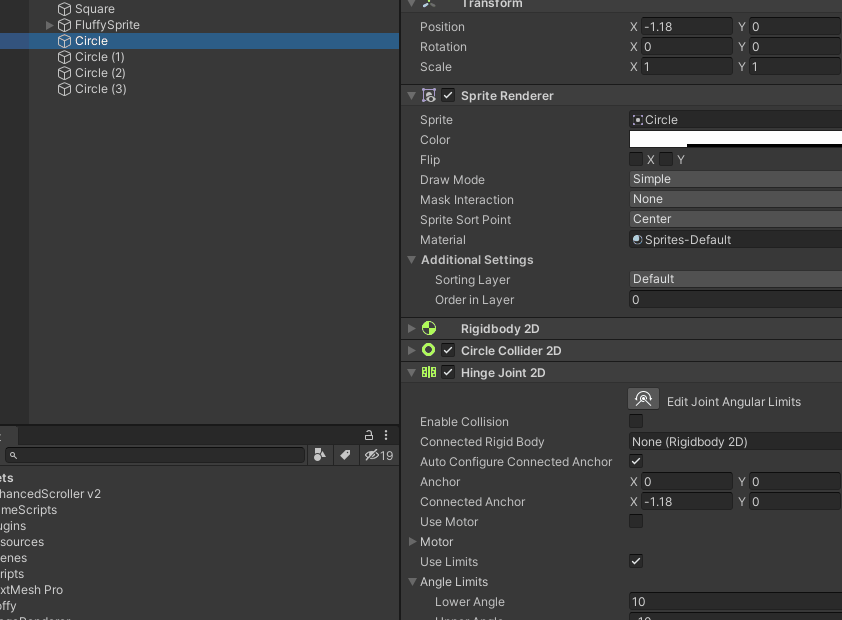
So after you setup a standard unity project with a startup scene and the main camera you will have to create a 2D sprite circle, after the circle creation you need to add a rigidbody 2D and a 2D circle collider to it so that it can interact with other objects and have its physics. After doing that you can create a bunch of circles overlapping each other equal to the size of the object you want to make fluffy . After doing that you need to add a hinge joint 2D to all of the circles you create except the last circle because we don't want our line to be deformed at the end as it will not look good. Also, make sure to go into the inspector of all the hinge joints and enable the Use Limits option and then add your lower angle limit to -10 and upper angle limit to 10. After doing that your output should look like this :

After completing this, you will have to setup your hinge joints to connect the joints respective to each other. In order to do that you will have to select the circle you want and its connection body. For eg: To connect circle 1 and circle 2 together you will need to select circle 1 and drag circle 2's rigidbody to its connected rigidbody refrence. So like that, you will have to connect circle 1 with circle 2, circle 2 with circle 3, circle 3 with circle 4 and so on. Here's a gif demo of it :
After doing this you can see your object getting fluffy in play mode. After doing this you need to select your first circle in your list and add a line renderer to it so it can be visible in both editors and in play mode. After adding linerender to your first circle transform it might look like this in your editor :

If you want your line renderer to have more smooth and circular edges you will have to increase its end cap vertices which will provide you with a more circular edge like this :

After doing this we will create a simple script that will render your line renderer in both editors and play mode, as well as set your hinge joints transforms more visible with the line renderer. For that we will create a class called image renderer which will look like this :
public class ImageRenderer : MonoBehaviour
{
    [SerializeField] private LineRenderer _lineRenderer;
    [SerializeField] private List<Transform> transforms;

   void Start()
   {
       _lineRenderer.positionCount = transforms.Count;
   }

    // Update is called once per frame
    void Update()
    {
        _lineRenderer.SetPositions(transforms.Select(p=>p.position).ToArray());
    }

    private void OnDrawGizmos()
    {
        _lineRenderer.positionCount = transforms.Count;
        _lineRenderer.SetPositions(transforms.Select(p=>p.position).ToArray());
    }


}
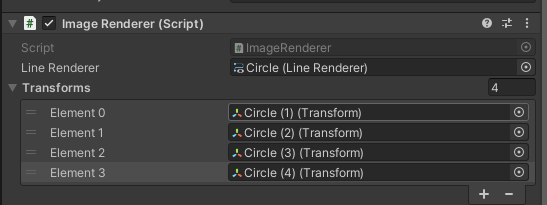
So in this script, we create a reference to the LineRenderer which is assigned from the inspector where we assign the line renderer we created in the first circle. This script is attached to the first circle gameobject which has the line renderer. So in start, we assign the line renderer with its vertices that are position counts which are obtained from the transform list of all the circles we created. Then in the update, we set this linerenderer's position respective to our list of transform's position. We created OnDrawGizmos because it will run in the play mode providing us with a preview of our generated line renderers, and also this function will not get compiled into your builds it is made for DEBUG / editor use only. Finally, in the transform's list section of the script all you need to do is assign all your circle's transform in the inspector like this :
This is it with all these you will be able to create your own fluffy sprites for your games, you can also play around with the line renderer and hinge joint settings for more suitable outcomes according to your needs. Note : If you want your line renderer to have a texture or an image you can create a basic material and assign it to the line renderer's material