
As stated by Unity's official document, EditorGUILayout is a version of EditorGUI with auto layout feature. It is a UI property provided by Unity to be applied in the Unity Editor using a custom editor script. Using the properties of EditorGUILayout , you can create your own version of an element with specific features.
Components of EditorGUILayout
EditorGUILayout is composed of three components:
- Editor – allows viewing or entering visual components for a program.
- Graphical User Interface (GUI) – enables viewing and managing interactions on-screen.
- Layout – is the arrangement of items.
You might have noticed EditorGUILayout and the normal UI components of Unity are alike, and their functions are the same. However, the difference is that the normal UI is applied in the scene of the Unity Editor, whereas EditorGUILayout is applied to the Unity Editor's Inspector and also helps provide the required feature to the target script.
With the help of the elements provided by EditorGUILayout, you can add or organise the properties of the custom editor's target script.
Elements of EditorGUILayout
If you know about the custom editor and how to use it, you might want to add new elements to the target script, which is possible with EditorGUILayout.
Before that, let's organise the elements given by the EditorGUILayout to our own custom types to understand them better.
Organising the elements
EditorGUILayout has various elements, most of which aren't officially categorized in the official Unity documentation. But, for our easy understanding, we will classify them into five categories.
Input fields
These elements allow you to enter or change the value that falls under the input fields. They are:
IntFieldFloatFieldTextFieldPasswordFieldColorFieldVector2Field,Vector3Field,Vector4Field
Labels
These elements display the text or give descriptive information about other elements. There are only two elements that come under this category, and they are:
LabelFieldFoldout
Selection controls
These elements allow selections of single or multiple options from the various options. Such as dropdowns, menus or toggle buttons. Five elements can be categorized under selection controls. They are:
PopupEnumPopupObjectFieldLayerMaskFieldTagField
Layout controls
These elements are responsible for layout management (i.e. UI arrangement). These elements properly manage the spaces between them by grouping them and managing scroll areas. The elements are:
BeginHorizontalEndHorizonalBeginVerticalEndVerticalFlexibleSpaceSpaceBeginScrollView
Custom controls
The elements which allow you to create your own custom UI by combining other elements for a specific purpose and functions are grouped under custom controls. There are no elements which can specifically be grouped under this category. All the elements that can be used and have been used together to form a feature of our requirements are categorized under custom controls.
EditorGUILayout may not be listed in the category as they may not fit properly. You can easily re-categorize the elements as per your requirement.Now that the elements are listed under categories based on their features, we can easily find them by searching for the category title. You can customise category lists per the element's functions and needs.
Description and Examples of the Elements
As we listed the elements without details, let's introduce them by creating a simple C# script in Unity. We plan to make a custom editor script targeting the elements and show examples of their usage using the two scripts.
First, let's create a simple script TestScript.cs and attach it to a GameObject in the Unity Editor. Also, create a custom editor script named TestScriptEditor.cs within the Editor folder under the Assets folder.
Once you're done with the setup, we can start learning about EditorGUILayout's elements, along with their examples.
1. Input fields
Input fields refer to the elements allowing us to enter and modify values. So, we need data types like string, integer, and boolean in the target script, whether hidden or shown in Inspector. Let's add some variables in TestScript.cs file, which will be handled by the input field elements from the custom editor script.
using UnityEngine;

public class TestScript : MonoBehaviour
{
    public string strVal;
    public string passVal;
    public int intVal;
    public float floatVal;
    public bool boolVal;
    public string passVal;
}
TestScript.cs with input field variables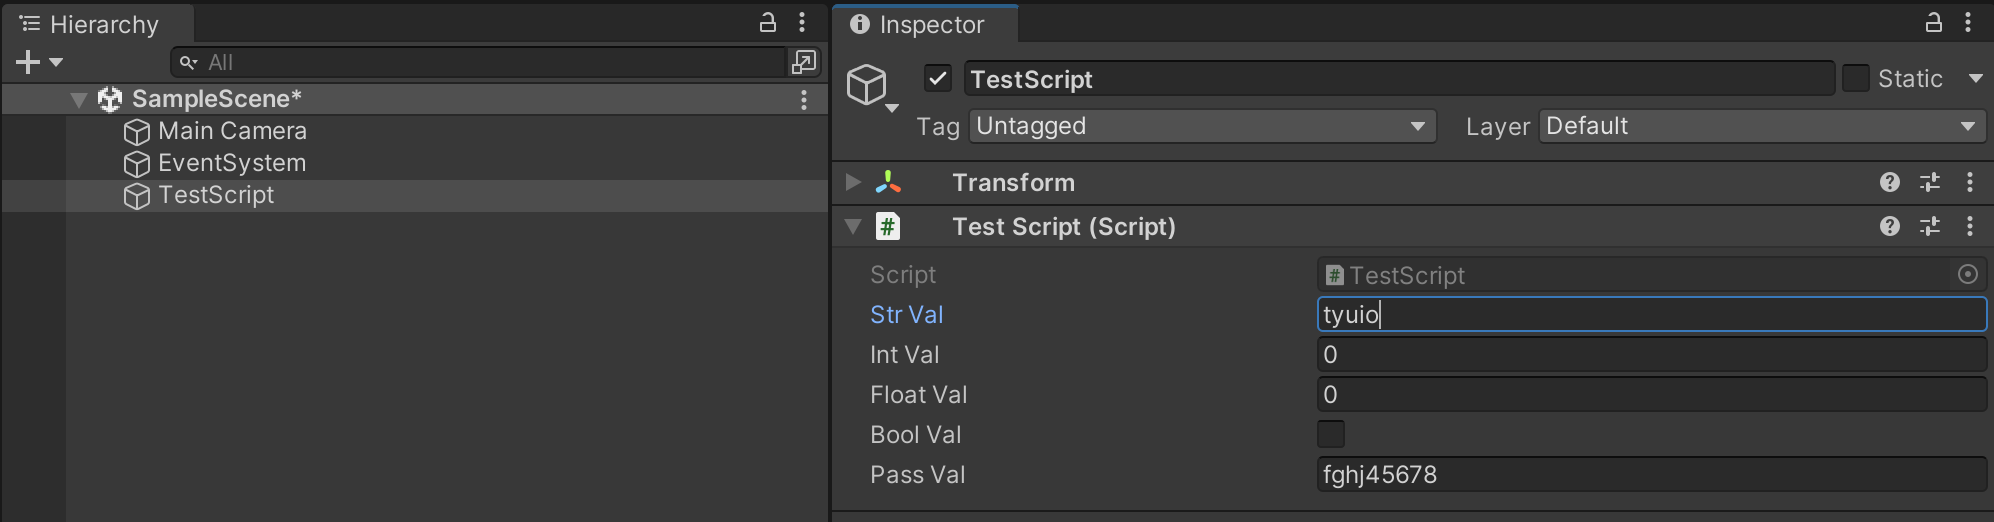
TestScript.cs fileThese input field variables will later be handled using the corresponding input fields of EditorGUILayout from the custom editor script.
Elements of input fields
IntField: It displays a field to enter integer values only.StringField: It displays a field to enter string values only.PasswordField: It displays a field to enter the value of the target field. It can be a string, integer or float. The entered value will be hidden with an asterisk sign (*), as the password should be hidden from public view.FloatField: It displays a field to enter float values only.BooleanField: It displays a toggle field.ColorField: It opens a colour pick panel, where you can choose the colour and assign it to the field.
Let's assign the input field elements in TestScriptEditor.cs file to the corresponding variables in the TestScript.cs.
using UnityEditor;
    using UnityEngine;


    [CustomEditor(typeof(TestScript))]
    public class TestScriptEditor : Editor
    {
        private TestScript testScript;

        private void OnEnable()
        {
            testScript = (TestScript)target;
        }

        public override void OnInspectorGUI()
        {
        	testScript.passVal = EditorGUILayout.PasswordField("Password", testScript.passVal);
            testScript.strVal = EditorGUILayout.TextField("String", testScript.strVal);
            testScript.intVal = EditorGUILayout.IntField("Number", testScript.intVal);
            testScript.floatVal = EditorGUILayout.FloatField("Float", testScript.floatVal);
            testScript.boolVal = EditorGUILayout.Toggle("Boolean", testScript.boolVal);
        }
    }
TestScriptEditor.cs file with input field elementsIn the above example, OnEnable() initialises the target script, i.e., TestScript.cs. The OnInspectorGUI() is overridden to provide the custom UI functionality for it, and the following layout is applied to its corresponding variables.
PasswordFieldis assigned to thePassValofTestScript.csfile and its label to be viewed in the Inspector is set toString Value. The text is hidden with the asterisk sign (*).TextFieldis assigned to thestrValofTestScript.csfile and its label to be viewed in the Inspector is set toString Value.IntFieldis assigned to theintValofTestScript.csfile and its label to be viewed in the Inspector is set toInteger Value.FloatFieldis assigned to the float variablefloatValofTestScript.csand its label is set toFloat Value.Toggleis assigned to the boolean variableboolValofTestScript.csand its label is set toBoolean Value.
After adding all these input fields, the Inspector will look like this:
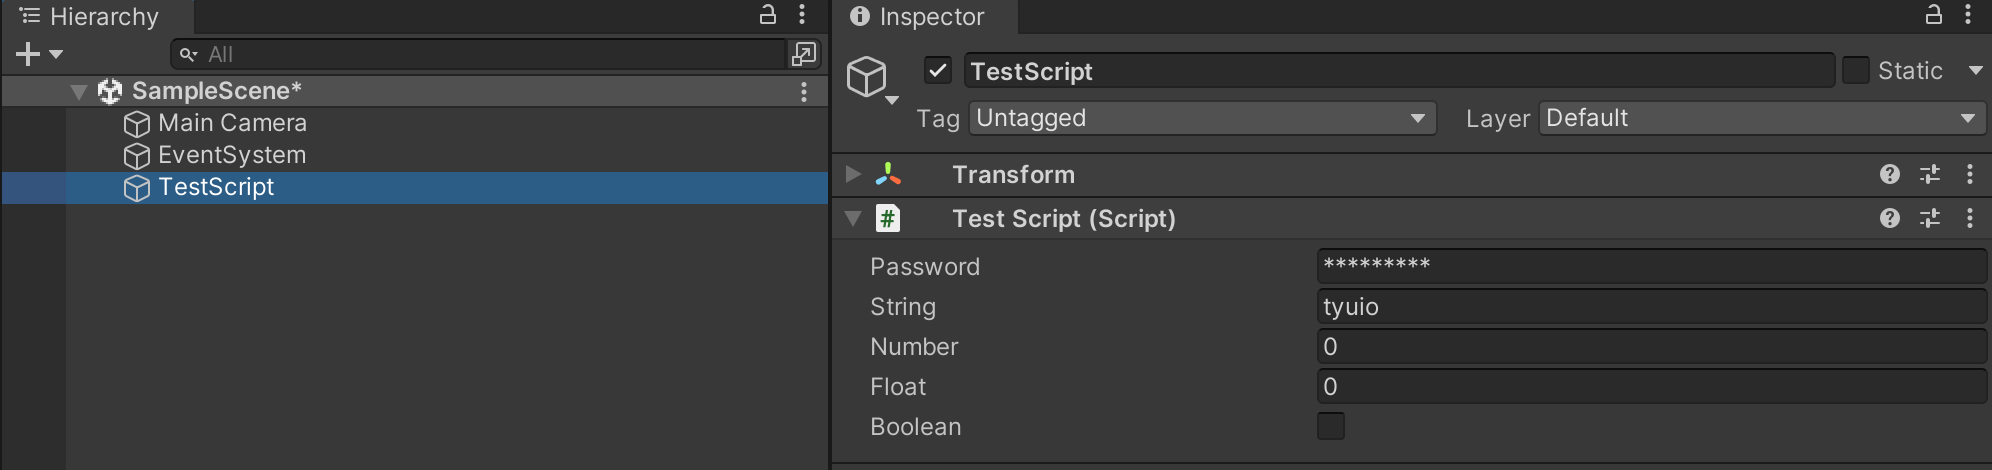
TestScript.cs file in Inspector after adding custom editor scriptOn seeing Fig.1 and Fig.2, it might seem that the label of Fig.1 has been overridden with new labels for the variables we assigned in the TestScriptEditor.cs file. However, that is not the case. The only change made in the custom editor script is that the variables declared in the target script haven't been shown, and a new corresponding variable with a new label is assigned.
By adding base.OnInspectorGUI() as the first line in OnInspectorGUI() in the custom editor script, all the declared variables will be shown in the Inspector along with the new fields introduced from the custom editor script.
The Inspector will then look like this.
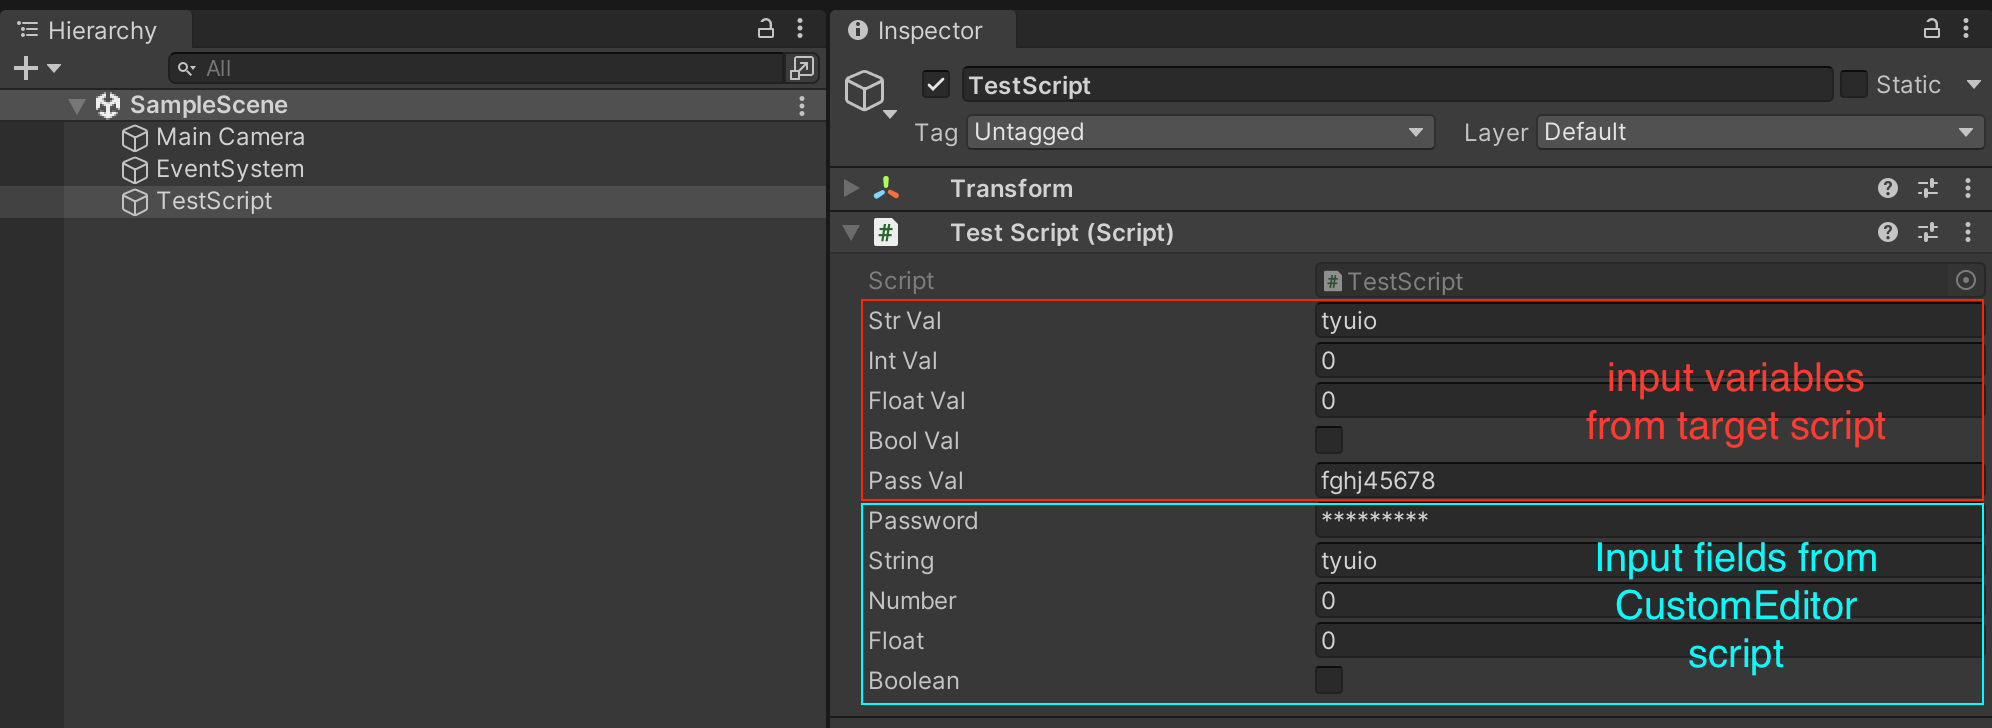
base.OnInspector() to the custom editor scriptFinal Note
You can create a new field in the Inspector of the target script using the private variable assigned to the custom editor script. However, they can only be used to support the existing variables of the target script. So, the things to note are:
1. The variables declared in the custom editor script are for support and visibility only. It can't be used directly from other scripts, even if it is the target script of that custom editor script.
Example:
private int testInteger;

        public override void OnInspectorGUI()
        {
            testInteger= EditorGUILayout.IntField("Testing Int", testInteger);
     ...............
}

2. The position of the variable shown in the Inspector depends on the arrangement of the declared EditorGUILayout element in the custom editor script of that target script.
That's all for the input field. The next part of this blog series will describe other categories and their related elements. Make sure to comment if you have any questions.
Thank you for reading, and subscribe using either of the buttons below.