
Hello everyone, today we will learn an intermediate level Unity programming skill which will be very helpful if you want to create editor tools and make your created packages and plugins easily usable.
What Will We Accomplish in this Blog?
- Creating an Inspector GUI
- Creating an Editor Window
- Serializing classes in Editor Window
- Reading values from Editor Window
This might be a long process, so we will divide the workflow into three steps
Step 1: Creating a Data Class
Begin by creating a MonoBehaviour class that keeps our information for creating the Editor Window.
 /// <summary>
    /// Enum of animation types
    /// </summary>
    public enum AnimationType
    {
        SlideType,FadeType,ScaleType
    }
    /// <summary>
    /// This Data Class has objects of Animation Type classes and we are going to display data from those classes
    /// </summary>
    [Serializable]
    public class DataClass : MonoBehaviour
    {
        public AnimationType animationType;
        public AnimationTypeSlide slideAnimation ;
        public AnimationTypeFade fadeAnimation;
        public AnimationTypeScale scaleAnimation;

    }
/// <summary>
/// Below animation classes has 2 different variables which will be visible in editor window.
/// </summary>
    [Serializable]
    public class AnimationTypeScale
    {
        public float finalValue;
        public bool isLoop;
    }

    [Serializable]
    public class AnimationTypeFade
    {
        public float finalFadeValue;
        public float animationDuration;
    }

    [Serializable]
    public class AnimationTypeSlide
    {
        public float finalPosition;
        public bool slideBoolean;
}This class stores all the variables we will be using; it's that simple. It stores the variable so they can be displayed in the Editor Window. So, only this class will be attached to GameObject in the Editor.
Step 2: Creating Inspector GUI
Now we will provide options in the Inspector Window in the Editor to choose the class we will display in Editor Window.
    /// <summary>
    /// This class is to create Inspector GUI and read enum values to create Editor Window.
    /// </summary>
    [CustomEditor(typeof(DataClass))]
    public class DataEditor : Editor
    {


        private DataClass _dataObj;
        private AnimationType _animationType;

        public override void OnInspectorGUI()
        {

            _dataObj = target as DataClass;
            AnimationType newValue = (AnimationType) EditorGUILayout.EnumPopup(_animationType);
            if (newValue != _animationType)
            {
                _animationType = newValue;
                Debug.Log("New enum is "+newValue);

                WindowCreator.ShowWindow(newValue,_dataObj);//Creating Editor Window for enum value changed.
            }

        }


}This DataEditor class controls variables to be visible in the Inspector window (for now, we display only the enum value). The user will then select the required enum , and the DataEditor class will send a request to the WindowCreator class to create a window and fill in the specific values.
Step 3: Creating Editor Window
Finally, we create the Editor Window with the help of a WindowCreator class that derives from the EditorWindow class and fills data in it.
 /// <summary>
    /// This class is responsible to create Editor Window and fill it.
    /// </summary>
    public class WindowCreator : EditorWindow
    {
        /// <summary>
        ///For understanding Serialized object is like object of a class
        /// In our case it will be DataClass.
        /// </summary>
        private SerializedObject _serializedObject;

        /// <summary>
        /// Serialized property is like variable of SerializedObject.
        /// In our case it will be variables in DataClass.
        /// </summary>
        private SerializedProperty _serializedProperty;

        private static DataClass _dataClassObj;

        /// <summary>
        /// This variable will be used to get specific serializedProperty or say variables in DataClass
        /// </summary>
        private static string _animationName;

        [MenuItem("Window/WindowCreator")]
        public static void ShowWindow(AnimationType type, DataClass dataObjR)
        {
            var window = GetWindow(typeof(WindowCreator));
            _dataClassObj = dataObjR;

            switch (type)
            {
                case AnimationType.SlideType:
                    _animationName = "slideAnimation";
                    break;
                case AnimationType.FadeType:
                    _animationName = "fadeAnimation";
                    break;
                case AnimationType.ScaleType:
                    _animationName = "scaleAnimation";
                    break;
            }
        }

        private void OnGUI()
        {
            if (!_dataClassObj)
            {
                return;
            }
            GUILayout.FlexibleSpace(); //Creates space between elements in window.
            _serializedObject = new SerializedObject(_dataClassObj);

            _serializedProperty = _serializedObject.FindProperty(_animationName);
            DrawProperties(_serializedProperty, true);

            if (GUI.Button(new Rect(10, 10, 200, 30), "PrintValues"))
            {
                PrintValues();
            }
        }

        void PrintValues()
        {
            _serializedProperty = _serializedObject.FindProperty(_animationName);
            ReadDatas(_serializedProperty);
        }

        /// <summary>
        /// This function fills elements in Editor Window.
        /// </summary>
        /// <param name="property"></param>It is a variable in DataClass for eg: slideAnimation
        /// <param name="drawChild"></param>
        private void DrawProperties(SerializedProperty property, bool drawChild)
        {
            string lastPropPath = string.Empty;
            foreach (SerializedProperty p in property)
            {
                if (p.isArray && p.propertyType == SerializedPropertyType.Generic)
                {
                    EditorGUILayout.BeginHorizontal();
                    p.isExpanded = EditorGUILayout.Foldout(p.isExpanded, p.displayName);
                    EditorGUILayout.EndHorizontal();
                }
                else
                {
                    if (!string.IsNullOrEmpty(lastPropPath) && p.propertyPath.Contains(lastPropPath))
                    {
                        continue;
                    }

                    lastPropPath = p.propertyPath;
                    EditorGUILayout.PropertyField(p);
                    Apply();
                }
            }
        }

        /// <summary>
        /// This function reads data from each field in Editor Window.
        /// </summary>
        /// <param name="property"></param>
        void ReadDatas(SerializedProperty property)
        {
            string lastPropPath = string.Empty;
            foreach (SerializedProperty p in property)
            {
                if (!string.IsNullOrEmpty(lastPropPath) && p.propertyPath.Contains(lastPropPath))
                {
                    continue;
                }

                lastPropPath = p.propertyPath;
                Debug.Log(p.propertyPath);
                if (p.propertyType == SerializedPropertyType.Float)
                {
                    Debug.Log("Entered value is " + p.floatValue);
                }
            }
        }

        /// <summary>
        /// This function now allows to enter values in Editor Window
        /// </summary>
        void Apply()
        {
            _serializedObject.ApplyModifiedProperties();
        }
}Output
Now, let's see the output of our program.
Create an empty gameObject and add DataClass.cs to it.
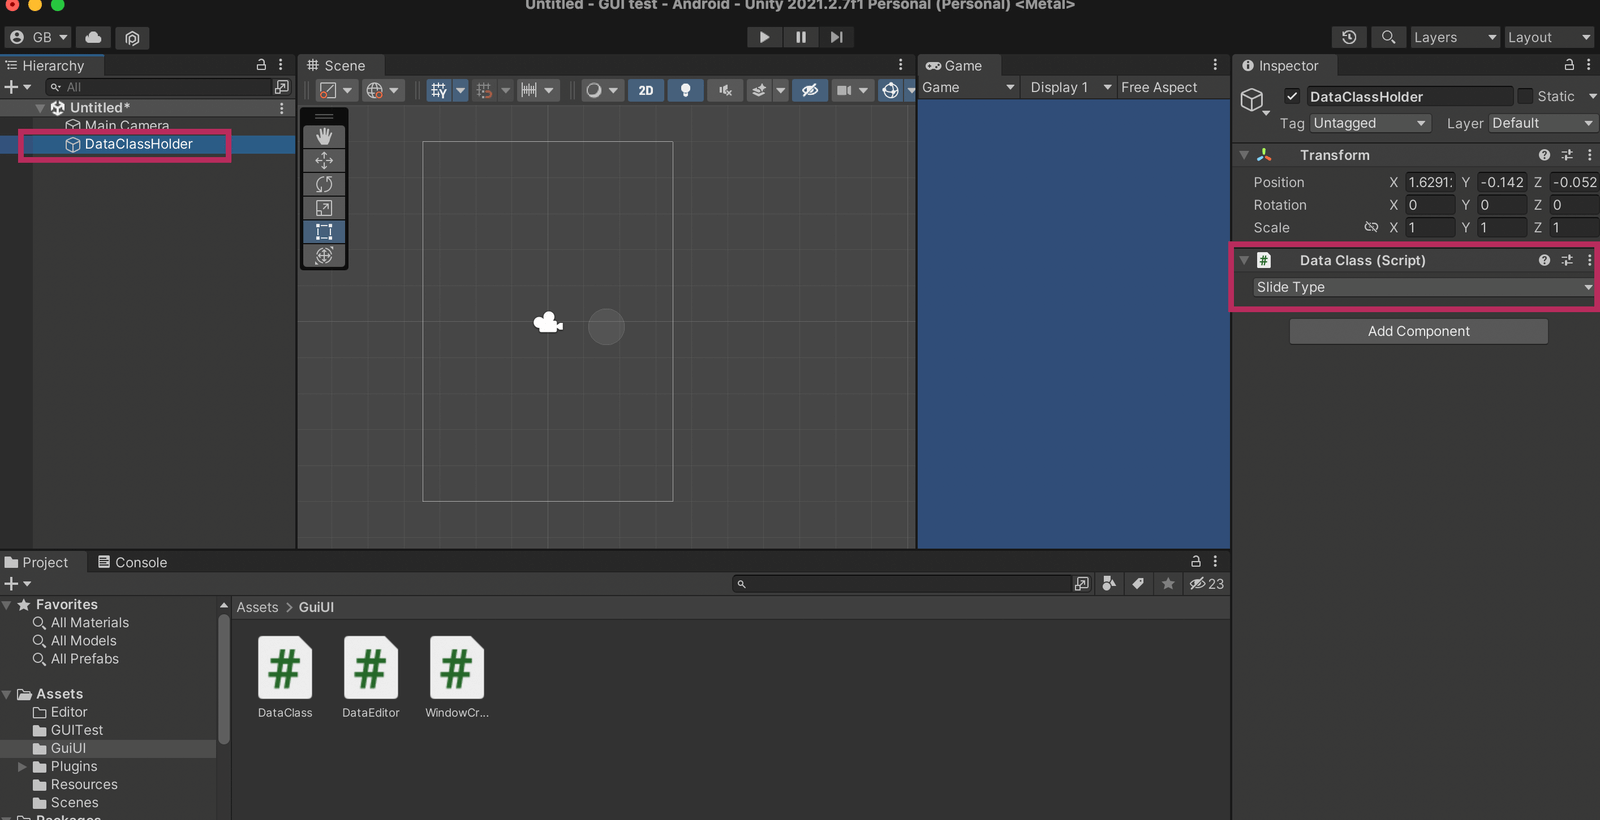
Change the enum values.
We will see a variable field of the respective animation class.
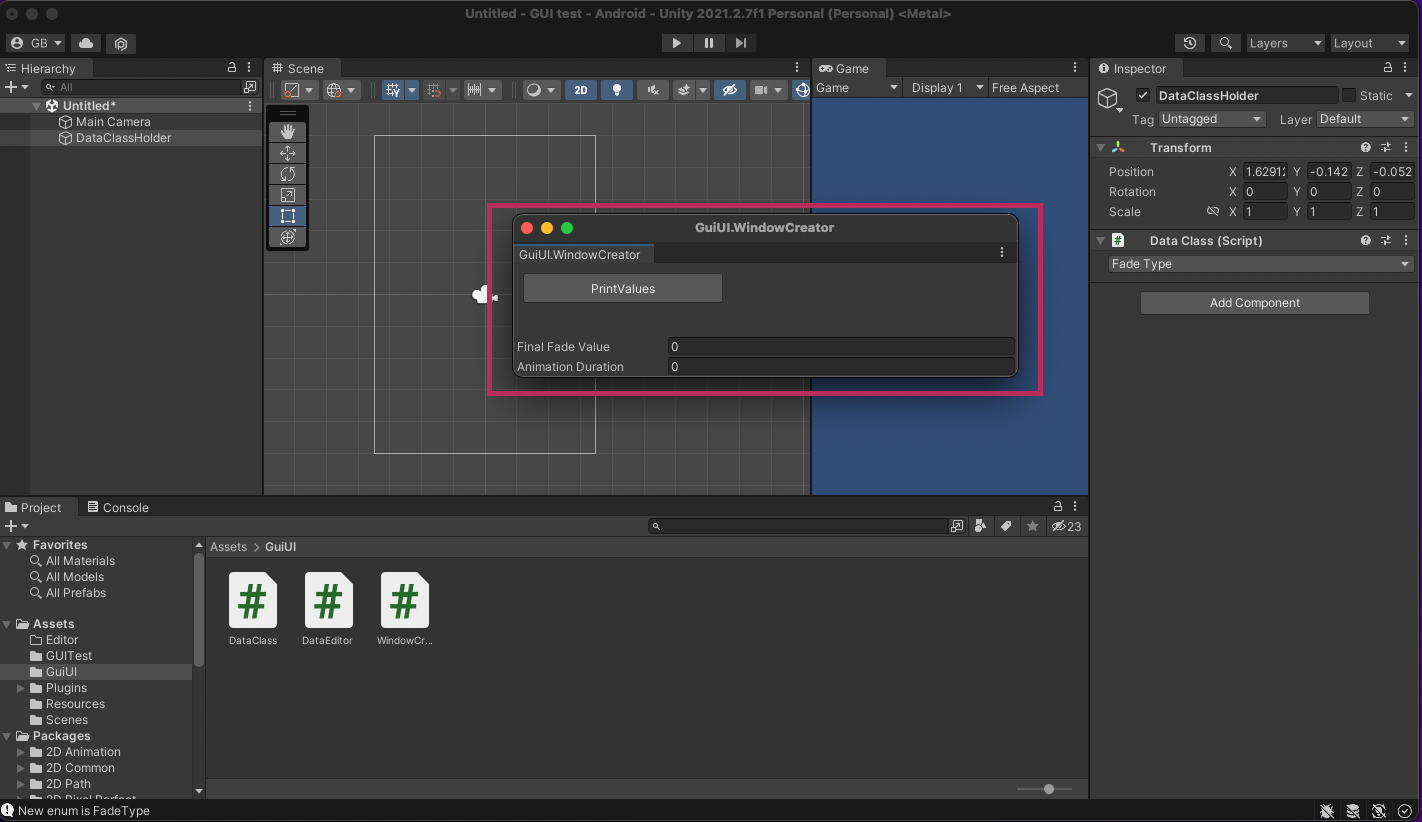
Provide value in the text field and press the PrintValues button
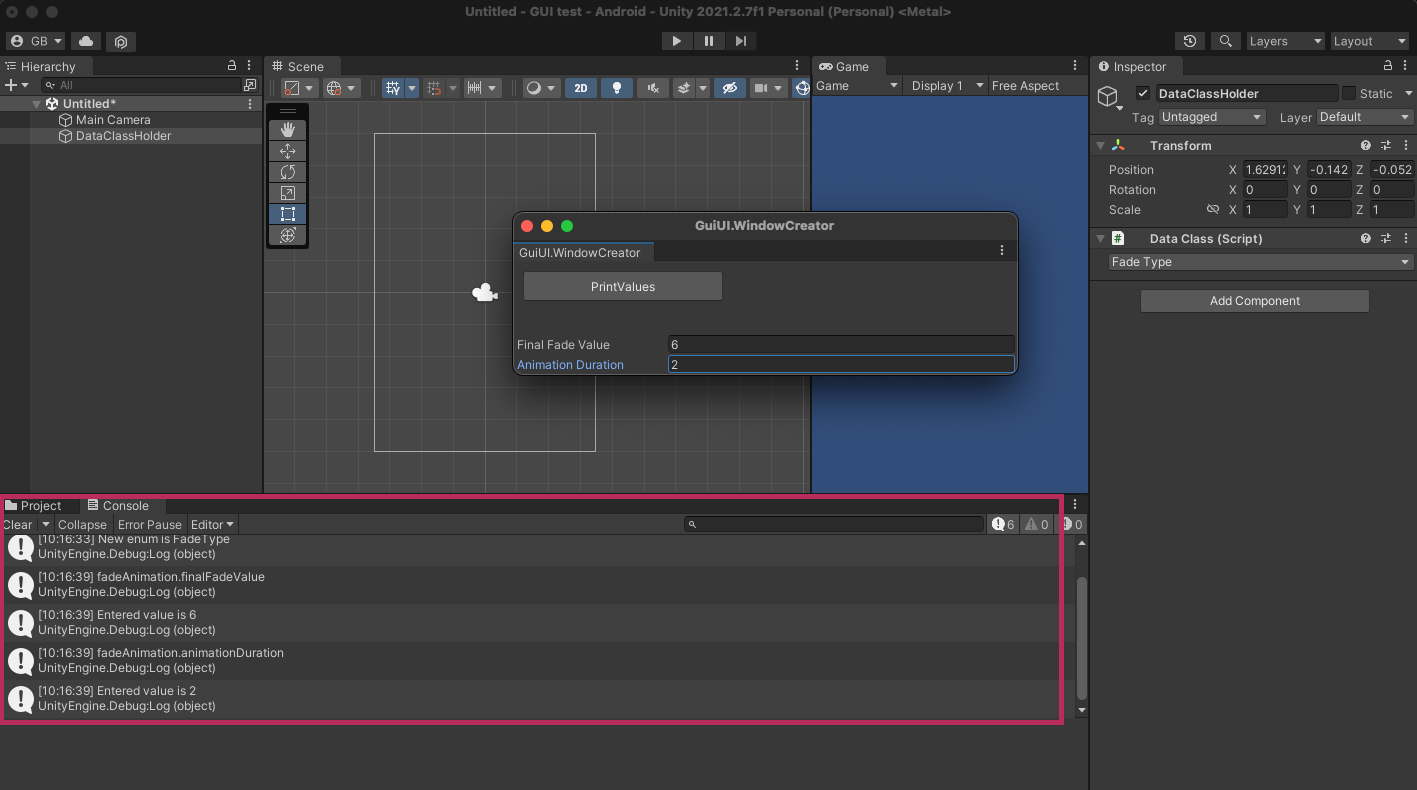
Voila! We see the result as expected.
This is a simple example to fill values in EditorWIndow and fetch them. This feature has many more use cases so feel free to explore them!