
Drone is an open-source CI/CD solution that can do everything based on Docker. Ranging from building images to running them, Drone can accomplish it all.
An efficient continuous integration and continuous delivery (CI/CD) pipeline is essential for quickly and reliably delivering high-quality code. With the rise of containerization and cloud-native technologies, many organizations are turning to Drone to automate their software delivery pipelines. This blog will explore how to set up Drone Server and Drone Runners and write a CI definition file.
Pre-Requisites
- Server (Minimum specs –
RAM: 1 GB,VCPU: 1 Core) - OS – Linux
- Domain name mapped to the server's public
IPV4address
Drone Server Setup
The Drone server is already pre-packaged into a Docker container by the maintainers. Our task will be to set up configuration files that the Drone Docker container will read.
This will generate a 16-character RPC secret that will be used by Drone and its runners to identify each other and authenticate.
openssl rand -hex 16To connect Drone with our GitHub repository, we need to create an OAuth application in GitHub. After creating the app, provide the app Client ID and Client Secret to Drone for authentication.
You can do so by navigating to developer settings in the GitHub settings dashboard. Click on the OAuth app and create the OAuth application.
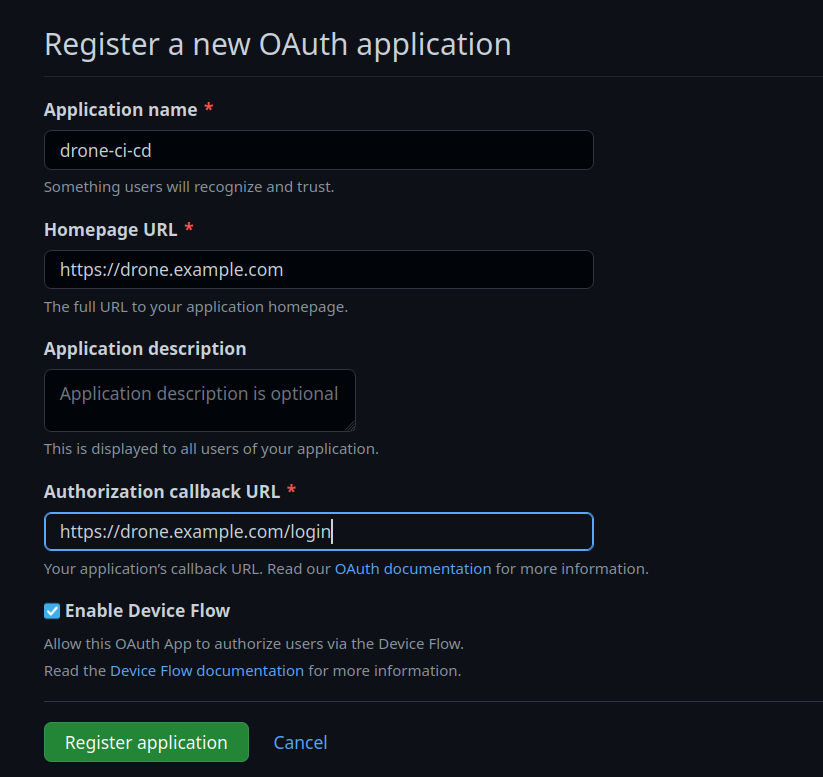
After creating the OAuth application, we should be able to access the Client ID and Client Secret, which we can use to configure our Drone Server.
Let's run the command below to write our configuration to /etc/drone.
cat << 'EOF' | sudo tee /etc/drone
DRONE_SERVER_HOST=drone.example.com
DRONE_SERVER_PROTO=https
DRONE_GITHUB_CLIENT_ID=random-github-oauth-app-client-id
DRONE_GITHUB_CLIENT_SECRET=random-github-oauth-app-client-secret
DRONE_RPC_SECRET=random-generated-secret
DRONE_USER_CREATE=username:notre,admin:true
DRONE_USER_FILTER=users
DRONE_TLS_AUTOCERT=true
EOF/etc/drone filedocker pull drone/drone:latest
docker volume create drone-data
docker run \
--name=drone \
--detach \
--restart=always \
--env-file=/etc/drone \
--volume=drone-data \
--publish=80:80 \
--publish=443:443 \
drone/drone:latestsudo ufw enable
sudo ufw allow openssh
sudo ufw allow 80, 443
sudo ufw statusOnce the setup is complete, you can open the Drone server dashboard using the domain name you mapped to the server's IP address.
Drone Runner Setup
Let's set up the Drone Runners. The Drone runners are responsible for running the tasks we specify on the CI/CD YAML definition file, which consists of all the steps required for a successful build and deployment.
We will set up two types of runners Docker and exec. The Docker runner executes tasks on a container that is spun up every time the pipeline runs, whereas the exec runner runs tasks directly on the host shell.
/tmp/drone.Docker runner
To set up the Docker runner:
docker run \
--name drone-runner \
--detach \
--restart=always \
--volume=/var/run/docker.sock:/var/run/docker.sock \
-e DRONE_RPC_PROTO=https \
-e DRONE_RPC_HOST=drone.example.com \
-e DRONE_RPC_SECRET=random-generated-secret \
-e DRONE_RUNNER_CAPACITY=1 \
-e DRONE_RUNNER_NAME=${HOSTNAME} drone/drone-runner-docker:latestExec runner
Using the command below, download and install the Drone exec runner.
curl -L https://github.com/drone-runners/drone-runner-exec/releases/latest/download/drone_runner_exec_linux_amd64.tar.gz | tar zx

sudo install -t /usr/local/bin drone-runner-exec
We also need to provide the exec runner with a configuration file. The exec runner will then read the configuration file and connect to the Drone server.
cat << 'EOF' | sudo tee -a /etc/drone-runner-exec/config
DRONE_RPC_PROTO=https
DRONE_RPC_HOST=drone.example.com
DRONE_RPC_SECRET=random-generated-secret
EOF/etc/drone-runner-exec/configNow, we will install the drone-runner-exec service and start it.
drone-runner-exec service install
drone-runner-exec service start
drone-runner-exec serviceWriting the CI Definition File
To create a Drone pipeline, you need to define the steps that should be executed when a build is triggered. The steps are defined in a YAML file named .drone.yml that is stored in the root directory of the project's repository.
Here is an example .drone.yml file:
kind: pipeline
type: docker
name: default

steps:
- name: build-and-test
  image: node
  commands:
  - npm i
  - npm run build
  - npm run test

- name: publish
  image: plugins/docker
  depends_on: build-and-test
  settings:
    repo: repository/app
    username:
      from_secret: docker_username
    password:
      from_secret: docker_password
  when:
    branch: master
The type field specifies the type of pipeline, which can be Docker, exec, ssh or Kubernetes.
The steps field contains a list of steps to be executed when the pipeline runs. In the example above, there are two steps:
- The
build-and-teststep downloads the project's dependencies, compiles them and runs tests on the code. - The
publishstep publishes the Docker image to a container registry. It only runs when thebuild-and-teststep is completed successfully.
Each step has a name field that identifies the step and an image field that specifies the Docker image to be used for the step. The commands field contains the commands to be executed when the step runs.
The depends_on field specifies a step or stage dependency that needs to be fulfilled.
The when field specifies the conditions under which the step should be executed.
In the example above, the publish step is only executed when the build is triggered on the master branch.
The settings field contains the settings for the step. In the publish step, the repo field specifies the name of the Docker repository where the image should be published. The username and password fields specify the credentials to authenticate with the container registry. In this example, the credentials are stored as secrets in the Drone server.
Conclusion
In this article, we learned to implement CI with Drone. We also learned to set up the Drone server and the Drone runners.
We will learn to set up an end-to-end CI/CD pipeline in another article.
Please comment below if you have any queries. I regularly update this article to ensure legibility!