
A custom editor is as its name represents. It is created purely for a single script. It focuses on a single script you want the editor to focus on and will update the information in the script and scene as you make any changes.
Why is Custom Editor Extension Essential?
If you're a Unity game developer, you know that the changes you do in any script directly or from the inspector of the Unity Editor will not be applied to the script or its related UI in edit mode. To view the changes that you have done in the script and to be able to see what changes the edited script has made, you need to run the game.
Editing in edit mode and viewing its changes in run mode is the most common but time-consuming process all Unity developers have to go through. Using a custom editor script can significantly reduce the time and effort required to apply and test an item's properties. You can apply the changes directly in the scene in edit mode and will be able to check the several changes made without running the game.
Trying to understand with just the description is a little boring, right? So, let's understand it using a simple example of a ValueUpdater.
Custom Editor using ValueUpdater
As the title suggests, it's a simple value updater which shows the integer value in text. The difference is that you will see the value update in the text as you update its value from the Unity Editor in Edit Mode.
Without wasting any time, let's create this simple value updater.
Step 1: Create UI to show the value in the scene
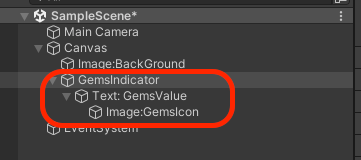
Create an image and a text in the Hierarchy section and give it the look you prefer. I have created the following UI, which represents gems increment.

HierarchyStep 2: Create a script to update the value update UI
Create a ValueUpdater script to update the UI of the said gem value indicator.
public class ValueUpdater : MonoBehaviour
{
    [Tooltip("Text to show the value.")] public Text ValueText;

    [Tooltip("The total value to show in the UI.")]
    public int value;
}
ValueUpdater scriptHere, ValueText is the text you will assign in the Unity Editor. It will represent the value you set for the gems.
Add a method to update the value integer to the text ValueText. This method will be called by our custom editor script, which we will create later to update the UI of the ValueUpdater script in case of a change in the value integer.
    /// <summary>
    /// Update the value integer to the text in ValueText
    /// </summary>
    public void UpdateValueInUI()
    {
        //if the Value presenting text is null don't access it
        if (ValueText == null) return;
        ValueText.text = value.ToString();
    }
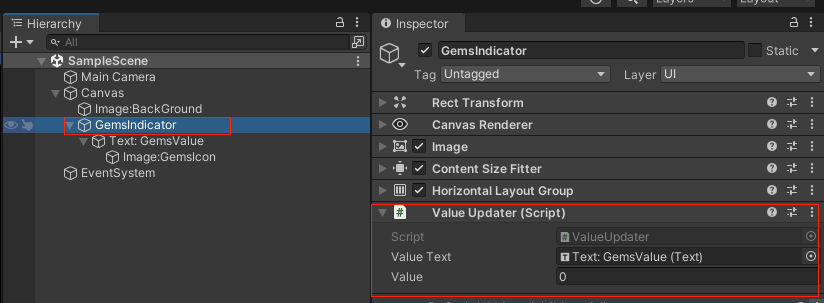
Now, attach the ValueUpdater script to the parent GameObject of the GemsIndicator and assign the Text element to the ValueText.

ValueUpdater script attached to the GemsIndicator GameObjectStep 3: Create a custom editor script to handle the value indicator script
After creating the ValueUpdater.cs script, we can now create a custom editor script for this script. Create it and name it ValueUpdaterEditor for easy recognition.
Editor. If this folder does not exist, you can simply create it. Unity reserves this folder name specifically for custom editor scripts. Failure to add your editor script to the Editor folder may result in errors when running your game.Create ValueUpdaterEditor.cs script in Editor folder and inherit it from Editor.
using UnityEditor;

[CustomEditor(typeof(ValueUpdater))]
public class ValueUpdaterEditor : Editor
{
    /// <summary>
    /// It is updated to the value of the value updater and
    /// is used to change the Ui of the valueupdater script if its value and this value has different value
    /// -1 is given so there will be difference in value compare
    /// </summary>
    private int _value = -1;

    public override void OnInspectorGUI()
    {
        //inherit all the property of the script this script is observing.
        base.OnInspectorGUI();
        //get the target script
        ValueUpdater valueUpdater = (ValueUpdater)target;

        //apply the Ui change only if there is change in the value
        if (valueUpdater.value != _value)
        {
            _value = valueUpdater.value;
            valueUpdater.UpdateValueInUI();
        }
    }
}
ValueUpdateEditor.cs fileHere, [CustomEditor(typeof(ValueUpdater))] is added above the ValueUpdaterEditor class. It indicates that the current script is the custom editor of ValueUpdater class.
CustomEditor above that editor script and define the type of script the custom editor is for. It will look like this:[CustomEditor(typeof(nameOfYourClass))]Replace
nameOfYourClass with your class name.OnInspectorGUI() is overridden. It is done so that we can make changes in the inspector of the ValueUpdater script.
base.OnInspectorGUI() is used to show all the properties of the target script i.e.ValueUpdater script. If you don't want to show the properties of the target script, then omit base.OnInspectorGUI(). For clarification, please refer to the images below.
base.OnInspectorGUI() is used in the custom editor script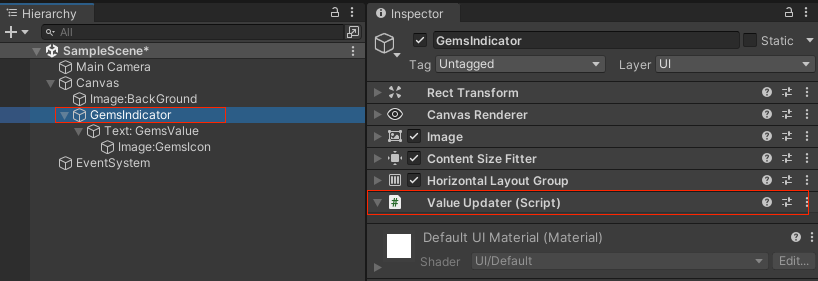
base.OnInspectorGUI() is omitted in the custom editor scriptIn Inspector above, the properties like ValueTextand Value are not visible if you omit base.OnInspectorGUI() when overriding the onInspectorGUI method in the custom editor.
The ValueUpdaterEditor script:
ValueUpdater valueUpdater = (ValueUpdater)target;
In ValueUpdaterEditor script, the script ValueUpdater's instance is referenced using target. We are using its value and the private value – _value to check if there are any differences in the number and apply changes to the ValueUpdater script.
Wrapping Up the Editor Extension
As the preparation is completed, let's test it out.
You just need to select the GameObject, where you attach the ValueUpdater script. In our case, it is a GameObject named GemsIndicator in Hierarchy. Ensure the Unity Editor is in Edit Mode and update the value of the Value integer. You will be able to see that the value you changed in the Inspector is being applied directly in the scene when you are in Edit Mode.

Full Code for ValueUpdater.cs
Here's the complete code for ValueUpdater.cs.
using UnityEngine;
using UnityEngine.UI;

public class ValueUpdater : MonoBehaviour
{
    [Tooltip("Text to show the value.")] public Text ValueText;

    [Tooltip("The total value to show in the UI.")]
    public int value;

    /// <summary>
    /// Update the value integer to the text in ValueText
    /// </summary>
    public void UpdateValueInUI()
    {
        //if the Value presenting text is null don't access it
        if (ValueText == null) return;
        ValueText.text = value.ToString();
    }
}ValueUpdater.cs file.Conclusion
This is only a simple introduction and example of a custom editor extension. There are many things you can do using a custom editor, some of them being:
- Add additional properties to the target script in their inspector.
- Hide or show the properties as per your requirement.
- Display different properties as per the selection done, and many more.
Proper use of custom editors and proper knowledge of their usage will surely help you in game development. It will boost productivity while reducing the production time.
Hope you found this article helpful. If you want to see more articles related to Unity, please leave a comment below. Thank you for reading!