
Making Match 3 Games
Match 3 games are one of the biggest casual games loved by everyone. With the huge success of games like candy crush, thousands of match 3 games with millions of downloads have appeared on the Play Store, Steam, or any other digital game marketplace. Even hypercasuals, RPGs, and tower defence games have been built on the match-3 genre.
So, have you ever thought of creating your own match 3 game with your own concept or design ideas? If the answer is yes, you have landed in the correct place. In this blog series, we will be creating a basic game with a match 3 game logic that is robust and can fit exactly into any type of design idea.
Adding Assets
I will be using the CandyMatch3Kit resources from the assets store for this project, but you can use any themed resources you want to use, as this tutorial will not be a specific asset-focused tutorial.
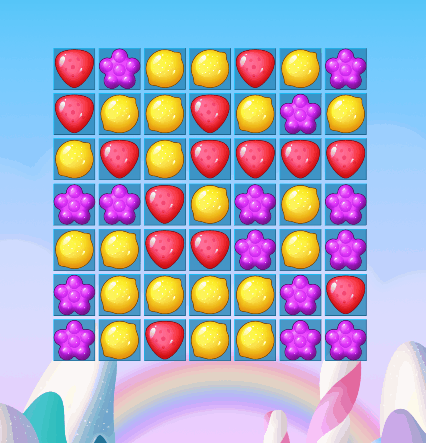
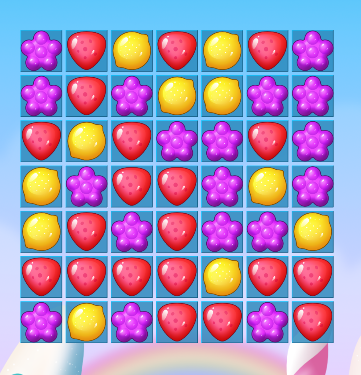
So, to kickstart this tutorial, we will start by creating a basic board and laying out our candies on the grid board, which can be moved around the grid. After you complete this blog tutorial, the result should look like this.
Initial Scripting
using System.Collections;
using System.Collections.Generic;
using UnityEngine;

public class Board : MonoBehaviour
{
   public int width,height;
   public GameObject backgroudTile;

   public Candy[] candies;

   public Candy[,] allCandies;

   public float candySpeed=8f;

    void Start()
    {
        allCandies = new Candy[width,height];
        Setup();
    }

    private void Setup()
    {
        //i and j are x and y coord
        for (int i = 0; i < width; i++)
        {
            for(int j=0;j<height;j++)
            {
                Vector2 pos = new Vector2(i,j);

                GameObject bgTile = Instantiate(backgroudTile,pos,Quaternion.identity);
                bgTile.transform.parent = transform;
                bgTile.name = "Tile -" + i + "," + j;

                int randCandy = Random.Range(0,candies.Length);
                SpawnCandy(new Vector2Int(i,j),candies[randCandy]);
            }
        }
    }
Generating Background Tiles
We start by writing a script called Board.cs, which will control everything that happens on our game board.
Here, we first declare two public int variables height and width which will determine the height and width of our board. After that, we create an array of the candies class that holds references to all types of our candies.
Then, we also create a multi-dimensional array of the candies type that will be used to store the position of our candies throughout the board. At the start, you can see that we have initialized our all candies multi-dimensional array with the height and width of our board.
So, we move on with the setup function, where we have a nested loop for i and j, which is used to go through the height and width of the board and generate cells to hold the candies. You can think of i , j as x and y coordinates.
Inside the loop, we create a new vector 2 called pos that holds our generated cell positions. Then, we generate a new GameObject for each cell at the vector2 position pos, which we generated above with no rotation.
After this is complete, we assign the parent of the generated object to our board's transform and set the name to "Tile", which contains its cell coordinates.
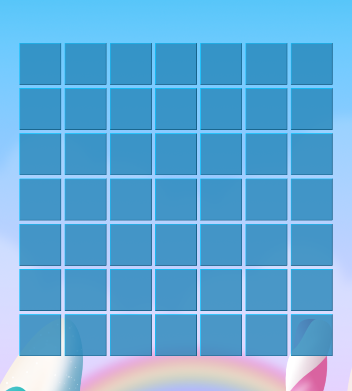
After the cells are generated, it should somewhat look like this :
Spawning Candies on the Tiles
After our board cells are generated, we can move on and fill them up with some candies.
We will first create an integer value called randcandy that will hold a random index between 0 and the length of our candy array. We can then call the SpawnCandy() with a Vector2Int and Candy arguments.
We pass in a new Vector2Int() in the spawn candy method, which is created with the cell's x and y coordinates & a random candy from the candies array.
  void SpawnCandy(Vector2Int spawnPos,Candy candyToSpawn)
    {
        Candy candy = Instantiate(candyToSpawn,new Vector3(spawnPos.x,spawnPos.y),Quaternion.identity);
        candy.transform.parent = this.transform;
        candy.name = "Candy -" + spawnPos.x + "," + spawnPos.y;
        allCandies[spawnPos.x , spawnPos.y] = candy;

        candy.SetupCandy(spawnPos,this);
    }

}With the script above, we create a new Candy called candy with our particular candy object. Its spawn position is also passed through the parameters.
We also assign the candy's parent to the object's transform. We then set the candy's name to "Candy" using its cell coordinates. After the generation is completed, we assign the generated candy to our multi-dimensional array, indexing it to the spawn point coordinates where the candies were generated.
After the script is updated, you should see your end result look like this.
Binding Data to the Candies
public Vector2Int posIndex;
public Board board;

public void SetupCandy(Vector2Int pos , Board Board)
{
        posIndex = pos;
        board = Board;
}This script saves the references of the board and the position index of our candies and acts as an instance for our candy's behaviours. Later in the series, we will extend this script to add behaviours to our candies.
Board.cs Final Code
using System.Collections;
using System.Collections.Generic;
using UnityEngine;

public class Board: MonoBehaviour {
  public int width, height;
  public GameObject backgroudTile;

  public Candy[] candies;

  public Candy[, ] allCandies;

  public float candySpeed = 8 f;

  void Start() {
    allCandies = new Candy[width, height];
    Setup();
  }

  private void Setup() {
    //i and j are x and y coord
    for (int i = 0; i < width; i++) {
      for (int j = 0; j < height; j++) {
        Vector2 pos = new Vector2(i, j);

        GameObject bgTile = Instantiate(backgroudTile, pos, Quaternion.identity);
        bgTile.transform.parent = transform;
        bgTile.name = "Tile -" + i + "," + j;

        int randCandy = Random.Range(0, candies.Length);
        SpawnCandy(new Vector2Int(i, j), candies[randCandy]);
      }
    }
  }

  void SpawnCandy(Vector2Int spawnPos, Candy candyToSpawn) {
    Candy candy = Instantiate(candyToSpawn, new Vector3(spawnPos.x, spawnPos.y), Quaternion.identity);
    candy.transform.parent = this.transform;
    candy.name = "Candy -" + spawnPos.x + "," + spawnPos.y;
    allCandies[spawnPos.x, spawnPos.y] = candy;

    candy.SetupCandy(spawnPos, this);
  }

}In the next part of the blog, we will be learning how to move the candies around the bound and make the candies interactable!
Thank you for reading and learning with me. Please leave comments if you have any regarding this article.